 STITCH ROUND
 Strawberry heart crochet shoulder bag pattern
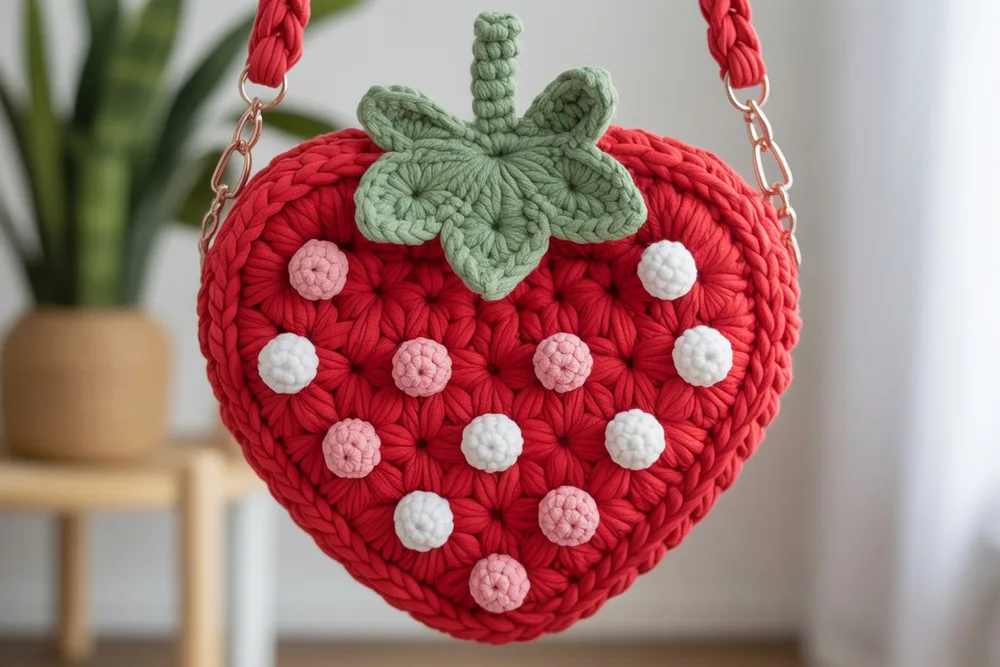
Three rounds per heart panel build this strawberry shoulder bag with leafy top band and cream seed stitching.
- Skill
- Intermediate
- Rounds
- 9 rounds
- Yarn weight
- Worsted
- Hook
- 4.0 mm
- Time
- 4-6 hours

Intermediate
What the original page called it. Nothing here is graded a second time.

9 rounds
Each one gets its own line, with a box beside it to tick as you go.

Worsted
What the sample was made in. Any weight works — the size moves with it.
About this pattern
This is a novelty shoulder bag built from two strawberry- panels, each ticked off in three rounds plus an optional fourth to size up. A leafy calyx band crosses the top opening of the front panel, cream seed embroidery scatters across its face, and a long cord or flat strap finishes the piece before the two hearts are seamed together.
The shaping lives in the increases: Round 1 sketches the heart from a magic ring, and Rounds 2 and 3 build the curves while holding the ch-2 corners square at the top cleft and the bottom point. Slow down on those corner stitches and on the symmetrical increase pairs along each side, since drift there throws the heart off balance before seaming.
Finished bag body (without strap): about 22-24 cm wide x 20-22 cm tall in worsted-weight cotton with a 4.0 mm hook. Gauge is not critical, but keep both heart panels the same size, and stay with the same three colors throughout: strawberry red for the body, leaf green for the calyx and strap, and soft cream for the seed embroidery.
- Work the magic ring start to shape the pointed base of each heart panel.
- Build outward through the increase rounds, keeping the top cleft and bottom point squared with ch-2 corners.
- Add the leafy calyx band across the top edge of one panel only, working each leaf separately.
- Scatter cream seed stitches across the front panel, keeping even spacing away from the edges.
- Crochet a strap, either a Romanian cord or a flat single crochet band, long enough to wear over the shoulder.
- Make a second, matching heart panel to serve as the plain back.
- Seam the two panels together with wrong sides facing, leaving the top open, then attach the strap.
What goes wrong
- Loose or lopsided magic ring Cinch the ring firmly but evenly before the first round so the heart's point closes snugly rather than gaping or puckering.
- Uneven cleft and point corners Keep the ch-2 corners at the top cleft and bottom point consistent on every round so the two panels match when seamed.
- Crowded or crooked seed embroidery Space the cream V-stitches or French knots evenly and keep them 1-1.5 cm clear of the edges so seaming is not obstructed.
- Calyx leaves bunched or sparse Adjust the spacing of the five leaves as needed across the top edge so they fill the opening evenly rather than clustering to one side.
Yarn, hook and the rest
Copied from the source pattern's own materials list.
- Worsted-weight cotton: strawberry red (MC), leaf green (CC1), soft cream (CC2 for seeds)
- 4.0 mm (G-6) hook
- Tapestry needle, scissors, 6-8 locking stitch markers
- Measuring tape (to keep both heart panels the same size)
Optional
- light cotton fabric + sewing needle/thread for lining
Progress tracker
0 of the 9 rounds on this page are ticked.
The pattern, round by round
Kept in the order and the wording the source used. Tick a round as you finish it; the ticks stay on this device.
A) Large Solid Heart Panel (make 2 instrawberry red)
Begin with a magic ring so the point of your heart closes snugly. Work tall stitches into the loop to sketch the heart outline right away. Keep your tension even and the yarn flowing smoothly across your finger. After the last stitch, cinch the ring firmly but not aggressively, preserving a tidy center. Place a marker at the joining point so both panels match. If magic rings make you nervous, chain four and slip stitch to form a loop, then continue the same round. Either way, you're shaping a clean foundation in strawberry red, setting the tone and size for the rest of the project.
Round 1
(into magic ring): Work 4 tr, 5 dc, ch 1, 1 tr, ch 1, 5 dc, 4 tr, ch 3 , sl st into ring. Pull tail to form a heart.
Use a thoughtful mix of sc, hdc, and dc to smooth the heart's curves. Shorter stitches keep the edges tidy near the point; taller stitches stretch the arcs across the tops. Work slowly around the cleft, adding the ch-2 corner there so the dip reads clearly. Mirror your placements on the opposite side so the panel stays symmetrical. Pause to lay the piece flat and check for wobble; small blocking taps with your fingers help it settle. Keep everything strawberry red. Add a marker at the point and at the cleft so you hit the same places cleanly on the second panel.
Round 2
Ch 1, sc in next 3, hdc in next 3, dc in next 4, (2 dc, ch 2, 2 dc) in the top cleft ch-1 sp , dc in next 4, hdc in next 3, sc in next 3, (sc, ch 2, sc) in the bottom point ch-3 sp , sl st to first sc.
Round 3
Ch 1, sc in next 4, hdc in next 4, (dc in next 2, 2 dc in next st) twice, dc in next 2, (2 dc, ch 2, 2 dc) in top cleft , dc in next 2, (2 dc in next st, dc in next 2) twice, hdc in next 4, sc in next 4, (sc, ch 2, sc) in point , sl st to first sc.
Finish enlarging the heart by sprinkling increases evenly along each curved side. This prevents ruffling and keeps the outline balanced. Aim for a width around 22-24 cm; stop sooner for a petite bag or add another increase round for extra capacity. Keep corners at the point and the cleft defined with small ch-2 turns. Compare against your tape and jot quick notes; you'll copy this exact round count for the back panel. Stay in strawberry red for every stitch. When you like the size and shape, fasten off neatly and weave the center tail so the fabric feels secure and smooth.
Round 4
Optional to enlarge Work evenly around: add gentle increases along each curve (about 6 increases spread per side). Maintain (… ch 2 …) corners at the top cleft and point . Fasten off, weave tail.
Make two identical panels . Block lightly if you like (steam or mist).
B) Strawberry Seeds (on front panel only)
Add character with small cream seeds. Thread a tapestry needle with soft cream and make tiny V stitches scattered across the front panel, leaving a clean border near the edges. Keep spacing consistent—casual but intentional—so the surface looks playful, not busy. Work from the back to the front and re-enter close to where you exited to avoid long floats. Pull gently so the fabric doesn't pucker. Tie off on the wrong side and weave tails securely. These creamy flecks pop against strawberry red, giving the bag that unmistakable strawberry vibe while staying lightweight and flexible for everyday wear.
Seeds
With soft cream yarn, embroider tiny "V" stitches or French knots randomly across the front panel, avoiding 1-1.5 cm from edges. Keep spacing even.
C) Leafy Calyx Band (inleaf green)
With RS facing a single heart panel , join leaf green at the top cleft , work across the top edge only:
Round 1
[sc, hdc, dc, tr, dc, hdc, sc] evenly over ~1/6 of the top edge, ch 2, turn (Leaf 1).
Round 2
Sk first st, work down: sc in each st to base , sl st to next unworked top stitch group.Rep to make 5 leaves spaced across the top edge (adjust spacing to fill the opening). Fasten off.Make this leafy band on one panel only (this will be the front/top opening detail).Build each leaf with a ladder of stitches—sc, hdc, dc, tr, dc, hdc, sc—so it gently peaks, keeping tension even to avoid the scallops lifting too high. Double-check the leaf spacing aligns with your planned strap points so everything looks intentional once assembled, and keep colors to strawberry red, leaf green, and soft cream only.
D) Strap (choose one)
A strong strap—either a Romanian cord or a flat crochet band—keeps the bag wearable for errands, festivals, or everyday outfits. A Romanian cord in leaf green looks crisp and resists stretch; a flat red strap is also great and simpler to work.
Romanian Cord
Recommended, in leaf green or red Ch 1, pull up a loop, insert hook between first 2 loops, yo, pull up a loop, yo, pull through 1, yo, pull through 2 ; repeat to ~100-110 cm.
Flat Strap
OR simple flat strap (in red): Ch 5, work 1 sc in 2nd ch from hook and across (4 sc). Turn. Ch 1, 4 sc. Repeat to length; edge with sl sts for stability.
Join
Step 1Place hearts WS together with the leafy calyx panel at the top of the front . Starting at the top right , whipstitch or sc-seam around the curves and point to the top left , leaving the top open .
Step 2Attach strap ends to the two top corners; reinforce with extra stitches. Weave all ends.
Finish
- Weave in every tail from the magic ring closures, seed embroidery, and leaf band before seaming.
- Seam the two heart panels wrong sides together from the top right around the curves and point to the top left, leaving the top opening clear.
- Attach both strap ends to the top corners with reinforcing stitches, then block the panels lightly if the curves need smoothing.
- Cut two fabric hearts slightly smaller than panels, then whipstitch them to the inside just below the green leaves and around the curve, keeping the top edge neat.
Bigger or smaller
- Larger
- Work the optional fourth round with gentle increases spread along each curve to add width while keeping the top cleft and point corners defined.
FAQs
Asked and answered
These answers came from whoever first published the pattern, kept word for word.
Which panel gets the leafy calyx band?
Only one of the two heart panels receives the leaf band, and that panel becomes the front of the bag. The second panel stays a plain heart for the back.
Should the seed embroidery go on before or after seaming?
Work the cream seed stitches across the front panel while it is still flat, before whipstitching the two hearts together. This keeps the stitching even and the edges free for seaming.
Is the fourth round necessary?
No, Round 4 is optional and only needed to enlarge the panels. Stop after Round 3 for a smaller bag, or add the extra round for more capacity.
Which strap option is better, the cord or the flat strap?
The Romanian cord is the recommended option for a sturdier, rounder strap in leaf green or red. The flat single crochet strap in red is the simpler alternative, edged with slip stitches for stability.