 STITCH ROUND
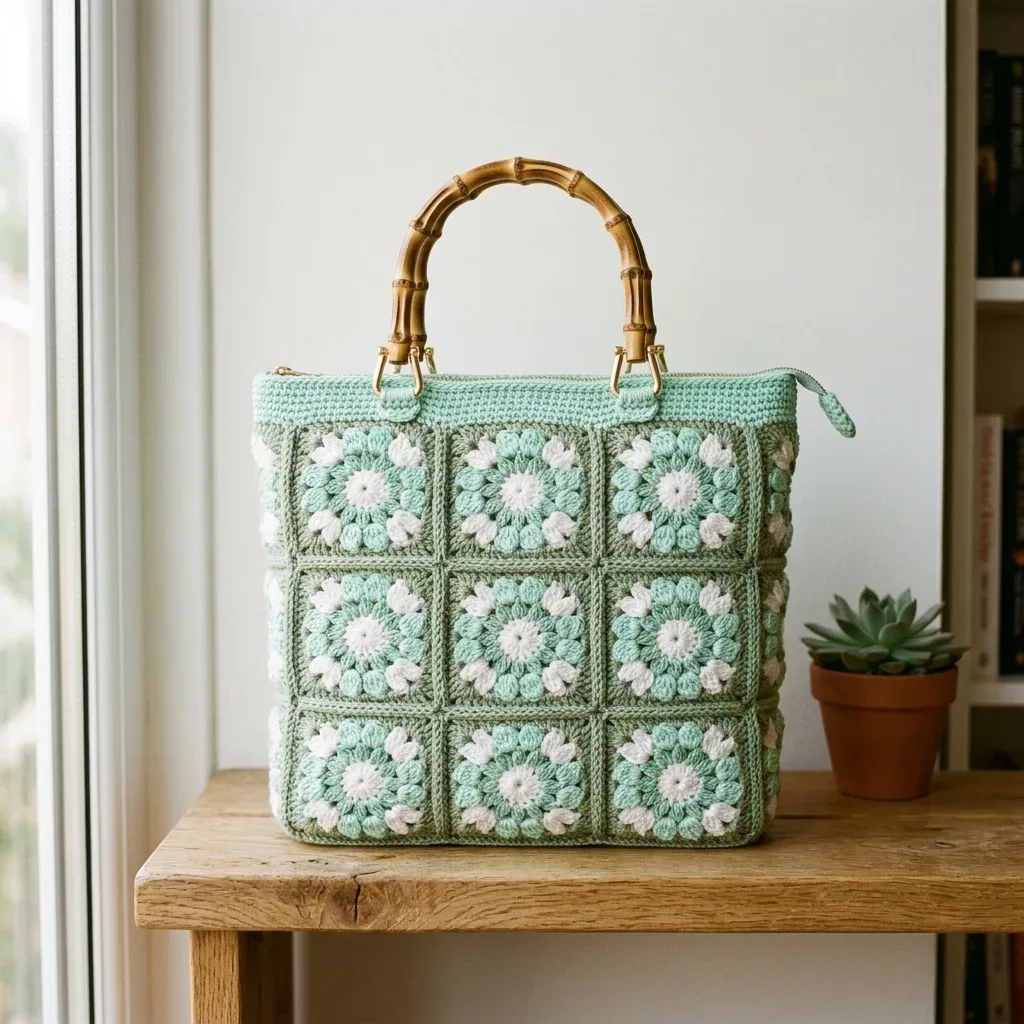
 Mint garden granny square bag crochet pattern
4 rounds per square, 27 squares, one zippered granny bag with bamboo handles.
- Skill
- Intermediate
- Rounds
- 5 rounds
- Yarn weight
- Worsted
- Hook
- 4.0 mm
- Time
- 4-6 hours

Intermediate
What the original page called it. Nothing here is graded a second time.

5 rounds
Each one gets its own line, with a box beside it to tick as you go.

Worsted
What the sample was made in. Any weight works — the size moves with it.
About this pattern
This bag is built from 27 individual granny squares, each ticked off in four rounds through the color sequence white, mint, mint, sage. Working one motif at a time keeps the project portable, and the repeat means square five goes faster than square one. Once the full stack is made, the real build begins: joining them into front, back, two side panels and a base.
The shaping lives entirely in the corner chain spaces, which keep each square square and let the panels line up edge to edge later. Round 1 sets the center, color C, and that first round is where gauge gets decided, so slow down there and block a test square before committing to all 27. The puff stitch version swaps a tidy center for a textured one, and that round deserves a slower pace too since each puff has to close fully before the next begins.
The finished bag measures approximately 13 inches wide by 12 inches tall by 4 inches deep, not including the handles. That is a generous size for carrying books, a small project, your wallet, phone, and all the random things that accumulate in a tote.
This pattern is rated intermediate. You should be comfortable working granny squares, reading stitch counts, and following motif construction, since the puff stitch (PS) adds texture to the flower centers and the join as you go (JAYG) method connects the squares with minimal bulk. Expect to spend 20 to 28 hours on this project from start to finish, including making all 27 squares, joining them into panels, working the top band, attaching the zipper, and adding the handles.
The mint and sage color palette feels fresh and springy, though you could absolutely swap in your favorite colors instead.
- Work 27 granny squares through four rounds each in the sage, mint, and white color sequence.
- Choose the standard flat-top center or the optional puff stitch flower center for round one.
- Check gauge on a single finished square before committing to the full set of 27.
- Arrange the finished squares into front, back, two side panels, and a base panel.
- Join the panels together to form the bag body and set in the zipper.
- Attach the bamboo ring handles and lobster clasp hardware to complete the bag.
What goes wrong
- Skipping the gauge square Work one square all the way through round 4 and measure it before starting the other 26. Adjust hook size up or down until it reads true, since panel fit depends on every square matching.
- Losing track of the color sequence Each square runs white, mint, mint, sage in that order, and fastening off between rounds makes it easy to lose the pattern. Lay out all three colors before starting a square and check the round count against the sequence as it goes.
- Uneven puff stitches in the flower center Each puff stitch needs to close fully before the next one starts, or the center pulls out of round. Draw the loop snug on every yarn over and check the ring stays flat after all eight puffs are in.
- Misjoining at the ch-2 corner spaces Every round joins back into a ch-2 corner space, and slipping into the wrong space throws off the corner count for the next round. Pin or mark the corner spaces with a stitch marker before joining a new color.
Yarn, hook and the rest
Copied from the source pattern's own materials list.
- Worsted weight yarn in three colors (100% cotton or a cotton-acrylic blend recommended for the best stitch definition and structure)
- Color A (Sage Green): approximately 350 yards (320 m)
- Color B (Mint Green): approximately 250 yards (229 m)
- Color C (White): approximately 150 yards (137 m)
Yarn suggestions that work beautifully
- Lion Brand 24/7 Cotton in Sage, Mint, and White. This mercerized cotton gives crisp stitch definition and holds its shape well in bags.
- Paintbox Yarns Simply DK Cotton in Grass Green, Spearmint, and Pure White. This one runs slightly lighter than worsted, so use a tighter gauge with a size F hook.
- Scheepjes Cahlista in Sage Green, Chrystalline, and Old Lace. Excellent color retention and stitch clarity.
- Avoid fuzzy or textured yarns. They will obscure your beautiful puff stitch flower detail.
Hook
- US Size G-6 (4.0 mm)
Additional supplies
- One 14-inch (35 cm) zipper in mint or white
- One pair bamboo ring bag handles with swivel clasp attachments (ring diameter approximately 4 inches)
- 4 gold swivel lobster clasp D-ring sets or bag handle loops with screws
- Yarn needle
- Scissors
- Stitch markers
- Sewing needle and coordinating thread for zipper attachment
Optional
- firm interfacing or bag base insert (5 inches by 13 inches) for structure
Optional
- cotton fabric for interior lining, approximately 0.5 yard
Progress tracker
0 of the 5 rounds on this page are ticked.
The pattern, round by round
Kept in the order and the wording the source used. Tick a round as you finish it; the ticks stay on this device.
Granny Square
Each square follows this color sequence: Round 1 - Color C (white), Round 2 - Color B (mint), Round 3 - Color B (mint), Round 4 - Color A (sage).
All granny squares are worked in the round on the right side. Do not turn unless instructed.
The bag uses 27 total squares arranged as: front panel (9 squares), back panel (9 squares), left side panel (3 squares), right side panel (3 squares), and base panel (3 squares).
Work all color changes at the end of the last step of the final stitch before the change. Draw the new color through the last 2 loops.
Ch-3 at the beginning of rounds counts as the first double crochet throughout.
Corner spaces are ch-2 spaces. Side spaces between clusters are ch-1 spaces.
Block each square lightly before or after joining by misting with water and pinning to measurements.
Round 1 Puff Version is optional and creates the raised puff stitch flower center visible in the photos; use it instead of the standard Round 1.
Round 1
Color C Make a magic ring or ch-4 and join with sl st to form a ring. Ch-3 (counts as first dc), work 2 dc into ring, ch-2, [3 dc into ring, ch-2] 3 times, join with sl st to top of beginning ch-3. Fasten off Color C. (12 dc, 4 ch-2 corner spaces)
Round 1 (Puff)
Puff Version, Optional, Color C Make a magic ring. Ch-2 (does not count as stitch). Work 8 PS into ring, drawing each closed before beginning the next. After last PS, ch-1. Join with sl st to top of first PS. (8 puff stitches); Do not fasten off. Ch-1. Sc into top of each PS around. Join with sl st to first sc. (8 sc); Now work the flower surround: Ch-3 (counts as dc). Dc into same st. Ch-1. [2 dc into next sc, ch-1] 7 times. Join with sl st to top of beginning ch-3. (16 dc, 8 ch-1 spaces); Fasten off Color C.
Round 2
Standard Version, Color B Join Color B with sl st into any ch-2 corner space. Ch-3 (counts as dc), work 2 dc into same corner space, ch-2, 3 dc into same corner space for first corner. Ch-1. [3 dc, ch-2, 3 dc into next ch-2 corner space, ch-1] 3 times. Join with sl st to top of beginning ch-3. Fasten off Color B. (24 dc, 4 ch-2 corner spaces, 4 ch-1 side spaces)
Round 2 (Puff)
Puff Version, Color B Join Color B into any ch-1 space. Ch-3, 2 dc into same space, ch-2, 3 dc into same space (corner made). Ch-1. 3 dc into next ch-1 space. Ch-1. [3 dc, ch-2, 3 dc into next ch-1 space, ch-1, 3 dc into next ch-1 space, ch-1] 3 times. Join with sl st to top of beginning ch-3. Fasten off Color B. (24 dc, 4 ch-2 corners, 4 ch-1 side spaces)
Round 3
Color B Join Color B with sl st into any ch-2 corner space. Ch-3, 2 dc into same corner space, ch-2, 3 dc into same corner space (first corner made). Ch-1. 3 dc into ch-1 side space. Ch-1. [3 dc, ch-2, 3 dc into next corner space, ch-1, 3 dc into next ch-1 side space, ch-1] 3 times. Join with sl st to top of beginning ch-3. Fasten off Color B. (36 dc, 4 ch-2 corner spaces, 8 ch-1 side spaces)
Join
Step 1Zipper Attachment: Lay the bag flat. Open the zipper fully. Pin the zipper tape to the inside of the top band, aligning the zipper teeth just below the top edge. Using a sewing needle and coordinating thread, whipstitch through the zipper tape and through Round 1 of the top band all the way around.
Step 2Bamboo Handle Attachment: Thread the hardware connector (D-ring tab or swivel clasp) through each ch-6 loop. Secure by sewing through the tab multiple times with a yarn needle and matching yarn. Slide each bamboo ring over the connector hardware and clip or screw into place.
Step 3Base Reinforcement (Optional): Cut a piece of stiff interfacing or plastic canvas to 13 inches by 4 inches. Place inside the bag at the base to prevent sagging.
Step 4Lining (Optional): Cut two pieces of cotton fabric 14 inches by 13 inches for front and back, two pieces 5 inches by 13 inches for sides, and one piece 14 inches by 5 inches for the base. Sew together with 0.5-inch seam allowance. Insert lining wrong side out, fold top edge under, and whipstitch to inside of top band.
Finish
- Weave in every color-change end from each granny square before joining panels, since 27 squares in three colors leave a lot of tails to secure.
- Sew the zipper in along the top opening using sewing needle and coordinating thread so the closure sits flat against the mint or white tape.
- Attach the bamboo ring handles with the swivel clasp and D-ring hardware, then block the assembled bag lightly to square off every seam.
Bigger or smaller
- Larger
- Move up from the G-6 hook and a worsted weight to a heavier yarn with a larger hook, which makes each square grow past the stated 4-inch measurement and scales the whole bag up without changing the round count.
- Smaller
- Drop down a hook size from G-6, which pulls each square in below 4 inches and shrinks every panel proportionally, since the 27-square layout stays the same.
FAQs
Asked and answered
These answers came from whoever first published the pattern, kept word for word.
Can the puff stitch center be swapped in after squares are already started?
Round 1 is the only round where the two versions differ, so the swap only works if that round has not been worked yet. Once round 2 begins over a standard center, the square is locked into the flat-top version.
Why does gauge matter more here than in a typical granny square project?
Final bag dimensions depend on 27 squares joining at consistent edges across front, back, sides and base. A gauge swatch that reads off by even a little compounds across that many panels, so checking one finished square first saves rework.
Is the interfacing or fabric lining required?
Both are listed as optional in the materials. The firm interfacing or base insert adds structure to the base panel, and the cotton lining covers the interior, but the bag holds together with yarn and zipper alone if those are skipped.
Do all three colors get used in every square?
Yes, each of the 27 squares runs the same sequence: color C for round 1, color B for rounds 2 and 3, and color A for round 4. Fastening off between colors keeps the color-change ends manageable instead of carrying yarn up the side.