 STITCH ROUND
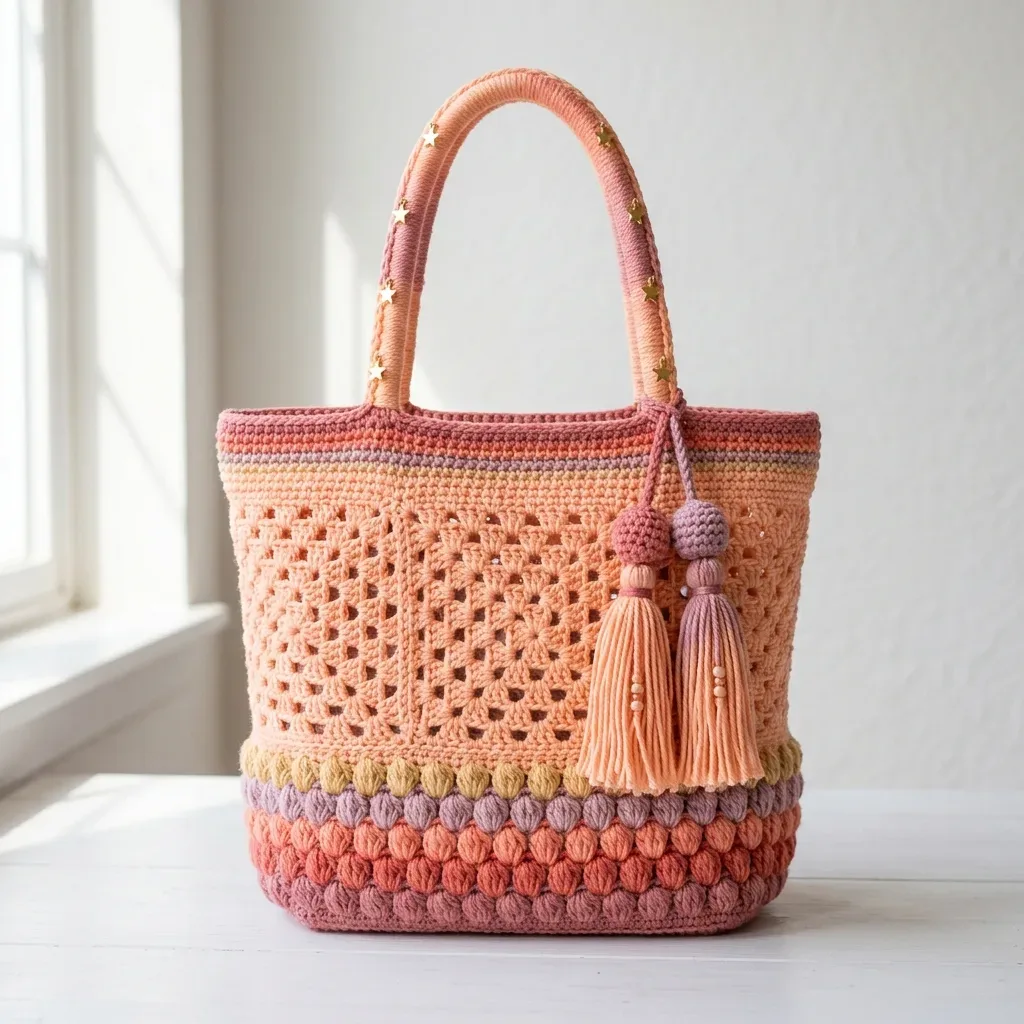
 Pastel sunset granny tote with a bobble band
Tick off 8 base rounds and 6 bobble rounds, then shape this pastel granny mesh tote bag.
- Skill
- Intermediate
- Rounds
- 32 rounds
- Yarn weight
- Worsted
- Hook
- 5.0 mm
- Time
- 18-26 hours

Intermediate
What the original page called it. Nothing here is graded a second time.

32 rounds
Each one gets its own line, with a box beside it to tick as you go.

Worsted
What the sample was made in. Any weight works — the size moves with it.
About this pattern
This tote builds in clear, trackable stages: an oval base worked flat in single crochet, a textured bobble stripe band, a single transition round, an open granny mesh body, a colorwork stripe border, wrapped handles, and two tasseled charms. Each section has its own rhythm, so the project never feels like one long unbroken round. Checking off the base rounds alone gives a satisfying sense of progress before the bobble texture even starts.
Shaping happens almost entirely in the oval base, where increases at each short end push the flat foundation into its rounded tote shape. Slow down there to keep both ends symmetrical, since any unevenness carries up through every section above it. The bobble band and the handle wrapping also deserve patience: both are repetitive and relaxing once a rhythm sets in, but rushing the tension on either one changes how the finished bag sits and carries.
- Work the oval base flat in single crochet, increasing at both short ends to shape it.
- Join around and build the bobble stripe band, alternating bobble rounds with plain single crochet rounds in rotating colors.
- Add one sage single crochet round as a clean transition before moving into the mesh.
- Shift into the open granny mesh body, which forms the lightweight upper portion of the bag.
- Finish the top opening with the colorwork stripe border for added structure and color.
- Make and attach the wrapped handles, then construct the tasseled charms for the final details.
What goes wrong
- Bobbles pulled too tight Keep the loop relaxed when closing each bobble instead of cinching it hard. An overly tight bobble flattens the texture and throws off the stitch count across the band.
- Uneven increases at the oval ends Keep stitch markers in place at both short ends of the base through all its rounds. Matching increases on each side keeps the oval symmetrical instead of lopsided.
- Loose color joins at round starts Pull new colors snug when joining with a slip stitch and weave tails in as soon as a round ends. Leftover loose joins show up as gaps once the bobble band is finished.
- Granny mesh left tight and puckered Wet block and stuff the bag before judging the mesh. The open spaces only look even and relaxed once the fibers have had a chance to set after soaking.
Yarn, hook and the rest
Copied from the source pattern's own materials list.
- Yarn (Worsted Weight, Category 4, 100% Cotton or Cotton Blend)
- Color A (Warm Peach): 550 yards / 503 meters. This is your main color for the granny mesh body, handles, and one tassel.
- Color B (Coral / Terracotta): 120 yards / 110 meters
- Color C (Dusty Rose / Mauve): 100 yards / 91 meters
- Color D (Lavender): 100 yards / 91 meters
- Color E (Sage / Olive Gold): 60 yards / 55 meters
- Color F (Gray / Taupe): 40 yards / 37 meters
- Recommended Yarn Brands
- Lion Brand 24/7 Cotton works beautifully for this pattern. It has excellent stitch definition, holds its shape without blocking, and comes in all the soft sunset shades you need. Paintbox Yarns Simply DK held doubled is a budget friendly option with a gorgeous color range. WeCrochet Comfy Worsted (75% pima cotton, 25% acrylic) adds a bit of memory and durability if you want your bag to carry heavier loads.
- Hooks
- US size H-8 / 5.0 mm crochet hook for the body
- US size G-6 / 4.0 mm crochet hook for handles (optional, for a tighter wrap)
- Notions
- Yarn needle for weaving ends
- Scissors
- 4 stitch markers
- 16 to 20 gold star charms or beads
- 4 wooden beads, approximately 8 mm diameter (2 per tassel)
- Sewing needle and strong thread for attaching charms
Optional
- 14 by 28 inches of cotton fabric for lining
Progress tracker
0 of the 32 rounds on this page are ticked.
The pattern, round by round
Kept in the order and the wording the source used. Tick a round as you finish it; the ticks stay on this device.
Section 1: Oval Base
The base is worked flat in single crochet with increases at each short end to create an oval shape.
Foundation: With Color A (Peach) and H-8 hook, chain 31. Place a stitch marker in the 2nd chain from hook and another in the last chain.
Round 1
(RS): Starting in the 2nd chain from hook, work 1 sc in the 2nd chain from hook, 1 sc in each of the next 28 chains, work 3 sc in the last chain. Rotate your work to crochet along the bottom loops of the foundation chain. Work 1 sc in each of the next 28 chains along the bottom. Work 2 sc in the same stitch as the first sc. Sl st to the first sc to join. (64 sc)
Round 2
Ch 1. Work 2 sc in the first st, 1 sc in each of the next 28 sts, 2 sc in the next st, 2 sc in the next st, 1 sc in each of the next 28 sts, 2 sc in the last st. Sl st to join. (68 sc)
Round 3
Ch 1. Work 1 sc in the first st, 2 sc in the next st, 1 sc in each of the next 28 sts, 2 sc in the next st, 1 sc in the next st, 2 sc in the next st, 1 sc in each of the next 28 sts, 2 sc in the next st. Sl st to join. (72 sc)
Round 4
Ch 1. Work 1 sc in each of the first 2 sts, 2 sc in the next st, 1 sc in each of the next 28 sts, 2 sc in the next st, 1 sc in each of the next 2 sts, 2 sc in the next st, 1 sc in each of the next 28 sts, 2 sc in the next st. Sl st to join. (76 sc)
Round 5
Ch 1. Work 1 sc in each of the first 3 sts, 2 sc in the next st, 1 sc in each of the next 28 sts, 2 sc in the next st, 1 sc in each of the next 3 sts, 2 sc in the next st, 1 sc in each of the next 28 sts, 2 sc in the next st. Sl st to join. (80 sc)
Round 6
Ch 1. Work 1 sc in each of the first 4 sts, 2 sc in the next st, 1 sc in each of the next 28 sts, 2 sc in the next st, 1 sc in each of the next 4 sts, 2 sc in the next st, 1 sc in each of the next 28 sts, 2 sc in the next st. Sl st to join. (84 sc)
Round 7
Ch 1. Work 1 sc in each of the first 5 sts, 2 sc in the next st, 1 sc in each of the next 28 sts, 2 sc in the next st, 1 sc in each of the next 5 sts, 2 sc in the next st, 1 sc in each of the next 28 sts, 2 sc in the next st. Sl st to join. (88 sc)
Round 8
Ch 1. Work 1 sc in each st around. Sl st to join. (88 sc) Fasten off and weave in ends. Your base should measure approximately 14 inches long and 6 inches wide. It should lie flat without cupping or ruffling.
Section 2: Bobble Stripe Band
This section creates the textured lower body of the bag using three colors in alternating rounds of bobbles and single crochet.
With RS facing, join Color B (Coral) with sl st to any stitch of the final base round.
Round 1
Bobble Round, Color B Ch 2 (does not count as dc). Work 1 bobble in each st around. Sl st to join. (88 bobbles)
Round 2
(Single Crochet Round, Color B): Ch 1. Work 1 sc in each st around (work into the tops of bobbles). Sl st to join. (88 sc)
Round 3
Bobble Round, Color C Join Color C. Ch 2. Work 1 bobble in each st around. Sl st to join. (88 bobbles)
Round 4
(Single Crochet Round, Color C): Ch 1. Work 1 sc in each st around. Sl st to join. (88 sc)
Round 5
Bobble Round, Color D Join Color D. Ch 2. Work 1 bobble in each st around. Sl st to join. (88 bobbles)
Round 6
(Single Crochet Round, Color D): Ch 1. Work 1 sc in each st around. Sl st to join. (88 sc)Fasten off all colors. Your bobble band should measure approximately 3.5 inches tall and show three distinct rows of bobbles in Coral, Dusty Rose, and Lavender.
Section 3: Transition Row
Round 1
This single round in sage creates a clean break between the bobble band and granny mesh.
Round 2
Join Color E with sl st to any stitch of the final sc round.
Round 3
Transition Round: Ch 1. Work 1 sc in each st around. Sl st to join. (88 sc)Fasten off Color E.
Section 4: Granny Mesh Body
This is the open lattice section that makes up the central body of the bag. You will convert your 88 stitches into 22 granny mesh shells.
Round 1
Join Color A with sl st to any stitch of the Transition Round.
Round 2
Setup Round Ch 4 (counts as 1 dc + ch 1). Skip 3 sts. Work 3 dc in the next st. Ch 1. Skip 3 sts. Repeat (3 dc in next st, ch 1, skip 3 sts) around. Sl st to the 3rd chain of beg ch-4 to join. (22 shells of 3 dc with 22 ch-1 spaces)
Round 3
Granny Mesh Round 1: Sl st across and into the first ch-1 sp. Ch 3 (counts as 1 dc). Work 2 dc in same ch-1 sp. Ch 1. Work 3 dc in next ch-1 sp. Ch 1. Repeat (3 dc in next ch-1 sp, ch 1) around. Sl st to the top of beg ch-3. (22 shells, 22 ch-1 spaces)Repeat Granny Mesh Round 1 for a total of 8 rounds (including the Setup Round). Your granny mesh section should measure approximately 7 inches tall.
Section 5: Upper Colorwork Stripe Border
Round 1
This section transitions back to single crochet with narrow stripes in multiple colors.
Round 2
Transition to Single Crochet Setup: Join Color A with sl st to any ch-1 space of the final granny mesh round.
Round 3
Ch 1. Work 2 sc in each ch-1 sp and 1 sc in each dc around. This gives you 44 sc from the chain spaces plus 66 sc from the double crochets. Sl st to join. (110 sc)
Round 4
Stripe Round 1 (Color A): Ch 1. Work 1 sc in each st around. Sl st to join. (110 sc)
Round 5
Stripe Round 2 (Color B): Join Color B. Ch 1. Work 1 sc in each st around. Sl st to join. (110 sc)
Round 6
Stripe Round 3 (Color C): Join Color C. Ch 1. Work 1 sc in each st around. Sl st to join. (110 sc)
Round 7
Stripe Round 4 (Color F): Join Color F. Ch 1. Work 1 sc in each st around. Sl st to join. (110 sc)
Round 8
Stripe Round 5 (Color E): Join Color E. Ch 1. Work 1 sc in each st around. Sl st to join. (110 sc)
Round 9
Stripe Round 6 (Color D): Join Color D. Ch 1. Work 1 sc in each st around. Sl st to join. (110 sc)
Round 10
Stripe Round 7 (Color A): Join Color A. Ch 1. Work 1 sc in each st around. Sl st to join. (110 sc)
Round 11
Stripe Round 8 (Color A): Ch 1. Work 1 sc in each st around. Sl st to join. (110 sc)
Round 12
Stripe Round 9 (Color B): Join Color B. Ch 1. Work 1 sc in each st around. Sl st to join. (110 sc)Fasten off all colors. Weave in all ends from the stripe section now.
Section 6: Handle Construction
Make 2 handles.
Core Preparation: Cut 2 lengths of rope or cord, each 24 inches long. Fold each in half so both ends meet, creating a loop.
Handle Wrapping: Using Color A yarn, wrap tightly and evenly around each cord from one end to the other. Trap the tail end under the first inch of wraps. As you wrap, slide gold star charms onto the yarn, spacing them approximately 1.5 inches apart. Use 5 to 6 charms per handle.
Handle Attachment: Position the first handle on the front of the bag, centered, with the cord ends approximately 4.5 inches apart. Using Color A and a yarn needle, stitch the cord ends securely to the inside of the top border. Repeat for the second handle on the back.
Section 7: Tassel Construction
Make 2 tassels, one in Color A (Peach) and one in Color D (Lavender).
For each tassel: Cut 30 lengths of yarn, each 12 inches long. Fold all strands together in half. Cut an 18 inch tying strand, fold it in half, loop it around the fold point, and pull through to create the hanging loop.
Wrap a 12 inch piece of yarn around all strands approximately 1 inch below the top. Wrap 5 to 6 times tightly and tie a firm knot. Thread 2 to 3 wooden beads onto the hanging loop above the tassel head. Trim ends evenly to 4 to 5 inches.
Tassel Cord Attachment: Cut a 16 inch length of Color D yarn. Fold in half and attach the midpoint to one handle base. Thread both tassels onto this cord and knot to secure.
Join
Step 1Weave in all remaining yarn ends, threading through at least 4 to 5 stitches in different directions.
Step 2Wet blocking: Soak the finished bag in lukewarm water for 15 minutes. Gently squeeze out excess water without wringing. Stuff the bag firmly to hold its shape and smooth the granny mesh so all spaces are open and even. Allow to dry completely for 24 to 48 hours.
Step 3For extra structure, cut a piece of plastic canvas or craft foam to fit the base interior and slip it into the bottom of the bag.
Check your count
- Section 1: Oval Base · Round 2: 68 sts
- Section 1: Oval Base · Round 4: 76 sts
- Section 1: Oval Base · Round 6: 84 sts
- Section 1: Oval Base · Round 7: 88 sts
- Section 2: Bobble Stripe Band · Round 2: 88 sts
- Section 2: Bobble Stripe Band · Round 4: 88 sts
Finish
- Weave in every yarn end through several stitches in different directions so colors stay secure through regular use.
- Wet block the bag, stuffing it firmly while damp to open the granny mesh evenly and hold the oval shape as it dries.
- Slip a cut piece of plastic canvas or craft foam into the base interior for extra structure before calling the bag finished.
Bigger or smaller
- Larger
- Move up to a bigger hook or a heavier yarn weight across the whole project. The fabric opens up and every section, from the oval base to the mesh body, grows proportionally wider and taller.
- Smaller
- Drop to a lighter yarn and a smaller hook, or work fewer repeats of the bobble stripe and mesh sections. The bag tightens up and the finished dimensions shrink in step with the reduced rounds.
FAQs
Asked and answered
These answers came from whoever first published the pattern, kept word for word.
Is the bobble stitch hard to learn for this bag?
No, the bobble stripe band is the one unfamiliar technique for most crocheters, but it is introduced step by step. A few practice bobbles on scrap yarn before starting the live rounds helps lock in consistent tension.
Which parts of this project take the longest?
The bobble stripe band and the handle wrapping take the most hands-on time of any section. Both become relaxing and repetitive once a working rhythm sets in.
Does this tote need a fabric lining?
Yes, a lining is recommended since the granny mesh body is open-stitch and not solid. The materials list includes a sized piece of cotton fabric specifically for this purpose.
How many yarn colors does this pattern use?
Six colors are used in total, with the main peach shade carrying the largest share of yardage. The remaining five colors appear in smaller amounts across the bobble band, transition round, and stripe border.