 STITCH ROUND
 Crochet heart hoodie pattern with color block front
27 rounds tick off a full heart-front hoodie with hood and set-in sleeves.
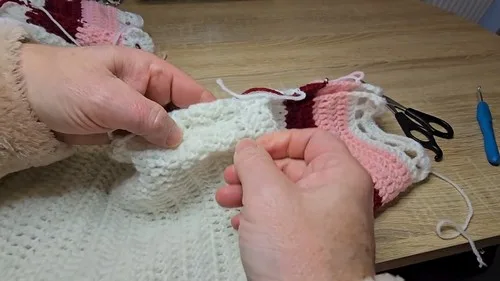
- Skill
- Intermediate
- Rounds
- 27 rounds
- Yarn weight
- Worsted
- Hook
- 4 mm
- Time
- 4-6 hours

Intermediate
What the original page called it. Nothing here is graded a second time.

27 rounds
Each one gets its own line, with a box beside it to tick as you go.

Worsted
What the sample was made in. Any weight works — the size moves with it.
About this pattern
This hoodie builds from five separate pieces that get ticked off one at a time: a plain back, a heart-front, two sleeves, and a hood, twenty-seven rounds in total before the bottom border closes things out. The back is the quickest win at three rounds, mostly a long stretch of double crochet rows. The front carries the bulk of the pattern's interest, nine rounds that turn a plain rectangle into a two-tone heart panel.
The shaping to watch sits inside the front and the sleeves. On the front, the heart section asks for a mid-row color change held steady across twenty pink rows and a matching stretch in red, with yarn carried behind the work rather than cut. On the sleeves, a repeating cycle of plain rows and a single decrease row shapes the taper, so slow down at each decrease round rather than the plain rows either side of it.
- Work the back panel first as a straight rectangle in double crochet rows.
- Build the front panel the same way, then break in pink and red for the heart section partway up.
- Pick up stitches around each armhole and work the sleeves back and forth, shaping the taper as the rows build.
- Add the colored bands to the sleeve cuffs once the main shaping is finished.
- Shape the hood separately, then set it aside ready for seaming.
- Seam the front and back at the shoulders and sides, attach the sleeves, fold and close the hood, then finish with the bottom border.
What goes wrong
- Losing count on the heart's center Mark the exact middle stitch of the front panel with a stitch marker before starting the color change, since the whole heart is built from that point.
- Cutting yarn during the heart section Carry the unused color along the back of the work instead of cutting it, so it is ready to pick up again on the next color change row.
- Skipping the decrease row on sleeves Track the sleeve rows carefully so the single decrease row lands where it should within each repeat, or the taper will come out uneven between the two sleeves.
- Seaming with the wrong stitch Use the bord-à-bord edge-to-edge stitch specified for the shoulders, sides, and sleeve seams rather than a whip stitch, to keep the seam flat on the right side.
Yarn, hook and the rest
Copied from the source pattern's own materials list.
Yarn
- Yarn: Main color (e.g., white or off-white) and two contrasting colors (e.g., pink and red)
- Crochet Hook: 4 mm
Tools
- Scissors, tapestry needle, and stitch markers
Progress tracker
0 of the 27 rounds on this page are ticked.
The pattern, round by round
Kept in the order and the wording the source used. Tick a round as you finish it; the ticks stay on this device.
Back of the Sweater
Round 1
Create a chain of 94 stitches.
Round 2
First Row Chain 3 (counts as the first double crochet); work the first double crochet into the 5th chain from the hook; continue working double crochets across the row for a total of 94 double crochets. (94)
Round 3
Subsequent Rows Continue working in double crochet rows until the piece measures approximately 64 cm in height (about 62 rows).Fasten off the yarn and weave in all loose ends when the piece is complete.
Front of the Sweater (with Heart Design)
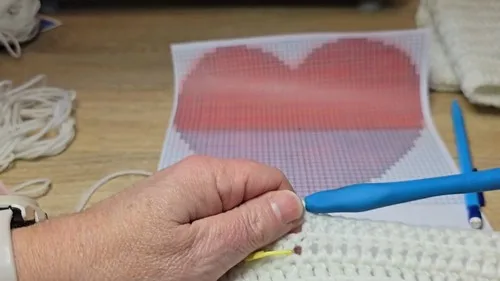
Refer to the provided diagram for the heart design.
The heart is worked in two colors: pink for the bottom 20 rows and red for the top 20 rows.
Carry the unused yarn along the back of your work.
Fasten off yarn and weave in ends when complete.
Round 1
Starting Begin with 94 stitches and 94 double crochets per row, just like the back. (94)
Round 2
Initial Rows Work 10 rows in the main color.
Round 3
(Heart Integration - from Row 11): Mark the exact middle of your 94-stitch row; the heart begins with 4 stitches in pink, centered on the piece.
Round 4
Color Changes Work in the main color until the heart begins; attach the contrasting color (pink) and work the specified number of double crochets for the heart; attach a new skein of the main color and continue to the end of the row.
Round 5
Pink Section Work 20 rows of the heart in pink, following the diagram for increasing the heart's width.
Round 6
Red Section After 20 rows of pink, cut the pink yarn and attach the red yarn; continue following the diagram for the next 20 rows in red.
Round 7
Heart Separation When the diagram shows the heart splitting, work each half separately, incorporating two white stitches in the middle.
Round 8
Top Section - Above Heart Continue working in the main color until the front piece reaches the desired height for the neckline.
Round 9
Neckline Shaping At row 57 from the bottom (or 7 rows above the heart), stop working the middle 32 stitches; work each side of the neckline separately (31 stitches on each side) until the piece reaches a total of 61 rows from the bottom.
Sleeves
Work sleeves back and forth without joining.
Fasten off yarn and weave in all loose ends when complete.
Repeat entire sleeve pattern for the second sleeve.
Round 1
Picking Up Stitches Attach white yarn under the armhole; pick up 40 stitches on each side of the armhole for a total of 80 stitches. (80)
Round 2
Working the Sleeve Work in double crochet rows (back and forth) without joining; work 7 rows of double crochet.
Round 3
(Decrease Row - Row 8): Work 4 double crochets, then make a decrease (crochet 2 double crochets together); repeat this pattern around.
Round 4
(Repeat Sequence): Repeat the sequence of 7 plain double crochet rows followed by 1 decrease row, three times in total; continue working 7 more plain double crochet rows.
Round 5
Colored Bands Cut the white yarn; attach red yarn and work 4 rows of double crochet; cut the red yarn; attach pink yarn and work 4 rows of double crochet.
Round 6
White Border Cut the pink yarn; attach white yarn and work 1 row of double crochet.
Round 7
(Lace Border - Row 1): Chain 6, skip 2 stitches, work 1 double crochet in the 3rd stitch; repeat around.
Round 8
(Lace Border - Row 2): Chain 1, work 1 single crochet in the first chain-3 space; work 6 double crochets in the next chain-3 space; work 1 single crochet in the next chain-3 space; repeat around.
Hood
A total of approximately 93 stitches were picked up around the neckline.
Work the hood back and forth without joining.
Fasten off yarn and weave in all loose ends when complete.
Round 1
Picking Up Stitches Attach pink yarn at the front neckline, leaving 4 stitches unworked at the beginning and end; work 2 double crochets, then make an increase (2 double crochets in the same stitch); repeat around the neckline to create a wider opening for the hood. (93)
Round 2
Working the Hood Work in double crochet rows (back and forth) without joining; create alternating bands of 4 rows of pink and 4 rows of red; make 4 full sets of these bands; for the last set, work 4 rows of pink and only 2 rows of red.
Round 3
Hood Border Attach white yarn at the front edge of the hood; pick up approximately 63 stitches around the entire edge; work 1 row of double crochet. (63)
Round 4
(Lace Border - Row 1): Chain 6, skip 2 stitches, 1 double crochet in the 3rd stitch; repeat around.
Round 5
(Lace Border - Row 2): Chain 1, 1 single crochet in the first chain-3 space; work 6 double crochets in the next chain-3 space; work 1 single crochet in the next chain-3 space; repeat around.
Bottom Border of the Sweater
Round 1
Lace Border - Row 1 Attach white yarn to the bottom edge of the sweater; chain 6, skip 2 stitches, 1 double crochet in the 3rd stitch; repeat around the entire bottom edge; join with a slip stitch.
Round 2
Lace Border - Row 2 Chain 1, 1 single crochet in the first chain-3 space; work 6 double crochets in the next chain-3 space; work 1 single crochet in the next chain-3 space; repeat around; join with a slip stitch.Fasten off the yarn and weave in all remaining loose ends.
Join
Step 1Lay the front piece over the back piece, aligning them.
Step 2Use stitch markers to secure the shoulders and the bottom edges, leaving approximately 29-30 cm for the armholes.
Step 3Using a tapestry needle and white yarn, sew the sides and shoulders together using a bord-à-bord (edge-to-edge) stitch on the right side of the fabric.
Step 4Sew the underside of the sleeve together using the bord-à-bord stitch; repeat for the second sleeve.
Step 5Fold the hood in half and sew the top seam together using the bord-à-bord stitch.
Step 6Sew the small gap at the front bottom of the hood border to close it.
Check your count
- Back of the Sweater · Round 2: 94 sts
- Front of the Sweater (with Heart Design) · Round 1: 94 sts
- Sleeves · Round 1: 80 sts
- Hood · Round 1: 93 sts
- Hood · Round 3: 63 sts
Finish
- Weave in every loose end left by the color changes across the heart section and the sleeve bands before seaming anything.
- Fold the hood in half and sew the top seam closed so it sits square before attaching it to the neckline.
- Use white yarn and a tapestry needle to sew the front and back together edge-to-edge at the shoulders and sides, then set in the sleeves and close their undersides the same way.
- Finish with the bottom border lace edging, working it around the entire bottom edge of the joined sweater and fastening off once it is closed with a slip stitch.
Bigger or smaller
- Larger
- Move up to a bigger hook and a heavier yarn to grow every piece proportionally, which increases the overall size without changing the round or row counts given.
- Smaller
- Drop down a hook size and use a lighter yarn to shrink the whole hoodie evenly, keeping the same sequence of rounds but producing a smaller finished garment.
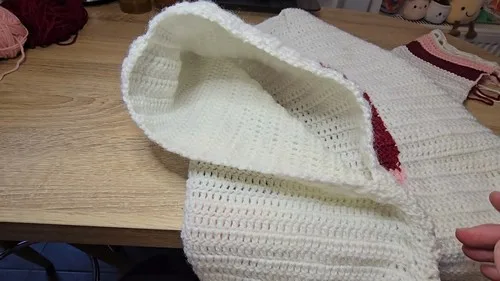
Photographs of this one
Every photograph on this page was taken by whoever published the pattern, and they are printed in the order the source listed them.
FAQs
Asked and answered
These answers came from whoever first published the pattern, kept word for word.
Do the front and back panels use the same stitch count?
Yes, both start from the same 94-stitch chain and work 94 double crochets per row. The heart section on the front only changes the colors within that row, not the stitch total.
Can the heart colors be swapped for different shades?
Yes, the pink and red sections can be substituted with any two contrasting colors against the main color. The construction stays the same regardless of which shades are chosen.
How are the sleeves attached to the body?
Stitches are picked up directly around each armhole with white yarn rather than crocheting the sleeve separately and seaming it in. The underside seam is then closed with the bord-à-bord stitch.
Is the hood worked in one piece?
The hood is worked as its own section over five rounds, then folded in half and sewn along the top seam. It attaches to the neckline after the shoulders and sides are already seamed.