 STITCH ROUND
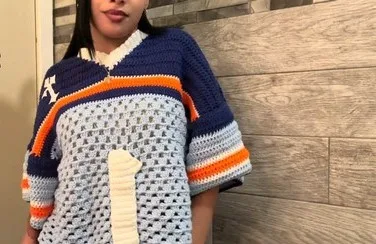
 Color block crochet jersey with a granny stitch base
12 rounds to tick off for a two-panel granny stitch jersey with V-neck shaping.
- Skill
- Intermediate
- Rounds
- 12 rounds
- Yarn weight
- Worsted
- Time
- 4-6 hours

Intermediate
What the original page called it. Nothing here is graded a second time.

12 rounds
Each one gets its own line, with a box beside it to tick as you go.

Worsted
What the sample was made in. Any weight works — the size moves with it.
About this pattern
This jersey builds from two identical panels, each starting with a granny stitch base before moving into a solid colorwork top. Between the two, there are twelve rounds to tick off: three for the granny stitch bottom half, three for the top colorwork section, one for shaping the back panel shoulders, two for V-neck shaping, two for the armhole edging and one for the neckline ribbing. Working two panels means repeating the bottom and top sections twice before any shaping or seaming begins.
The shaping only happens on the second panel, where the V-neck is worked from a marked center point outward in two separate sides. Slow down at the point where the stitch marker splits the top colorwork section and again when seaming the shoulders, since the slip stitch seam runs through back loops only and needs to stay even on both panels to keep the neckline symmetric.
- Crochet two matching panels, each built from a granny stitch bottom and a colorwork top.
- Shape the V-neck on the second panel only, working outward from a marked center point, then shape the back panel shoulders on the first panel.
- Lay the panels right sides together and slip stitch the shoulders through back loops to the V-neck.
- Turn the piece right side out to reveal the finished shoulder seam.
- Turn the jersey inside out again and slip stitch down both side edges to close the armholes.
- Finish the raw edges with the arm hole edging and neckline ribbing to complete the shape.
What goes wrong
- Uneven granny stitch clusters Count the chain-1 skip carefully on every repeat so each 3-DC cluster lands in the same spot across rows. A missed skip shifts the pattern for the rest of the panel.
- Panels that do not match Work the bottom and top halves on both panels before starting any shaping. Comparing row counts side by side catches a missed row early.
- Sloppy back-loop-only seam Pick up only the back loop on both panels when slip stitching the shoulders. Catching the full stitch instead flattens the seam and pulls the neckline out of shape.
- Losing track of the V-neck center Place the stitch marker at the true center of the top colorwork section before starting Side 1. Working the two sides from an off-center marker leaves the V-neck lopsided.
Yarn, hook and the rest
Copied from the source pattern's own materials list.
- Worsted weight yarn
- Crochet hook (size to suit your yarn)
- Yarn needle (for seaming and weaving in ends)
- Stitch marker
Progress tracker
0 of the 12 rounds on this page are ticked.
The pattern, round by round
Kept in the order and the wording the source used. Tick a round as you finish it; the ticks stay on this device.
The Bottom Half (Granny Stitch)
Foundation Chain: Begin with a slip knot and chain in multiples of four (e.g., 72 chains). Add 6 more chains to the end.
Round 1
Count 6 stitches from the hook. In the 7th chain, work: (1 Double Crochet (DC), 2 DC into the same stitch).Repeat: Chain 1, skip 3 chains, work 3 DC into the 4th stitch.End with 1 DC in the very last stitch.
Round 2
Chain 3 (counts as 1 DC), turn, work 2 DC into the first chain-1 space. Repeat: Chain 1, work 3 DC into the next chain-1 space.End with 2 DC into the last chain-1 space, then 1 DC into the 3rd stitch of the starting chain.
Round 3
Chain 4, turn, work 3 DC into the next chain-1 space. Repeat: Chain 1, work 3 DC into the next chain-1 space.End with 3 DC into the last space, chain 1, then 1 DC into the very last DC from the previous row.Repeat: Repeat Row 2 and Row 3 alternating until the bottom panel reaches your desired length (e.g., 30 rows).
The Top Half (Colorwork Section)
Transition Row: Chain 1, turn, work 1 Single Crochet (SC) into every stitch, including the chain-1 spaces.
Round 1
(SC): Chain 1, turn, work 1 SC into every stitch.
Round 2
(DC): Chain 2, turn, skip the first stitch, work 1 DC into every stitch until the end.
Round 3
(SC - Optional Color Change): Chain 1, work 1 SC into every stitch. Repeat: Follow your desired color pattern (e.g., 2 rows of Dark Blue, 3 rows of Orange, 1 row of White).Finish: Once done with both panels, cut the yarn on the first panel.
Do not cut the yarn on the second panel as you will use it for shaping.
Shaping the Front Panel (V-Neck)
The V-neck is worked on the second panel .
Setup: Locate the center stitch of the top colorwork section (Total Stitches ÷ 2).
Place a stitch marker between the two center stitches.
Start Side 1: Attach your yarn to the right side of the stitch marker.
Chain 2. Work 1 DC in the first stitch.
Work 1 DC in each stitch until 3 stitches remain before the marker.
Round 1
Decrease: Work a DC2TOG over the next two stitches. Work 1 regular DC in the last stitch before the marker.
Round 2
Return Turn your work. Work 1 DC into the same stitch. Work a DC2TOG over the next two stitches.Work 1 DC into every remaining stitch to the end of the row.Repeat: Repeat the decrease and return rows for a total of 10 rows on this side.Side 2: Repeat the same process on the other side of the stitch marker.
Shaping the Back Panel (Shoulders)
Top Section: Attach yarn to the top of the panel.
Round 1
Work 1 DC into every stitch for 10 rows.
Arm Hole Edging (Sleeves)
Start: Count 3 rows down on the main color.
Attach yarn through both panels to start the armhole.
Round 1
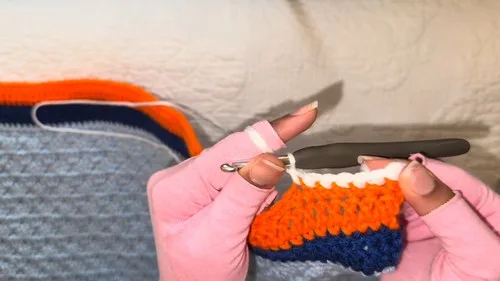
(SC Edging): Work 2 SC into the end of each previous row around the armhole opening.Slip stitch to the first SC to join.
Round 2
(DC Round): Chain 2, turn. Skip the first stitch. Work 1 DC into every stitch around.Slip stitch to join.Repeat: Continue repeating the DC Round until you reach your desired sleeve length.For the final edging, reattach yarn and work 1 SC into each stitch around.
Neckline Ribbing
Round 1
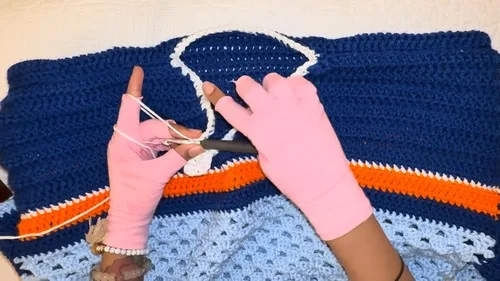
(SC Edging): Attach yarn to the side of the neckline. Work 2 SC into the end of each DC row along the V-neck opening.Ribbing Prep: Chain 5 (4 for height + 1 for turn).Skip 1 chain from the hook and work 4 SC.Repeat this pattern all the way around the neckline.
Seaming: When finished, cut yarn leaving a long tail.
Use a yarn needle to stitch the starting and ending edges of the ribbing strip together.
Sew the V-neck section down to secure the collar.
Finish
- Weave in all yarn ends left from color changes and panel transitions before seaming.
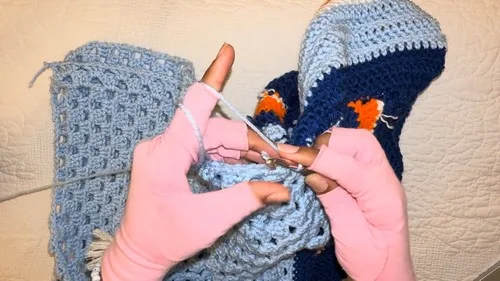
- Lay the front panel on top of the back panel with right sides facing together, attach yarn to both panels at the outer edge, and slip stitch into the back loops only across both shoulders until you reach the V-neck. Turn the work right side out to check the seam.
- Turn the jersey inside out again, attach the same color yarn at the bottom of the armhole, and slip stitch down the side edges until you reach the bottom.
- Work the neckline ribbing and arm hole edging last, once both seams are closed, for a clean finished edge.
Bigger or smaller
- Smaller
- Drop to a finer yarn with a smaller hook so each granny stitch cluster sits tighter, shrinking the overall panel width and length together.
Photographs of this one
Every photograph on this page was taken by whoever published the pattern, and they are printed in the order the source listed them.
FAQs
Asked and answered
These answers came from whoever first published the pattern, kept word for word.
Do both panels need the V-neck shaping?
No, the V-neck is only worked on the second panel. The first panel has its shoulders shaped straight across with the back panel shoulder rows instead.
Can the color pattern in the top half be changed?
Yes, Row 3 of the colorwork section is marked as optional for color changes. Follow any preferred sequence of colored rows as long as both panels match.
Why turn the work right side out partway through seaming?
Turning after the shoulder seam checks that the slip stitch line sits correctly before the side seams are closed. It is easier to fix a seam at this stage than after the armholes are done.
Does the same yarn color need to be used for both seams?
The side seam calls for the same color yarn used elsewhere in the piece so the slip stitch line blends in. The shoulder seam yarn is not specified as matching, so it can follow the nearest color block.