 STITCH ROUND
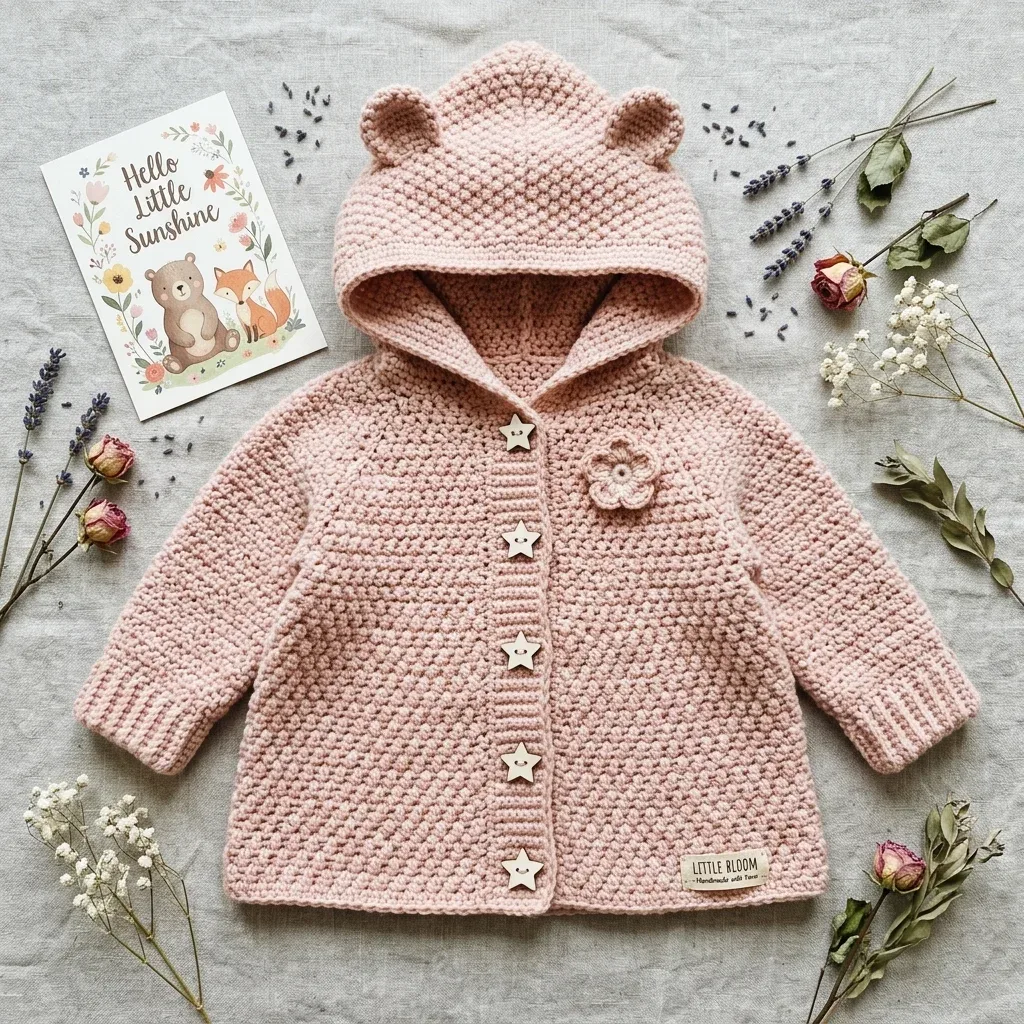
Moss stitch baby coat with a bear ear hood
42 rounds build this moss-stitch baby coat with a bear-ear hood.
- Skill
- Intermediate
- Rounds
- 42 rounds
- Yarn weight
- Worsted
- Hook
- 5.0 mm
- Time
- 12-18 hours

Intermediate
What the original page called it. Nothing here is graded a second time.

42 rounds
Each one gets its own line, with a box beside it to tick as you go.

Worsted
What the sample was made in. Any weight works — the size moves with it.
About this pattern
This hooded coat comes together from six flat pieces and one pair of ears worked in the round, adding up to 42 rounds across the whole project. A back panel, two front panels, two sleeves, and a hood all use the same moss stitch texture, so once the rhythm of sc and ch-1 spaces is set, the pieces tick off steadily. The bear ears are a quick round-based build, worked separately and set aside until the coat itself is seamed.
The real shaping happens at the underarms, neckline, and shoulders, where stitch counts shift across several short rounds on each front and back piece. Slow down through those shaping rounds and keep the right and left front panels labeled, since the buttonhole band and plain button band mirror each other but are not identical. The moss stitch itself stays simple throughout; the shaping is where attention actually matters.
- Work the back panel, two front panels, and two sleeves flat in moss stitch before any seaming begins.
- Shape the underarms, neckline, and shoulders on the front and back pieces as the pattern directs.
- Join the shoulder seams with mattress stitch, matching the right front to the back, then the left front.
- Seam the sides from the hem up to the underarm opening on each panel.
- Center and seam each sleeve into its armhole, then close the sleeve seam from cuff to underarm.
- Pin and whipstitch the hood around the neckline, then add the bear ears, button bands, and flower applique.
What goes wrong
- Losing count in moss stitch Count each sc together with its ch-1 space as one moss unit rather than counting stitches alone. Recheck the total against the pattern before starting a new row if the edge looks uneven.
- Mixing up the two front panels The button band and buttonhole band sit on opposite fronts and are not interchangeable. Label the right front and left front pieces as soon as they come off the hook to avoid reseaming later.
- Whipstitching the hood wrong side out The hood attaches with right sides facing out, not together like the other seams. Check the orientation against the neckline before whipstitching the full 113-stitch edge in place.
Yarn, hook and the rest
Copied from the source pattern's own materials list.
Yarn
- Approximately 430 yards / 393 meters of worsted weight yarn (category 4) in dusty rose or blush pink
Recommended yarn options
- Paintbox Yarns Simply DK used at worsted tension, in "Dusty Rose"
- Lion Brand Pound of Love in "Pastel Pink"
- Paintbox Yarns Simply Worsted in "Blush Pink" or "Rose Pink"
- Choose a smooth, tightly plied yarn. Avoid fluffy or textured yarns because they will hide that beautiful moss stitch texture.
Hooks
- US size H-8 / 5.0 mm for the body, sleeves, and hood
- US size G-6 / 4.0 mm for ribbing and the flower applique
Notions
- 5 wooden star-shaped buttons, approximately 18 mm
- Yarn needle for seaming and weaving ends
- At least 6 locking stitch markers
- Scissors
- Less than 10 yards / 9 meters of the same yarn for the flower applique
- Rust-proof pins for blocking
Progress tracker
0 of the 42 rounds on this page are ticked.
The pattern, round by round
Kept in the order and the wording the source used. Tick a round as you finish it; the ticks stay on this device.
Moss Stitch (Worked Flat Over an Even Number of Stitches)
This creates the beautiful textured fabric throughout the coat.
Foundation row setup: Chain an even number. Work 1 sc in 2nd ch from hook, ch 1, skip 1 ch, (sc in next ch, ch 1, skip 1 ch) across to last ch, sc in last ch. Turn.
Round 1
and all subsequent rows: Ch 1, sc in first ch-1 sp, ch 1, (sc in next ch-1 sp, ch 1) across, sc in last sc. Turn.One "moss unit" equals 1 sc plus 1 ch-1 sp. Stitch counts include both sc and ch-1 spaces plus any edge sc.
Rib Stitch (Worked Flat in BLO)
Chain a multiple of 2 plus 1.
Round 1
Sc in 2nd ch from hook and in each ch across. Turn.
Round 2
and all subsequent rows: Ch 1, sc BLO in each sc across. Turn.
Crochet Flower Applique
Magic ring.
Round 1
Ch 1, work 6 sc into ring, sl st to first sc to join. (6 sc)
Round 2
(Ch 3, dc in same st, ch 3, sl st in same st, sl st in next st) 6 times. (6 petals)Fasten off, leaving a 10 inch / 25 cm tail for attaching.
Bear Ears (Make 2)
Round 1
Magic ring, ch 1, 6 sc in ring, sl st to join. (6 sc)
Round 2
Ch 1, 2 sc in each sc around, sl st to join. (12 sc)
Round 3
Ch 1, (2 sc in next sc, sc in next sc) 6 times, sl st to join. (18 sc)
Round 4
Ch 1, sc in each sc around, sl st to join. (18 sc) Fasten off, leaving a 14 inch / 35 cm tail for attaching.
Back Panel
With MC and H-8 hook, ch 73.
Foundation Row: Sc in 2nd ch from hook, ch 1, (skip 1 ch, sc in next ch, ch 1) 35 times, sc in last ch. Turn. (73 sts)
Round 1
through 26: Rep the moss stitch row: Ch 1, sc in first ch-1 sp, ch 1, (sc in next ch-1 sp, ch 1) 35 times, sc in last sc. Turn. (73 sts)After Row 26, the back should measure approximately 5.2 inches / 13 cm.
Button Band (Right Front)
With MC and G-6 hook, RS facing, join yarn at hem of right front center edge.
Round 1
Ch 1, work 51 sc evenly up the right front center edge. Turn. (51 sc)
Round 2
through 5: Ch 1, sc BLO in each sc across. Turn. (51 sc) Fasten off.
Buttonhole Band (Left Front)
With MC and G-6 hook, RS facing, join yarn at top of left front center edge.
Round 1
Ch 1, work 51 sc evenly down the left front center edge. Turn. (51 sc)
Round 2
Ch 1, sc BLO in each sc across. Turn. (51 sc)
Round 3
Buttonhole Row Ch 1, sc BLO in first 3 sc, (ch 2, skip 2 sc, sc BLO in next 8 sc) 4 times, ch 2, skip 2 sc, sc BLO in last 4 sc. Turn.
Round 4
Ch 1, sc BLO in each sc and 2 sc in each ch-2 sp across. Turn. (51 sc)
Round 5
Ch 1, sc BLO in each sc across. Fasten off. (51 sc)
Sleeves (Make 2)
With MC and H-8 hook, ch 31.
Foundation Row: Sc in 2nd ch from hook, ch 1, (skip 1 ch, sc in next ch, ch 1) 14 times, sc in last ch. Turn. (31 sts)
Rows 1 through 4: Work even in moss stitch. (31 sts)
Round 5
Increase Row At each edge, work 2 sc into the edge stitch to create a new moss unit. (35 sts)Row 6: Work even. (35 sts)Rows 7 through 10: Work even. (35 sts)
Round 11
Increase Row Work increases at both edges. (39 sts)Row 12: Work even. (39 sts)Rows 13 through 16: Work even. (39 sts)
Round 17
Increase Row Work increases at both edges. (43 sts)Row 18: Work even. (43 sts)Rows 19 through 22: Work even. (43 sts)
Round 23
Increase Row Work increases at both edges. (47 sts)Row 24: Work even. (47 sts)Rows 25 through 28: Work even. (47 sts)
Round 29
Increase Row Work increases at both edges. (51 sts)Row 30: Work even. (51 sts)Rows 31 through 33: Work even. (51 sts) Do not fasten off.
Underarm Shaping
Round 27
Decrease Row Ch 1, sc2tog over first sc and first ch-1 sp, ch 1, (sc in next ch-1 sp, ch 1) 34 times, sc2tog over last ch-1 sp and final edge sc. Turn. (71 sts)
Round 28
Ch 1, sc in first ch-1 sp, ch 1, (sc in next ch-1 sp, ch 1) 34 times, sc in last sc. Turn. (71 sts)
Round 29
Decrease Row Ch 1, sc2tog over first sc and first ch-1 sp, ch 1, (sc in next ch-1 sp, ch 1) 33 times, sc2tog over last ch-1 sp and final edge sc. Turn. (69 sts)
Round 30
Ch 1, sc in first ch-1 sp, ch 1, (sc in next ch-1 sp, ch 1) 33 times, sc in last sc. Turn. (69 sts)Rows 31 through 50: Work even in moss stitch without shaping. (69 sts)
Underarm Shaping
Round 27
Ch 1, sc2tog over first sc and first ch-1 sp, ch 1, (sc in next ch-1 sp, ch 1) 16 times, sc in last sc. Turn. (35 sts)Row 28: Work even. (35 sts)
Round 29
Ch 1, sc2tog over first sc and first ch-1 sp, ch 1, (sc in next ch-1 sp, ch 1) 15 times, sc in last sc. Turn. (33 sts)Row 30: Work even. (33 sts)Rows 31 through 42: Work even in moss stitch. (33 sts)
Underarm Shaping
Round 27
Ch 1, sc in first ch-1 sp, ch 1, (sc in next ch-1 sp, ch 1) 15 times, sc2tog over last ch-1 sp and final edge sc. Turn. (35 sts)Row 28: Work even. (35 sts)
Round 29
Ch 1, sc in first ch-1 sp, ch 1, (sc in next ch-1 sp, ch 1) 14 times, sc2tog over last ch-1 sp and final edge sc. Turn. (33 sts)Row 30: Work even. (33 sts)Rows 31 through 42: Work even in moss stitch. (33 sts)
Neck Shaping
Round 43
Ch 1, sc in first ch-1 sp, ch 1, (sc in next ch-1 sp, ch 1) 13 times, sc2tog over last ch-1 sp and final edge sc. Turn. (31 sts)Row 44: Work even. (31 sts)
Round 45
Ch 1, sc in first ch-1 sp, ch 1, (sc in next ch-1 sp, ch 1) 12 times, sc2tog over last ch-1 sp and final edge sc. Turn. (29 sts)Row 46: Work even. (29 sts)
Round 47
Ch 1, sc in first ch-1 sp, ch 1, (sc in next ch-1 sp, ch 1) 11 times, sc2tog over last ch-1 sp and final edge sc. Turn. (27 sts)Row 48: Work even. (27 sts)
Round 49
Ch 1, sc in first ch-1 sp, ch 1, (sc in next ch-1 sp, ch 1) 10 times, sc2tog over last ch-1 sp and final edge sc. Turn. (25 sts)Row 50: Work even. (25 sts)
Round 51
Ch 1, sc in first ch-1 sp, ch 1, (sc in next ch-1 sp, ch 1) 9 times, sc in last sc. Fasten off. (21 sts)
Neck Shaping
Round 43
Ch 1, sc2tog over first sc and first ch-1 sp, ch 1, (sc in next ch-1 sp, ch 1) 14 times, sc in last sc. Turn. (31 sts)Row 44: Work even. (31 sts)
Round 45
Ch 1, sc2tog over first sc and first ch-1 sp, ch 1, (sc in next ch-1 sp, ch 1) 13 times, sc in last sc. Turn. (29 sts)Row 46: Work even. (29 sts)
Round 47
Ch 1, sc2tog over first sc and first ch-1 sp, ch 1, (sc in next ch-1 sp, ch 1) 12 times, sc in last sc. Turn. (27 sts)Row 48: Work even. (27 sts)
Round 49
Ch 1, sc2tog over first sc and first ch-1 sp, ch 1, (sc in next ch-1 sp, ch 1) 11 times, sc in last sc. Turn. (25 sts)Row 50: Work even. (25 sts)
Round 51
Ch 1, sc in first ch-1 sp, ch 1, (sc in next ch-1 sp, ch 1) 9 times, sc in last sc. Fasten off. (21 sts)
Shoulder Shaping
Round 51
Right Shoulder Ch 1, sc in first ch-1 sp, ch 1, (sc in next ch-1 sp, ch 1) 9 times, sc in next ch-1 sp. Fasten off. (21 sts)Skip center 27 sts for back neck. Mark these for hood attachment.
Round 51
Left Shoulder Reattach yarn in next ch-1 sp after center neck. Ch 1, sc in that sp, ch 1, (sc in next ch-1 sp, ch 1) 9 times, sc in last sc. Fasten off. (21 sts)
Right Front Panel
With MC and H-8 hook, ch 37.
Foundation Row: Sc in 2nd ch from hook, ch 1, (skip 1 ch, sc in next ch, ch 1) 17 times, sc in last ch. Turn. (37 sts)
Rows 1 through 26: Work even in moss stitch. (37 sts)
Left Front Panel
With MC and H-8 hook, ch 37.
Foundation Row: Sc in 2nd ch from hook, ch 1, (skip 1 ch, sc in next ch, ch 1) 17 times, sc in last ch. Turn. (37 sts)
Rows 1 through 26: Work even in moss stitch. (37 sts)
Cuff
Switch to G-6 / 4.0 mm hook. Turn sleeve so foundation chain edge faces you.
Pickup Row: Join MC to first ch of foundation ch, ch 1, sc evenly across the foundation ch edge working 1 sc in each original ch space. (30 sc)
Rib Rows: Work in BLO sc rib for 10 rows. (30 sc)
Fasten off. Rep for second sleeve.
Hood
With MC and H-8 hook, ch 113.
Foundation Row: Sc in 2nd ch from hook, ch 1, (skip 1 ch, sc in next ch, ch 1) 55 times, sc in last ch. Turn. (113 sts)
Rows 1 through 40: Work even in moss stitch. (113 sts) After Row 40, the hood rectangle should measure approximately 16 inches / 40.5 cm wide and 8 inches / 20 cm tall.
Hood Back Seam
Fold the hood rectangle in half so the two short edges meet. The fold becomes the front opening. Whipstitch or mattress stitch the two short ends together along 56 sts.
Bear Ears Attachment
Position the two bear ears on the top outside of the hood, approximately 2.5 inches / 6.5 cm in from each side of the front opening edge and 1 inch / 2.5 cm down from the top back seam. Stitch each ear firmly to the hood using the long tail.
Join
Step 1Sew the 5 star-shaped wooden buttons to the right front band, aligned with the buttonholes.
Step 2Attach the crochet flower applique to the right front panel, approximately 2 inches / 5 cm below the neckline and 0.5 inch / 1.5 cm from the center front edge.
Step 3Weave in all ends securely. Wet block the finished coat, pin to measurements, and let dry completely.
Check your count
- Crochet Flower Applique · Round 1: 6 sts
- Crochet Flower Applique · Round 2: 6 sts
- Bear Ears (Make 2) · Round 1: 6 sts
- Bear Ears (Make 2) · Round 2: 12 sts
- Bear Ears (Make 2) · Round 3: 18 sts
- Back Panel · Round 1: 73 sts
Finish
- Weave in every yarn tail from the panels, sleeves, hood, and bear ears before any seam becomes permanent.
- Sew the five star-shaped wooden buttons to the right front band and attach the crochet flower applique near the neckline.
- Wet block the finished coat, pin it to the stated measurements, and let it dry completely before dressing baby in it.
Bigger or smaller
- Larger
- Move up to a bulkier yarn with a larger hook while keeping the same stitch and row counts, which scales every panel up proportionally. Expect the chest circumference and shoulder-to-hem length to grow beyond the stated 20 inches / 51 cm and 13 inches / 33 cm.
- Smaller
- Work one fewer repeat of the moss stitch pattern rows on the body panels and sleeves before starting the shaping sections. This shortens the finished length without touching the stitch count, so the coat stays narrow but ends sooner.
FAQs
Asked and answered
These answers came from whoever first published the pattern, kept word for word.
Why does gauge matter so much for this coat?
A one-stitch-per-inch difference in the moss stitch gauge can make the finished coat 1.5 inches too large or small overall. Swatch at least 5 inches square with the H-8 / 5.0 mm hook, wash and block it, then measure the center 4 inches before casting on the back panel.
Can a fluffy or textured yarn be used instead?
Avoid it, since fluffy or textured yarns hide the pebbled moss stitch pattern that defines this coat. A smooth, tightly plied worsted weight yarn like the ones listed in the materials keeps the texture visible.
When should the bear ears be made?
The bear ears are worked in the round separately from the main pieces and can be made at any point before final assembly. Attach them only after the hood has been seamed onto the neckline.
Does the turning chain count as a stitch in moss stitch rows?
No, the turning chain-1 at the start of each moss stitch row does not count as a stitch. Work directly into the first ch-1 space after turning rather than treating the chain itself as a stitch to work into.