 STITCH ROUND
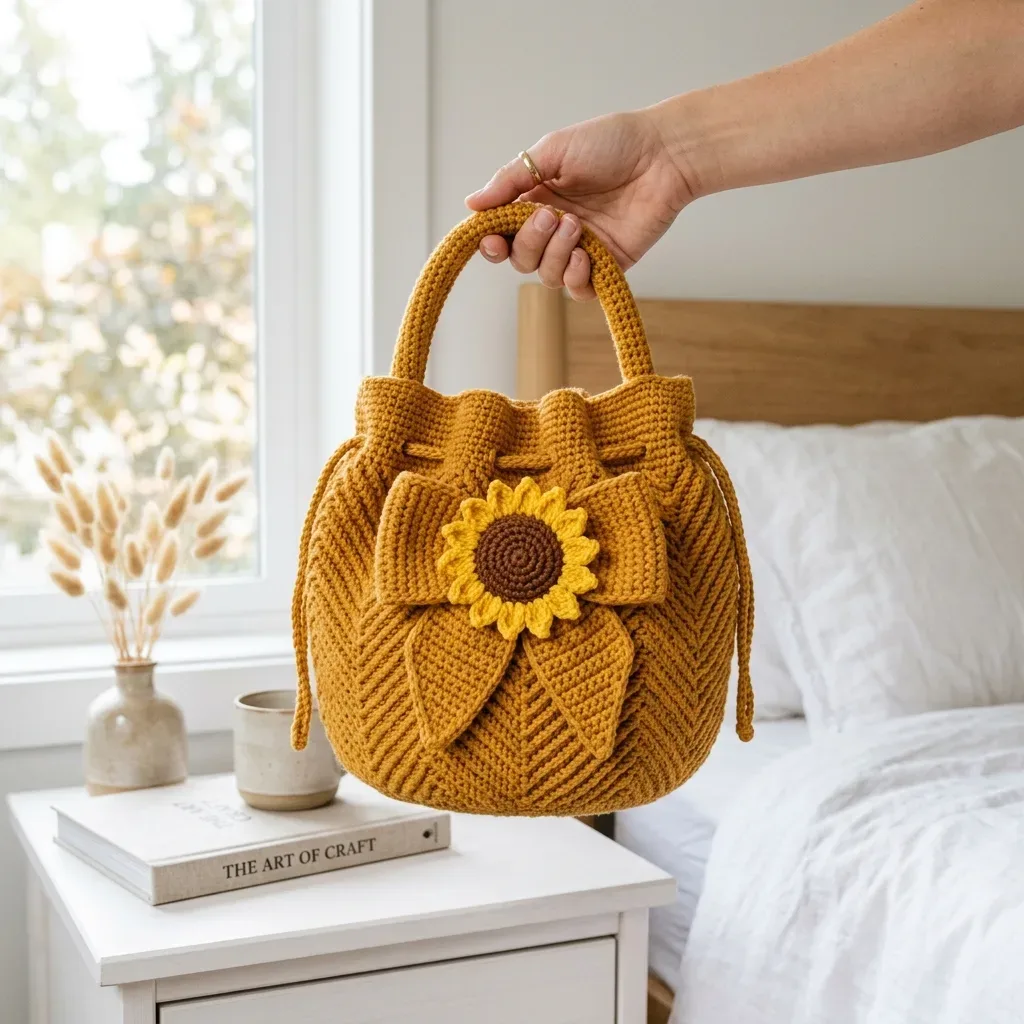
Mustard sunflower bow bucket bag crochet pattern
Tick off an oval base, 8-panel body, and bow applique for this structured bucket bag.
- Skill
- Intermediate
- Rounds
- 27 rounds
- Yarn weight
- Worsted
- Hook
- 4.0 mm
- Time
- 10-14 hours

Intermediate
What the original page called it. Nothing here is graded a second time.

27 rounds
Each one gets its own line, with a box beside it to tick as you go.

Worsted
What the sample was made in. Any weight works — the size moves with it.
About this pattern
This is a structured bucket bag with an oval base, straight sides, a gathered eyelet top, and a layered bow and sunflower applique set on the front. The oval base and body panel each take a handful of rounds to establish, the side panel builds up with plain rounds between texture markers, and a short strip becomes the padded carry handle. Add the drawstrings, bow pieces, and sunflower on top, and the whole bag is done in distinct, trackable stages rather than one long continuous round.
Shaping lives almost entirely in the base: increases are placed at the two curved ends while the long straight sides stay flat, which is what turns a flat oval into a proper footprint. Slow down at the transition from base to wall, where the stitch count locks in and any missed increase shows up as a lopsided bottom. The eyelet round further up also deserves care, since skipped stitches there need to line up evenly for the drawstring to gather the bag straight.
- Build the oval base first, working increases at both ends to turn a flat chain into a rounded footprint.
- Place markers to divide the wall into eight texture panels before adding any surface slip stitch.
- Work surface slip stitch over the panel markers to lay down the raised diagonal herringbone lines.
- Crochet the eyelet round and the row above it to set up the gathered, bucket-shaped top.
- Make the handle strip, bow loops, bow tails, and sunflower pieces separately, then assemble and sew them on.
What goes wrong
- Losing track of base increases Increases cluster at the two short ends of the oval, not evenly around. Count stitches at the end of each base round against the running total before moving on.
- Surface slip stitch pulled too tight Tight loops pucker the fabric and shorten the herringbone lines. Keep the loop loose on the hook and check the panel lies flat before continuing to the next one.
- Skipping the back-loop ridge rounds Those two rounds mark the turning point between base and wall and give the bag its defined edge. Work them in back loops only, even though the rest of the body uses both loops.
- Uneven eyelet spacing The eyelet round repeats the same sc and chain pattern eight times around the body. Use the panel markers from the texture rounds to confirm each repeat starts in the right place before chaining the skip.
Yarn, hook and the rest
Copied from the source pattern's own materials list.
Main color mustard
- approximately 360 yards (329 meters) of worsted weight cotton or cotton-acrylic blend
Sunflower yellow
- approximately 20 yards (18 meters)
Center brown
- approximately 12 yards (11 meters)
Suggested Yarns
- Lion Brand 24/7 Cotton, Paintbox Cotton Aran, or Lily Sugar n Cream work beautifully. Choose a smooth, firm yarn that shows texture clearly. If you prefer a softer yarn, consider adding a lining or going down a hook size to maintain structure.
Hooks
- US G/6 (4.0 mm) hook for the bag and applique
- US E/4 (3.5 mm) hook for surface crochet if needed
Tools and Extras
- Locking stitch markers
- Tapestry needle
- Removable marker for round start
- Pins
- Scissors
- Tape measure
Progress tracker
0 of the 27 rounds on this page are ticked.
The pattern, round by round
Kept in the order and the wording the source used. Tick a round as you finish it; the ticks stay on this device.
Main Pattern
Round 1
Chain 25. Work 2 sc in the 2nd chain from hook, sc in the next 22 chains, 4 sc in the last chain. Rotate to work along the opposite side of the chain, sc in the next 22 chains, 2 sc in the same chain as the first stitches. Join. (52 sc)
Round 2
Ch 1. Inc in the next 2 stitches, sc 22, inc in the next 4 stitches, sc 22, inc in the last 2 stitches. Join. (60 sc)
Round 3
Ch 1. (Sc 1, inc) twice, sc 22, (sc 1, inc) 4 times, sc 22, (sc 1, inc) twice. Join. (68 sc)
Round 4
Ch 1. (Sc 2, inc) twice, sc 22, (sc 2, inc) 4 times, sc 22, (sc 2, inc) twice. Join. (76 sc)
Round 5
Ch 1. Sc in each stitch around. Join. (76 sc)
Round 6
Ch 1. Sc 18, inc, sc 19, inc, sc 18, inc, sc 18, inc, sc 3. Join. (80 sc) Checkpoint: Your base should measure approximately 7.5 inches (19 cm) long and 4 inches (10 cm) deep after Round 6. If it’s significantly different, check your gauge and adjust your hook size if needed.
Main Pattern
Rounds 1–2
Ch 1. Working in back loop only (BLO) to create a turning ridge, sc in each stitch around. Join. (80 sc)
Rounds 3–22
Ch 1. Sc in each stitch around. Join. Place markers every 10 stitches to divide into eight texture panels. (80 sc each round)
Round 23
Eyelet Round Ch 1. Sc 3, ch 2, skip 2, sc 5; repeat from 8 times. Join. (64 sc + 8 ch-2 spaces)
Round 24
Ch 1. Sc 3, 2 sc in ch-2 space, sc 5; repeat from 8 times. Join. (80 sc)
Rounds 25–27
Ch 1. Sc in each stitch around. Join. (80 sc each round)
Round 28
Finish the edge with crab stitch around, or regular single crochet if you prefer. Join and fasten off. (80 sts)
Main Pattern
Round 1
Sc in the 2nd chain from hook and each chain across. (61 sc)
Rounds 2–5
Ch 1, turn, sc in each stitch across. (61 sc) Fold lengthwise with wrong sides together and whipstitch the long edges for a padded handle. Sew the ends securely to the inside top edge, centered over the side panels.
Handle checkpoint: The handle strip measures approximately 15 inches (38 cm) before sewing and gives about 5.5 inches (14 cm) of drop.
Bow Loops (Make 2)
Chain 16.
Round 1
Sc in the 2nd chain from hook and each chain across. (15 sc)
Rounds 2–10
Ch 1, turn, sc across. (15 sc) Fasten off, leaving a long tail for assembly.
Bow Tails (Make 2)
Chain 14.
Round 1
Sc in the 2nd chain from hook and each chain across. (13 sc)
Rounds 2–8
Ch 1, turn, sc across. (13 sc)
Round 9
Ch 1, turn, sc2tog, sc 9, sc2tog. (11 sc)
Round 10
Sc2tog, sc 7, sc2tog. (9 sc)
Round 11
Sc2tog, sc 5, sc2tog. (7 sc)
Round 12
Sc2tog, sc 3, sc2tog. (5 sc)
Round 13
Sc2tog, sc 1, sc2tog. (3 sc) Fasten off.
Bow Center Wrap
Chain 9.
Round 1
Sc in the 2nd chain from hook and each chain across. (8 sc)
Rounds 2–6
Ch 1, turn, sc across. (8 sc) Fasten off with a long tail for wrapping and securing.
Sunflower Center and Petals
Center Round 1: With brown yarn, make a magic ring, ch 1, work 6 sc in the ring. Join. (6 sc)
Round 2
Ch 1, inc in each stitch around. Join. (12 sc)
Round 3
Ch 1, (sc 1, inc) 6 times. Join. Change to yellow yarn. (18 sc) Petals: Ch 5, sc in the 2nd chain, hdc in the next chain, dc in the next chain, hdc in the next chain, sl st in the next center stitch; repeat from around. Fasten off. (18 petals)
Applique checkpoint: Your finished bow should be approximately 5 inches (12.5 cm) wide. The sunflower should be approximately 2.5 inches (6.5 cm) across and will sit centered over the bow wrap.
Join
Step 1Step 1: Weave in all body ends except those needed for sewing. Steam lightly or wet block the bag over a towel-stuffed form so the base stays oval and the walls dry upright.
Step 2Step 2: Sew the handle ends inside the top edge. Place each end over the side panels so the handle rises from side to side, not front to back. Stitch through several rows for strength.
Step 3Step 3: Lace the drawstrings through the Round 23 eyelets. Cinch gently to create the soft gathered bucket shape, then knot the cord ends.
Step 4Step 4: Shape the bow by overlapping the two loop rectangles at the center, pinching them together. Add the two tapered tails beneath and wrap with the center strip. Sew the wrap securely through all bow layers.
Step 5Step 5: Sew the bow to the front center with the wrap aligned between two front V panels. Sew the sunflower over the wrap using small stitches around the brown center and a few hidden stitches behind the petals.
Step 6Step 6 (Optional): For a lining, trace the base, add seam allowance, and sew a simple drawstring bucket lining. Tack the lining just below the eyelet round so it does not show.
Check your count
- Main Pattern · Round 1: 52 sts
- Main Pattern · Round 2: 60 sts
- Main Pattern · Round 3: 68 sts
- Main Pattern · Round 5: 76 sts
- Main Pattern · Rounds 1–2: 80 sts
- Main Pattern · Rounds 3–22: 80 sts
Finish
- Weave in all body ends before blocking, leaving only the tails needed to sew on the handle and applique pieces.
- Wet block or steam the bag over a towel-stuffed form so the oval base holds its shape and the walls dry standing upright.
- Sew the padded handle to the inside top edge over the side panels, then lace the drawstrings through the eyelet round and attach the bow and sunflower to finish.
Bigger or smaller
- Smaller or larger height
- Repeat or remove some of the plain body rounds worked between the back-loop ridge and the eyelet round to shorten or lengthen the bag without changing the base or top finishing.
FAQs
Asked and answered
These answers came from whoever first published the pattern, kept word for word.
Can the bag be worked without the surface crochet texture?
Yes, the plain rounds of the body already form a solid bucket shape on their own. Skipping the surface slip stitch leaves a smooth wall instead of raised diagonal lines, with no change to stitch counts.
What happens if gauge runs tighter or looser than stated?
A tighter gauge produces a smaller bag with a stiffer wall, while a looser gauge gives a larger, softer bag that may need a lining for structure. Checking gauge before starting the base keeps the finished size close to the stated measurements.
Does the bag need a lining?
A firm cotton or cotton-blend yarn worked at the stated gauge holds its shape without one. A lining is only necessary if a softer yarn is substituted and extra structure is wanted.
How are the bow and sunflower attached?
Both are worked as separate small pieces and sewn to the front of the bag once the body and applique rounds are complete. Layer the bow loops, tails, and center wrap together first, then stitch the sunflower center and petals in place alongside it.