 STITCH ROUND
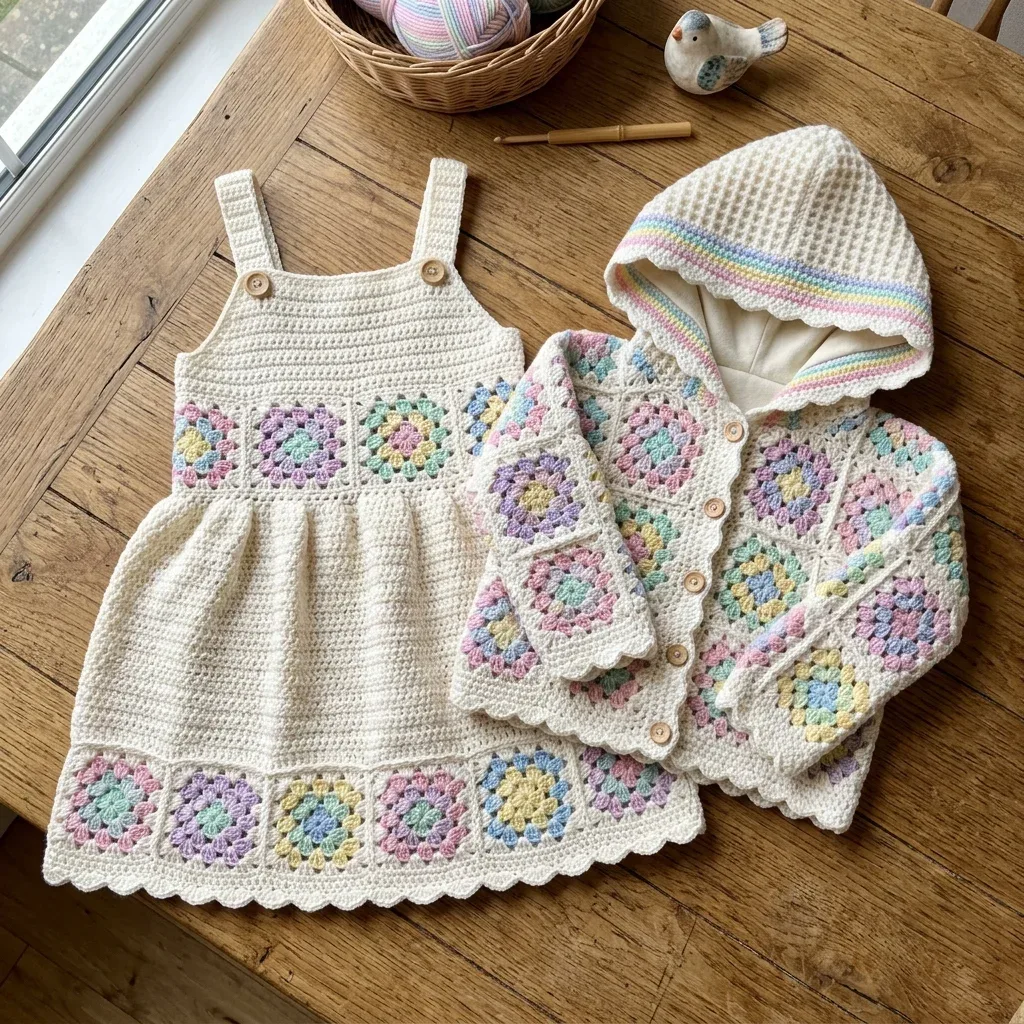
Pastel granny square pinafore dress and hooded cardigan set
A 3-round granny square anchors this pinafore dress and hooded cardigan toddler set.
- Skill
- Intermediate
- Rounds
- 44 rounds
- Yarn weight
- Worsted
- Hook
- 4.0 mm
- Time
- 8-12 hours

Intermediate
What the original page called it. Nothing here is graded a second time.

44 rounds
Each one gets its own line, with a box beside it to tick as you go.

Worsted
What the sample was made in. Any weight works — the size moves with it.
About this pattern
This set pairs a single-crochet pinafore dress with a hooded cardigan, both trimmed in cream granny squares worked in three rounds each. Every square cycles through a different pastel center so the finished band reads as a true rainbow rather than a repeat. The bodice front builds up fast in plain sc rows, the skirt joins on without fuss, and the cardigan body and sleeves work up in straightforward pieces before the two garments meet at the granny square bands and scallop edging.
Slow down at the armhole shaping on the bodice front and at the point where the cardigan splits into separate back, left front, and right front panels above the underarm, since these sections carry the fit. The granny square band at the yoke and the matching band at the skirt hem both need careful alignment with the garment edge before joining. The waffle stitch hood is simple fpdc and bpdc worked back and forth, but keep the post stitches tracking correctly so the texture sits even once the fabric lining goes in.
- Crochet the granny squares first, cycling through the pastel yarns so no two adjacent squares share a center color.
- Work the dress bodice front and back flat in single crochet, shaping the armholes before joining to the skirt.
- Add the granny square band at the yoke, then repeat the band again at the skirt hem before the scallop edging.
- Build the cardigan body from the hem to the underarm, then split the work into back, left front, and right front panels.
- Shape the sleeves separately and set them into the cardigan, then crochet the waffle stitch hood for texture and warmth.
- Hand-sew the fabric lining inside the hood and finish both garments with buttons before blocking to size.
What goes wrong
- Repeating a pastel center by accident Lay out all five pastel yarns before joining squares into the band and track color placement so no two neighboring squares share a center.
- Skipping the gauge swatch Swatch in single crochet with the G-6 hook before starting the bodice, since both the dress and cardigan measurements depend on that gauge.
- Losing track of waffle stitch rows Check whether the current row is RS or WS before starting, since the fpdc and bpdc placement flips between Row 1 and Row 2.
- Joining the granny square band unevenly Place stitch markers at matching points along the yoke and the square band before sewing so the corners line up square by square.
Yarn, hook and the rest
Copied from the source pattern's own materials list.
Yarn Requirements
- Yarn A (Cream): 600 yards / 550 m, worsted weight, approximately 200 g
- Yarn B (Pastel Pink): 50 yards / 46 m, worsted weight
- Yarn C (Pastel Lavender): 50 yards / 46 m, worsted weight
- Yarn D (Pastel Mint): 50 yards / 46 m, worsted weight
- Yarn E (Pastel Yellow): 50 yards / 46 m, worsted weight
- Yarn F (Pastel Blue): 50 yards / 46 m, worsted weight
Hooks
- US size G-6 / 4.0 mm for main fabric
- US size F-5 / 3.75 mm for granny squares and edging
Notions
- Yarn needle for weaving ends
- Stitch markers (at least 6)
- 8 wooden buttons, approximately 3/4 in / 19 mm diameter (4 for dress shoulder straps, 4 for cardigan front band)
- 1/4 yard / 23 cm cotton quilting fabric in cream for hood lining
- Sewing needle and thread to match lining
- Scissors
- Rust-proof pins for blocking
Progress tracker
0 of the 44 rounds on this page are ticked.
The pattern, round by round
Kept in the order and the wording the source used. Tick a round as you finish it; the ticks stay on this device.
Granny Square
This pattern uses a 3-round granny square worked in rounds.
Round 1
With first CC, make a magic ring (or ch 4, sl st to first ch to form ring). Ch 3 (counts as first dc), work 2 dc into ring, ch 2, (3 dc into ring, ch 2) 3 times, sl st to top of beg ch-3 to join. Fasten off. (4 clusters of 3 dc, 4 ch-2 corner spaces)
Round 2
Join second CC in any ch-2 corner sp, ch 3 (counts as dc), work 2 dc in same sp, ch 2, 3 dc in same sp (corner made), ch 1, (3 dc, ch 2, 3 dc) in next corner sp, ch 1, rep from ( to ) around all 4 corners, sl st to top of beg ch-3. Fasten off. (8 clusters of 3 dc, 4 ch-2 corner spaces, 4 ch-1 side spaces)
Round 3
Join MC in any ch-2 corner sp, ch 3, work 2 dc in same sp, ch 2, 3 dc in same sp (corner made), ch 1, 3 dc in next ch-1 side sp, ch 1, (3 dc, ch 2, 3 dc) in next corner sp, rep ch 1, 3 dc, ch 1 between each corner, sl st to top of beg ch-3. Fasten off. (12 clusters of 3 dc total, 4 ch-2 corner spaces, 8 ch-1 spaces)
Waffle Stitch (for Hood Exterior)
Round 1
(RS): Ch 1, (fpdc around next st, bpdc around next st) across, turn.
Round 2
(WS): Ch 1, (bpdc around next st, fpdc around next st) across, turn. Rep Rows 1 and 2 for pattern.
Dress Bodice Front
With MC and G-6 hook, ch 47.
Round 1
(RS): Sc in second ch from hook and in each ch across. Turn. (46 sc)
Rounds 2–10
Ch 1, sc in each st across. Turn. (46 sc) Checkpoint: After Row 10, bodice front should measure approximately 4.5 in / 11.5 cm wide by 1.8 in / 4.5 cm tall.
Armhole Shaping:
Round 11
(RS): Ch 1, sl st in first 4 sts, sc in each st to last 4 sts, leave last 4 sts unworked. Turn. (38 sc)
Round 12
Ch 1, sc in each st across. Turn. (38 sc)
Round 13
Ch 1, sc2tog, sc in each st to last 2 sts, sc2tog. Turn. (36 sc)
Round 14
Ch 1, sc in each st across. Turn. (36 sc)
Round 15
Ch 1, sc2tog, sc in each st to last 2 sts, sc2tog. Turn. (34 sc)
Rounds 16–22
Ch 1, sc in each st across. Turn. (34 sc) Checkpoint: Bodice front with armhole shaping should measure approximately 4 in / 10 cm wide across the top and approximately 4 in / 10 cm tall from foundation chain.Fasten off. Weave in ends. Set aside.
Dress Straps (Make 2)
With MC and G-6 hook, ch 7.
Round 1
Sc in second ch from hook and in each ch across. Turn. (6 sc)
Round 2
32 Ch 1, sc in each st across. Turn. (6 sc per row) At Row 32, the strap should measure approximately 6 in / 15 cm long.Fasten off, leaving a 10 in / 25 cm tail for sewing.Fold under the last 1 in / 2.5 cm of each strap end and sew a buttonhole by working 3 ch over 2 skipped sts, or simply mark with stitch markers and use a separate button loop of ch 5, sl st closed.
Pin straps to bodice front top edge, spaced approximately 1.25 in / 3 cm in from each side edge. Sew securely on WS. Straps cross over the back and button at the back bodice top edge using 2 wooden buttons per strap.
Dress Skirt
With MC and G-6 hook, ch 83.
Round 1
(RS): Sc in second ch from hook and in each ch across. Turn. (82 sc)
Rounds 2–22
Ch 1, sc in each st across. Turn. (82 sc) Checkpoint: Skirt main body should measure approximately 18 in / 46 cm wide and 4 in / 10 cm tall before the hem band is attached.Do not fasten off. Set aside while you prepare the hem band.
Cardigan Body (Hem to Underarm)
With MC and G-6 hook, ch 101.
Round 1
(RS): Sc in second ch from hook and in each ch across. Turn. (100 sc)
Rounds 2–20
Ch 1, sc in each st across. Turn. (100 sc) Checkpoint: Cardigan body at Row 20 should measure approximately 22 in / 56 cm wide and approximately 3.6 in / 9 cm tall.
Cardigan Sleeves (Make 2)
The sleeves are worked flat from cuff upward. The granny square strip wraps around the sleeve near the center.
Sleeve Cuff and Lower Section: With MC and G-6 hook, ch 35.
Round 1
(RS): Sc in second ch from hook and in each ch across. Turn. (34 sc)
Rounds 2–7
Ch 1, sc in each st across. Turn. (34 sc)
Round 8
Ch 1, inc in first st, sc to last st, inc in last st. Turn. (36 sc)
Rounds 9–10
Ch 1, sc in each st across. Turn. (36 sc) Checkpoint: Sleeve at Row 10 should measure approximately 8 in / 20 cm wide and approximately 1.8 in / 4.5 cm tall.
Sleeve Granny Square Band:
Take 4 granny squares and join into a strip measuring approximately 9 in / 23 cm x 2.25 in / 5.7 cm. Sew the strip to the sleeve fabric at Row 10.
Sleeve Upper Section:
Round 11
Pick up sc across top of granny strip. Turn. (36 sc)
Round 12
Ch 1, inc, sc to last st, inc. Turn. (38 sc)
Rounds 13–15
Ch 1, sc in each st across. Turn. (38 sc) Continue working in sc, increasing as needed to shape the sleeve cap. Seam sleeves into tubes and set into armholes.
Continue Body Above Granny Band
After attaching the granny band, re-join MC at right edge of Row 20 above the band.
Round 21
(RS): Ch 1, pick up and sc evenly across the top of the granny strip. Work 1 sc per ch-1 sp and 2 sc in each ch-2 corner sp as needed to maintain width. Turn. (100 sc)Place stitch markers at stitch 25 and stitch 75 to mark armhole split positions.
Rounds 22–30
Ch 1, sc in each st across. Turn. (100 sc) Checkpoint: At Row 30, the body from hem foundation chain should measure approximately 8.5 in / 21.5 cm. You are now at the underarm split.
Cardigan Left Front (Underarm to Shoulder)
Round 31
(RS): Ch 1, sc in first 22 sts only. Turn, leaving rem sts unworked. (22 sc)
Round 32
Ch 1, sl st in first 3 sts (armhole shaping), sc to end. Turn. (19 sc)
Round 33
Ch 1, sc to last 2 sts, sc2tog. Turn. (18 sc)
Rounds 34–40
Ch 1, sc in each st across. Turn. (18 sc)
Neckline Shaping:
Round 41
(RS): Ch 1, sc in first 12 sts, leave rem 6 sts unworked. Turn. (12 sc)
Round 42
Ch 1, sc2tog, sc to end. Turn. (11 sc) Fasten off. This is the left shoulder: 11 sc wide.
Cardigan Back (Underarm to Shoulder)
Rejoin MC at stitch 23 of Row 30, with RS facing.
Round 31
(RS): Ch 1, sc across next 56 sts. Turn. (56 sc)
Round 32
Ch 1, sl st in first 3 sts, sc to last 3 sts, sl st in last 3 sts. Turn. (50 sc)
Round 33
Ch 1, sc2tog, sc to last 2 sts, sc2tog. Turn. (48 sc)
Rounds 34–42
Ch 1, sc in each st across. Turn. (48 sc) Fasten off. Back shoulder width: 48 sc across. Left and right shoulder each occupy the outer 11 sc on either side. Center 26 sc is the back neck opening.
Cardigan Right Front (Underarm to Shoulder)
Rejoin MC at stitch 79 of Row 30, with RS facing.
Round 31
(RS): Ch 1, sc in last 22 sts. Turn. (22 sc)
Round 32
Ch 1, sc to last 3 sts, sl st in last 3 (armhole shaping). Turn. (19 sc)
Round 33
Ch 1, sc2tog, sc to end. Turn. (18 sc)
Rounds 34–40
Ch 1, sc in each st across. Turn. (18 sc)
Round 41
(RS): Ch 1, sc in first 12 sts, leave rem 6 sts unworked. Turn. (12 sc)
Round 42
Ch 1, sc to last 2 sts, sc2tog. Turn. (11 sc) Fasten off. Shoulder Join: With WS together, align left front shoulder (11 sc) with the 11 leftmost sc of the back shoulder. Sl st or whipstitch through both layers to seam. Repeat for right front shoulder with rightmost 11 sc of back.
Dress Bodice Back
Work exactly as Dress Bodice Front through Row 22. (34 sc)
Fasten off. Set aside.
Attaching the Granny Square Yoke Band
Take 9 completed granny squares and join them into one horizontal strip using the flat join method. The strip should measure approximately 20.25 in / 51.5 cm long by 2.25 in / 5.7 cm tall.
With RS facing, pin the yoke strip horizontally across the lower edge of the bodice front, aligning one long edge of the strip with Row 10. Using MC and a yarn needle, sew or sl st through corresponding sc sts along the bodice and the top ch-1 spaces of the granny square strip edge. Repeat for bodice back.
Skirt Hem Granny Square Band
Take remaining 9 granny squares and join into one horizontal strip. With RS of skirt facing, pin strip along Row 22, matching the strip’s top edge ch spaces to the live sts of Row 22. Using MC, sl st or sew the strip to the skirt across the full width, easing gently. The strip overhangs approximately 2.25 in / 5.7 cm below the skirt body.
Skirt Hem Scallop Edging
With MC and F-5 hook, join yarn at bottom edge of the granny square hem strip at the right side. Work scallop edging across the full bottom:
Sl st in first st or ch sp, (sl st, ch 3, 2 dc, ch 3, sl st) in same sp, skip 2 sts or spaces, rep (sl st, ch 3, 2 dc, ch 3, sl st) in next sp across entire hem edge. Fasten off. Weave in ends.
Cardigan Granny Square Band (Body)
Take 12 granny squares and join into one horizontal strip measuring approximately 27 in / 68.5 cm x 2.25 in / 5.7 cm. With RS facing, sew or sl st the top edge of the granny square strip along Row 20 of the body, easing evenly across all 100 sc.
Join
Step 1Block both garments following standard blocking procedures. Pin to measurements, mist with water, and allow to dry completely. Sew all buttons securely. Weave in any remaining ends.
Step 2The completed dress should measure approximately 20 in / 51 cm across the chest and 14 in / 35.5 cm in length. The cardigan should measure approximately 22 in / 56 cm across the chest and 12 in / 30.5 cm in length with 8 in / 20 cm sleeves.
Check your count
- Dress Bodice Front · Round 11: 38 sts
- Dress Bodice Front · Round 13: 36 sts
- Dress Bodice Front · Round 15: 34 sts
- Dress Straps (Make 2) · Round 1: 6 sts
- Dress Skirt · Round 1: 82 sts
- Cardigan Body (Hem to Underarm) · Round 1: 100 sts
Finish
- Weave in every yarn end from the granny squares and garment pieces before any seaming begins.
- Hand-sew the cream cotton quilting fabric into the hood and attach all eight wooden buttons securely at the shoulder straps and front band.
- Block the dress and cardigan to measurement with rust-proof pins and a light misting, then let both pieces dry completely.
Bigger or smaller
- Larger
- Move up to a heavier worsted or DK yarn and size up both the G-6 and F-5 hooks, which grows the dress, cardigan, and granny squares together while keeping their proportions.
- Smaller
- Drop to a lighter yarn and a smaller hook throughout, or work the plain sc rows on the bodice front and cardigan body fewer times before the shaping rows begin, which trims the fit without touching the granny square motifs.
FAQs
Asked and answered
These answers came from whoever first published the pattern, kept word for word.
Why does the hood need a fabric lining?
The waffle stitch texture on the inside of the hood can catch small fingers, so a cotton quilting fabric lining is sewn in to cover the back of the stitches. This keeps the inside smooth against a toddler's skin.
Can the pastel colors in Yarns B through F be swapped out?
Yes, any five pastels can stand in for the ones listed as long as the no-repeat rule for adjacent squares is kept. Picking colors with similar weight to the cream base yarn keeps the squares consistent in size.
What happens if gauge does not match before starting?
Since gauge drives the finished chest and length measurements given in the pattern, swap hook sizes up or down and re-swatch in single crochet until 18 sc and 22 rows measure 4 in / 10 cm blocked. Skipping this step risks a dress or cardigan that does not fit as intended.