 STITCH ROUND
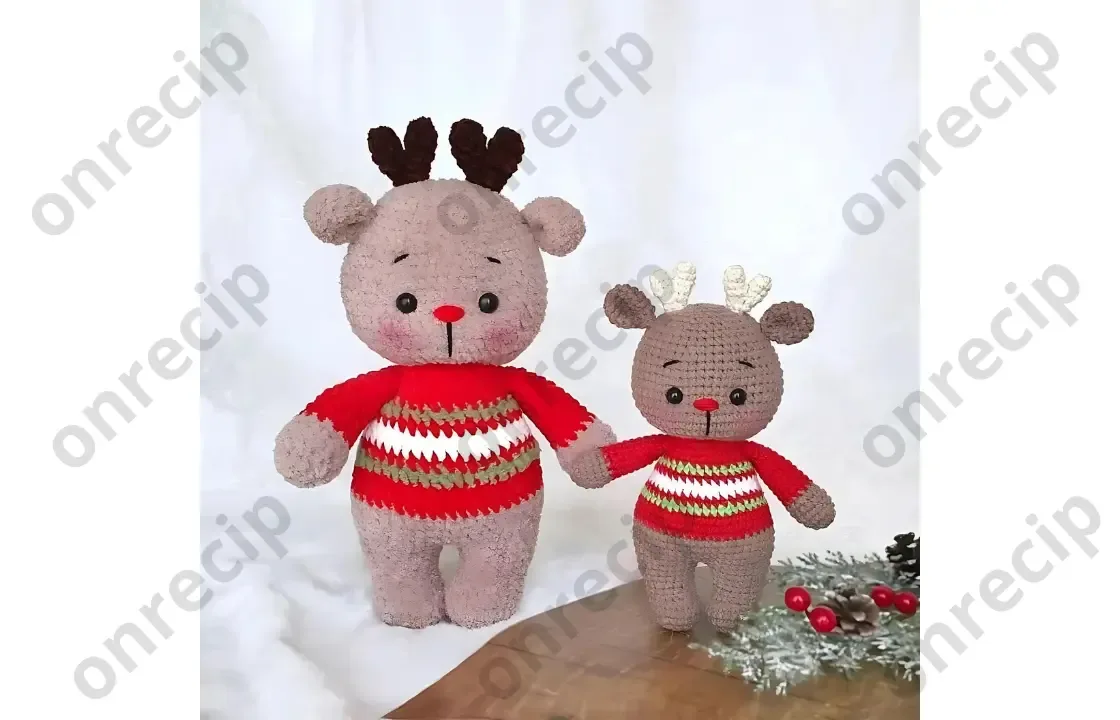
 Striped amigurumi deer crochet pattern with sculpted head
Tick off 12+ rounds of striped body plus a sculpted head to make this amigurumi deer.
- Skill
- Intermediate
- Rounds
- 21 rounds
- Yarn weight
- Worsted
- Hook
- 2.0 mm
- Time
- 4-6 hours

Intermediate
What the original page called it. Nothing here is graded a second time.

21 rounds
Each one gets its own line, with a box beside it to tick as you go.

Worsted
What the sample was made in. Any weight works — the size moves with it.
About this pattern
This amigurumi deer starts from the ground up: two legs are worked first, then joined into one piece and carried into the body, where a twelve-round stretch does most of the heavy lifting in single crochet. From there the head, ears, horns, tail and arms are built as separate pieces and attached once the main body is stuffed and closed. Every part is small enough to finish in one sitting, which makes the whole project easy to break into stages.
The main shaping happens where the two legs meet and become one continuous body, so stitch counts need to line up cleanly at that join. The stripe sequence in red, green and white adds another point to slow down, since each color change needs its tail secured before moving on. The head asks for the most care of all: sculpting around the safety eyes is what turns a round ball into a recognizable deer face, so take that step slowly rather than rushing past it.
- Crochet two legs on their own, then join them so the body continues upward as one piece.
- Work the joined body through a run of striped rounds in red, green and white before closing the top.
- Shape the head as its own piece, sculpting around the safety eyes as the rounds build outward.
- Crochet two arms and set them aside to attach once the body is closed and stuffed.
- Make the ears, horns and tail as small separate pieces ready for sewing on last.
- Pick a yarn and hook pairing from the materials list to set the finished size before starting.
What goes wrong
- Legs joined unevenly into the body Count stitches on both legs before joining them into the body round so the piece sits straight rather than twisting to one side.
- Loose or visible stripe changes Leave a long enough tail at each color change to weave in separately, and pull the first stitch of the new color snug before continuing.
- Skipping the eye sculpting step Take time on the head sculpting around the safety eyes; rushing this leaves the face looking flat instead of giving the deer its expression.
- Mismatched ears or horns pair Lay both ears and both horns side by side before sewing them on to check they match in size and angle.
Yarn, hook and the rest
Copied from the source pattern's own materials list.
For the little deer
- YarnArt Jeans yarn, 2.0 mm crochet hook, 7 mm safety eyes
For the big one
- Alize Softy and YarnArt Dolce Baby yarn, 3.0 mm crochet hook, 10 mm safety eyes
- Red and black embroidery thread
- Stitch marker
- Tapestry needle
- Scissors
- Fiberfill
Progress tracker
0 of the 21 rounds on this page are ticked.
The pattern, round by round
Kept in the order and the wording the source used. Tick a round as you finish it; the ticks stay on this device.
Body
Round 1
Crochet 7 sc more on the right leg, join the left leg (continue from where you stopped crocheting the leg) and crochet 21 sc on it. Crochet 21 sc on the right leg and put the marker here (42)
R 1
Rounds 2–3
6 sc (2 rows) For the first piece: Fasten off, cut the yarn.
R 2
Rounds 3–5
48 sc (3 rows) Change the yarn to red color: Now crochet rows with red, green or white yarn as shown below:
Rounds 6–8
Red 48 sc (3 rows)
Round 9
Green 48 sc
Round 10
Red 3 sc, dec, (6 sc, dec)*5, 3 sc (42)
Round 11
White 42 sc
Round 12
White (5 sc, dec)*6 (36)
Round 13
Red 36 sc
Round 14
Green 36 sc
Round 15
Red 2 sc, dec, (4 sc, dec)*5, 2 sc (30)
Rounds 16–17
Red 30 sc (2 rows)
Round 18
Red (3 sc, dec)*6 (24)
Round 19
Red 24 sc Stuff the body firmly, especially in the neck. Change the yarn to brown color, we will continue with the head:
For the second piece
Round 4
Don’t cut the yarn, connect the first piece (continue from where you stopped crocheting) and crochet 6 sc on it. Crochet 6 sc on the second piece and put the marker here (12)
R 5
Round 6
8 sc Sew the horns to the top of the head with 4 st between them.
R 6
Round 7
12 sc Don’t stuff. Make a sl st, fasten off and cut the yarn, leaving a tail for sewing.Fold the ears in half and sew them to the head in R 16.
R 11
Round 12
for the left leg: crochet only 15 sc Fasten off, cut the yarn.
Round 12
for the right leg: 21 sc Don’t cut the yarn, we will continue with the body:
R 11
Rounds 12–13
48 sc (2 rows) Insert the safety eyes between R 8 and R 9 with 9 sc between them. There are must be 7 sc visible.
R 15
Round 16
10 sc Stuff only ⅔ of the arm. Fasten off and cut the yarn, leaving a tail for sewing.Sew the arms to the body in R 17.
Legs, body and head (one piece)
Head sculpting on the eyes
Mark the points 1-6 with pins, as it’s shown in the picture.
Points 1 and 2 should be in the bottom of the head.
Insert a long threaded needle through point 1 and pull it out from point 3. Then insert into point 4 and pull out from point 2.
Now insert the needle through point 1 and pull it out from point 5. Insert it into point 6 and pull out from point 2.
Pull the thread ends tight and tie a knot. Hide the thread inside the head.
Your cute little deer is ready!
If you share your project on social media, don’t forget to tag the designer – @marizzatoys.
Designed and photos by @marizzatoys
Arms (make 2)
Start crocheting with the brown yarn:
R 6
Change the yarn to red color:
Legs (make 2)
Crochet with the brown yarn: Stuff as you go.
R 6
7 sc, 4 dec, 6 sc (17)
R 7
7 sc, 2 dec, 6 sc (15)
Head
Continue crocheting with the brown color: Stuff as you go.
R 1
1 sc, inc, (2 sc, inc)*7, 1 sc (32)
R 3
2 sc, inc, (4 sc, inc)*7, 2 sc (48)
R 14
3 sc, dec, (6 sc, dec)*5, 3 sc (42)
R 18
2 sc, dec, (4 sc, dec)*5, 2 sc (30)
R 20
1 sc, dec, (2 sc, dec)*5, 1 sc (18)
R 22
Make sure that the head is stuffed firmly.
Close the opening and hide the yarn inside.
Embroider the nose with red thread between R 7 and R 8.
Using a black thread, embroider the muzzle and the eyebrows.
Ears (make 2)
Crochet with the brown yarn:
Horns (make 2)
Crochet with the beige yarn: Stuff a little.
Crochet two pieces the same way.
Tail
Crochet with the brown yarn:
R 4
16 sc Stuff a little.
R 5
Sew the tail on the back, right under the blouse.
Check your count
- Body · Round 1: 42 sts
- R 2 · Round 10: 42 sts
- R 2 · Round 12: 36 sts
- R 2 · Round 15: 30 sts
- R 2 · Round 18: 24 sts
- For the second piece · Round 4: 12 sts
Finish
- Weave in every yarn tail left behind by the red, green and white stripe changes so the color joins stay invisible on the right side.
- Stuff the body and head firmly with fiberfill before closing the last round, paying extra attention around the sculpted eye area so the face keeps its shape.
- Sew the ears, horns, tail and arms into place, matching left and right pairs so the finished deer sits evenly on all four legs.
Bigger or smaller
- Smaller
- Use YarnArt Jeans yarn with the 2.0 mm hook and 7 mm safety eyes instead, which tightens the stitches and shrinks the whole piece.
FAQs
Asked and answered
These answers came from whoever first published the pattern, kept word for word.
Which yarn and hook combination should be used?
Either the YarnArt Jeans with a 2.0 mm hook and 7 mm eyes, or Alize Softy with YarnArt Dolce Baby on a 3.0 mm hook and 10 mm eyes. The first gives a smaller, firmer deer, while the second produces a larger, softer one.
Why does the body start with the legs instead of a base round?
The two legs are crocheted separately and then joined so the body continues upward as one connected piece. This builds the deer's stance directly into the body rather than sewing legs on afterward.
How are the stripes kept neat through the body?
Each color change in the red, green and white sequence needs its own tail woven in rather than carried up the inside. Keeping the first stitch of a new color snug also stops the join from showing.
What makes the head look like a deer rather than a plain ball?
The sculpting step worked around the safety eyes shapes the face after the eyes are placed. This is what gives the head its dimension, so it is worth working slowly through that part.