 STITCH ROUND
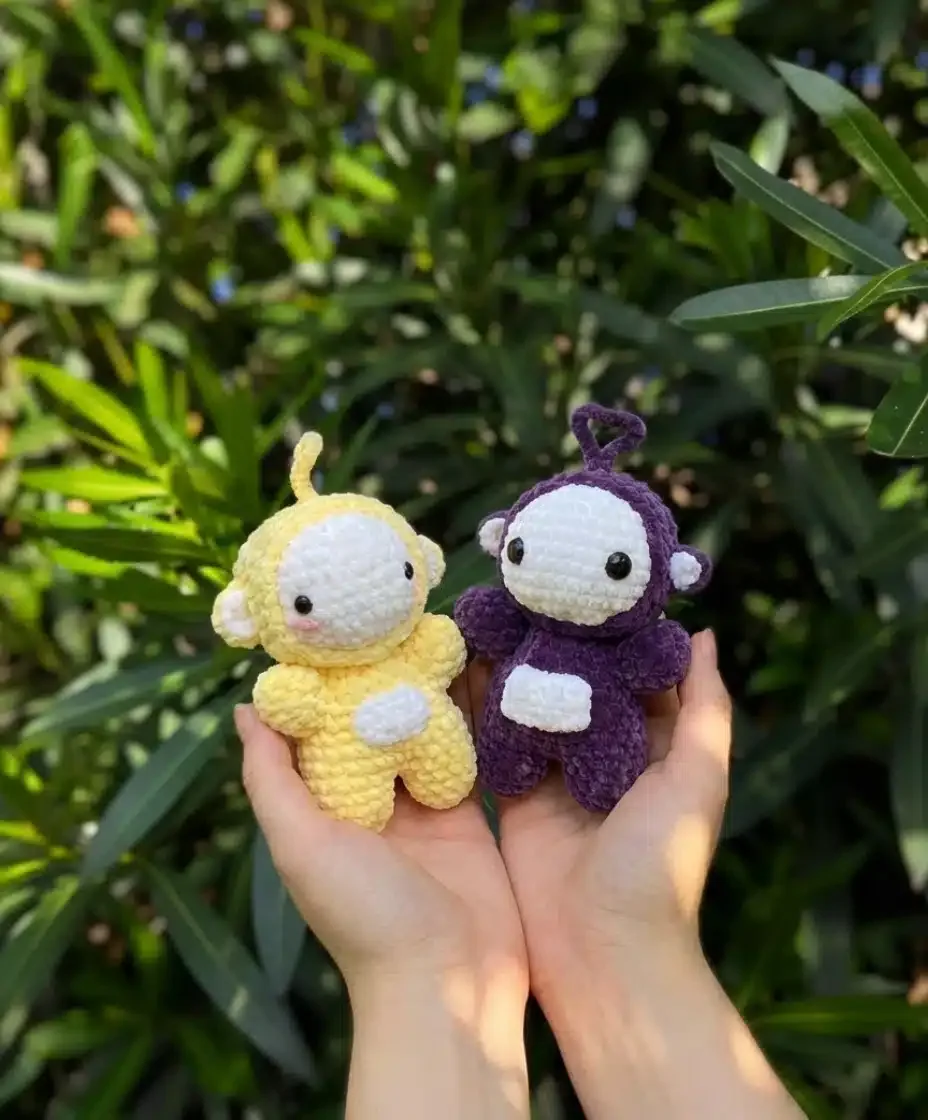
 Crochet Teletubby dolls with matching accessories
Tick off 91 rounds to crochet a Teletubby doll with matching accessories.
- Skill
- Intermediate
- Rounds
- 61 rounds
- Yarn weight
- Bulky
- Hook
- 3.5 mm
- Time
- 6-9 hours

Intermediate
What the original page called it. Nothing here is graded a second time.

61 rounds
Each one gets its own line, with a box beside it to tick as you go.

Bulky
What the sample was made in. Any weight works — the size moves with it.
About this pattern
This pattern builds a full Teletubby doll from nine separate pieces, plus three accessory sets for Po and Laa-Laa. The face takes 15 rounds, the head 13, and each leg-and-body piece 14 rounds worked twice. Arms take 6 rounds each, made twice, while the tummy screen closes in 4 rounds and the ears and blush finish quickly at 2 and 1 rounds each. Accessory fans can add Po's Pink Helmet, the 3-round Blue Scooter, or the no-round Orange Ball and antenna.
Shaping follows the same rhythm throughout: every piece starts in a magic ring and grows through a run of increase rounds before settling into straight rounds. Slow down on the face around Round 9, where safety eyes go in seven stitches apart while stuffing is still light. The Legs and Body piece deserves care too, since Round 11 through Round 14 is where the arms attach and the tummy screen gets centered between Round 9 and Round 12.
- Start with the face, building it in continuous rounds from a magic ring before setting safety eyes in place.
- Crochet the head separately, then tuck the finished face inside and stitch it in place through the last round.
- Stitch the tummy screen and blush pieces on their own, then set them aside for the assembly stage.
- Crochet the arms and ears as small quick pieces, worked separately and stuffed lightly before attaching.
- Finish with the antenna and any character accessories, saving them for last since some sit on the head.
What goes wrong
- Loose magic ring center Pull the tail tight before working the first round so no gap shows at the top of the face or head.
- Safety eyes placed too early Insert eyes between the rounds specified while stuffing is still light, since they cannot be repositioned once the backs are attached.
- Tummy screen sewn off-center Count rounds from the base before pinning the screen so it sits centered on the front rather than drifting to one side.
- Antenna attached before accessories Set the antenna aside until helmets, scooters, or balls are finished, since some of these sit on or near the head.
Yarn, hook and the rest
Copied from the source pattern's own materials list.
- Main color yarn (body): Red (Po), yellow (Laa-Laa), green (Dipsy), or purple (Tinky-Winky)
Face
- White or cream yarn
Tummy screen
- White or gray yarn
Blush
- Pink yarn, felt, or fine pink yarn
Accessories
- Black and orange yarn
- A hook that matches your yarn weight (pattern uses 3.5mm with Bernat Velvet bulky yarn)
- Stuffing
- Safety eyes (0.8 cm)
- Wire or chenille pipe cleaner for antenna
- Scissors
- Darning needle
Progress tracker
0 of the 61 rounds on this page are ticked.
The pattern, round by round
Kept in the order and the wording the source used. Tick a round as you finish it; the ticks stay on this device.
Face
Make 1 with white or cream yarn.
Round 1
6 sc in mr. (6)
Round 2
6 inc. (12)
Round 3
(1 sc, 1 inc) x 6. (18)
Round 4
1 sc, (1 inc, 2 sc) x 5, 1 inc, 1 sc. (24)
Round 5
(3 sc, 1 inc) x 6. (30)
Round 6
2 sc, 1 inc, (4 sc, 1 inc) x 5, 2 sc. (36)
Round 7
sc all around. (36)
Round 8
sc all around. (36)
Round 9
sc all around. (36)
Round 10
sc all around. (36)
Round 11
sc all around. (36)Place the safety eyes between Round 9 and Round 10, spacing them 7 stitches apart; begin stuffing as you go.
Round 12
(1 sc, 1 dec) x 12. (24)
Round 13
(1 sc, 1 dec) x 8. (16)
Round 14
(2 sc, 1 dec) x 4. (12)
Round 15
dec x 6. (6)Sew closed.
Head
Make 1 with your main color yarn (red, yellow, green, or purple).
Round 1
6 sc in mr. (6)
Round 2
6 inc. (12)
Round 3
(1 sc, 1 inc) x 6. (18)
Round 4
1 sc, (1 inc, 2 sc) x 5, 1 inc, 1 sc. (24)
Round 5
(3 sc, 1 inc) x 6. (30)
Round 6
2 sc, 1 inc, (4 sc, 1 inc) x 5, 2 sc. (36)
Round 7
sc all around. (36)
Round 8
sc all around. (36)
Round 9
sc all around. (36)
Round 10
sc all around. (36)
Round 11
sc all around. (36)
Round 12
sc all around. (36)Insert the face inside the head. If the forehead appears too large, add another round of single crochet, continuing until satisfied with the proportions.
Round 13
(4 sc, 1 dec) x 6. (30)Fasten off and leave a long tail for sewing.
Legs and Body
Make 2 legs, each worked through Round 4. Fasten off the first leg; for the second leg, don't fasten off - instead join both legs together with a single crochet and continue working around both legs starting at Round 5.
Fasten off and leave a long tail for sewing. Stuff firmly.
Use the remaining yarn from one leg to sew closed the small hole between the legs.
Round 1
7 sc in mr. (7)
Round 2
7 inc. (14)
Round 3
sc all around. (14)
Round 4
sc all around. (14)
Round 5
sc all around. (28)
Round 6
(6 sc, 1 inc) x 4. (32)
Round 7
sc all around. (32)
Round 8
sc all around. (32)
Round 9
sc all around. (32)
Round 10
(6 sc, 1 dec) x 4. (28)
Round 11
6 sc, 1 dec, 12 sc, 1 dec, 6 sc. (26)
Round 12
3 sc, 1 dec, 4 sc, 1 dec, 5 sc, 1 dec, 4 sc, 1 dec, 2 sc. (22)
Round 13
5 sc, 1 dec, 9 sc, 1 dec, 4 sc. (20)
Round 14
sc all around. (20)
Arms
Make 2 with your main color yarn.
Round 1
7 sc in mr. (7)
Round 2
7 inc. (14)
Round 3
sc all around. (14)
Round 4
sc all around. (14)
Round 5
sc all around. (14)
Round 6
sc all around. (14)
Note: If you'd like longer arms, add one more round of single crochet (making 5 rounds total instead of 4).
Fasten off and leave a long tail for sewing. Stuff lightly.
Ears
Fasten off and leave a long tail for each piece.
Sew the inner and outer ear pieces together before attaching to the head.
Round 1
(Inner ear, make 2): 4 sc in mr. (4)
Round 1
(Outer ear, make 2): 6 hdc in mr. (6)
Blush
Felt option: cut small circles from pink felt.
Embroidery option: embroider with pink yarn.
Makeup option: apply actual blush or makeup.
Round 1
(Crochet option): 6 sc in mr. (6)
Pink Helmet (Po's Accessories)
Make 1 with pink yarn.
Round 1
6 sc in mr. (6)
Round 2
6 inc. (12)
Round 3
(1 sc, 1 inc) x 6. (18)
Instructions for the remaining rounds of the Pink Helmet were not included on the original pattern page.
Tummy Screen
This rectangular piece is NOT worked in continuous rounds.
Fasten off and leave a long tail for sewing.
Alternative: use a rectangular piece of felt measuring approximately 4 x 6 stitches instead.
Round 1
ch 7.
Round 2
Starting on the second chain from your hook, sc 6, ch 1 and turn. (6)
Round 3
6 sc, ch 1 and turn. (6)
Round 4
6 sc and ch 1. (6)
Blue Scooter (Po's Accessories)
Fasten off and hide the ends.
Handlebar: use covered pink wire or a pink pipe cleaner to create the handlebar shape; glue it to the top of the blue crocheted piece.
Wheels: cut two circles from black felt and attach them to create the scooter wheels.
Round 1
ch 13 (adjust the number of chains if your Po is larger or smaller).
Round 2
Starting on the second chain from hook, sc 12, ch 1 and turn. (12)
Round 3
sc 12 and ch 1. (12)
Antenna
Cover approximately 10 cm of wire with the same yarn used for the body, or use a pipe cleaner.
Po: circular shape at the top. Laa-Laa: curly/spiral shape. Dipsy: straight antenna. Tinky-Winky: triangle shape at the top.
Set the antenna aside; attach it later after completing the accessories, as some characters have items that sit on their heads.
Orange Ball (Laa-Laa's Accessories)
Instructions for the Orange Ball were not included on the original pattern page.
Join
Step 1Face and Head: Insert the crocheted face inside the head. Use the remaining tail from the head to sew them together securely.
Step 2Body and Head: Sew the stuffed body to the head, ensuring it's centered and secure.
Step 3Arms: Attach the arms to the body between Round 11 and Round 14, spacing them 8 stitches apart on each side.
Step 4Tummy Screen: Sew the white or gray rectangle between Round 9 and Round 12 of the body. Center it on the front of the body - it should cover approximately 4 x 6 stitches.
Step 5Ears: Sew the assembled ears (inner and outer pieces together) between Round 10 and Round 12 of the head, with 18 stitches between them. Position them slightly below the eyes.
Step 6Blush: Attach, embroider, or glue the blush circles under the eyes, spacing them 9 stitches apart.
Step 7Antenna: Wait to attach the antenna until after completing your chosen Teletubby's accessories, as some have items on their heads. When ready, glue or sew the antenna between Round 9 and Round 10 of the head, centered at the top.
Step 8Now you can place Po's antenna and helmet on her head!
Check your count
- Face · Round 5: 30 sts
- Face · Round 10: 36 sts
- Face · Round 15: 6 sts
- Head · Round 4: 24 sts
- Head · Round 8: 36 sts
- Head · Round 12: 36 sts
Finish
- Weave in loose tails from the face, head, and limbs before assembly so nothing pulls loose during sewing.
- Stuff the head and body firmly as rounds close, easing fill into the neck and shoulders so the shape stays even.
- Sew the head onto the body, then attach the ears, arms, and antenna once the tummy screen and blush are in place.
Bigger or smaller
- Larger or smaller overall
- Swap the 3.5mm hook and bulky yarn for a bigger or smaller combination; every part scales up or down together while stitch counts stay the same.
- Taller body only
- Repeat one of the straight rounds in the Legs and Body piece before the closing rounds to add height without changing the character's width.
FAQs
Asked and answered
These answers came from whoever first published the pattern, kept word for word.
Can all four Teletubbies characters be made from the same pattern?
Yes, only the main color yarn changes - red for Po, yellow for Laa-Laa, green for Dipsy, or purple for Tinky-Winky. The face, head, body, and limb rounds stay identical across all four.
Do the accessories work for every character?
The Pink Helmet and Blue Scooter belong to Po's accessories, and the Orange Ball belongs to Laa-Laa's. Antenna shape also changes by character - circular for Po, spiral for Laa-Laa, straight for Dipsy, and triangle for Tinky-Winky.
What size hook and yarn does this pattern use?
The original is worked with Bernat Velvet bulky yarn and a 3.5mm hook, producing a doll about 16 cm tall. It has also been tested with yarn from bulky to super bulky using hooks from 4mm to 8mm.
When should the safety eyes go in?
Insert them into the face between Round 9 and Round 10, spacing them seven stitches apart. Add them before the face is fully stuffed and closed, since they cannot be adjusted afterward.