 STITCH ROUND
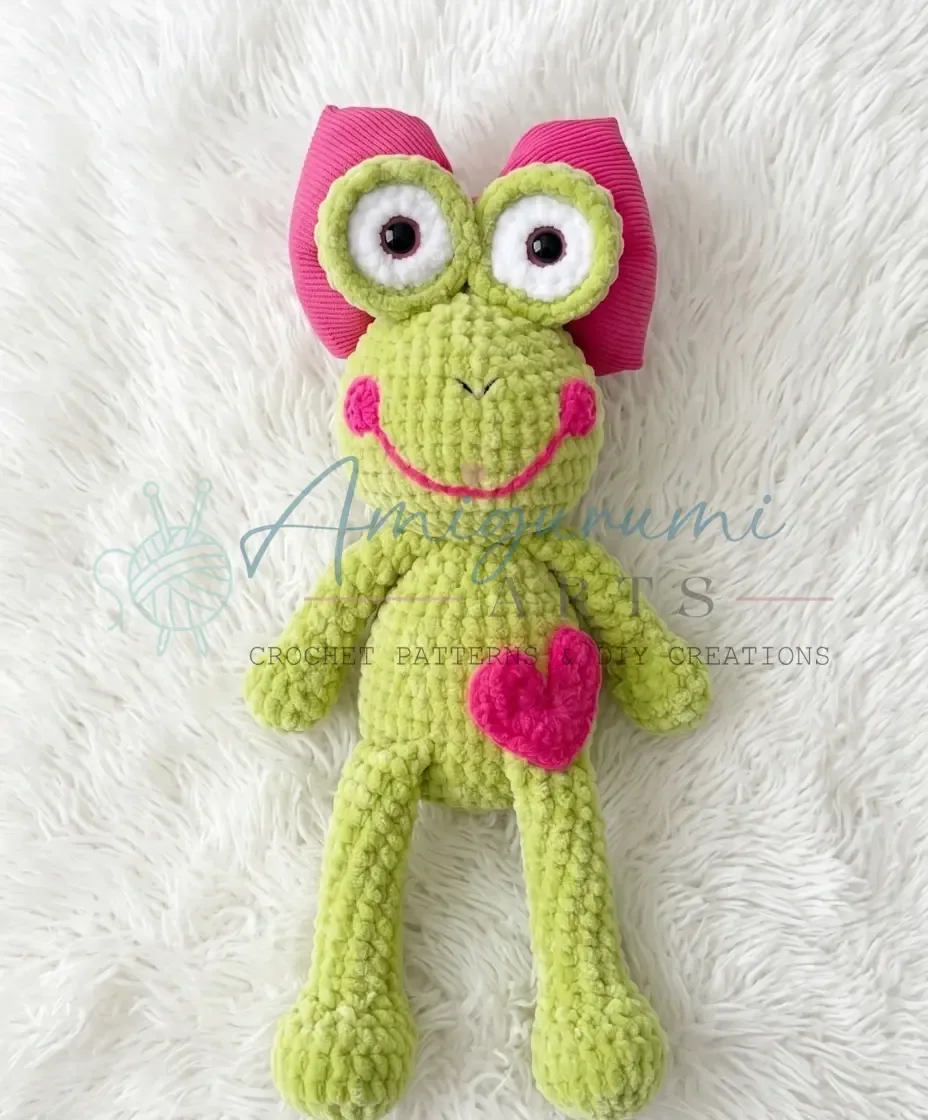
 Crochet frog amigurumi with a one-piece body and head
34 rounds build the body and head in one piece, plus legs, arms, and layered plush eyes.
- Skill
- Intermediate
- Rounds
- 52 rounds
- Yarn weight
- Worsted
- Hook
- 4.0 mm
- Time
- 4-6 hours

Intermediate
What the original page called it. Nothing here is graded a second time.

52 rounds
Each one gets its own line, with a box beside it to tick as you go.

Worsted
What the sample was made in. Any weight works — the size moves with it.
About this pattern
This frog amigurumi builds its body and head as one continuous piece, so there is no seam to sew between them once the 34 rounds are complete. Legs and arms are worked separately, 22 rounds and 13 rounds each, then set aside to attach once the main piece is done. Ticking off each limb pair first makes the long body-and-head climb feel more manageable.
Shaping runs through steady increase rounds early on, then narrows again as the head takes over from the body — this is where stitch count changes come fastest and where a stitch marker earns its keep. Slow down around the rounds where eyes, cheeks, and smile get placed, since a few rounds off in positioning will throw the whole face out of symmetry.
Gauge is not critical for this project — consistent tension matters more than exact measurements. Work stitches tightly enough that no stuffing shows through, and keep every piece worked in a continuous spiral without joining at the end of each round, moving a stitch marker up as you go to track your place.
- Crochet a matching pair of legs first, working each from a small starting ring up through steady increases.
- Crochet a matching pair of arms the same way, using a shorter stitch count sequence than the legs.
- Work the body and head as one continuous spiral piece, shaping through increases and decreases without breaking yarn.
- Layer plush white and green rounds to build each eye, then stuff and close them separately.
- Position and sew the finished eyes onto the head, keeping their placement even on both sides.
What goes wrong
- Losing the round marker in a spiral Move the stitch marker up at the start of every round without exception. Losing track in a continuous spiral makes it easy to drift a round off, which throws the head shaping out of sync with the body.
- Eye layers not aligned before joining Line up the white and green eye pieces edge to edge before working the joining round. A misaligned layer leaves a visible gap of white or green peeking out unevenly.
- Melting plush yarn ends with too much heat Hold the lighter briefly and at a distance when sealing chenille ends. Too much direct flame scorches the plush texture instead of just securing the tip.
Yarn, hook and the rest
Copied from the source pattern's own materials list.
Main yarn
- Worsted weight yarn (such as Wolans Bunny Baby), color #46 — 1 skein
Eye whites
- Small amount of plush/chenille yarn in white
Eye color
- Small amount of plush/chenille yarn in green
- Cheeks & smile: Small amount of cotton-blend yarn (such as Jeans semi-cotton) in pink
Nose
- Small amount of thin yarn in black
Hooks
- US G-6 / 4.0 mm (main) and US B-1 / 2.0 mm (cheeks and smile)
Safety eyes
- 14 mm with or without sparkle — 2
Stuffing
- Polyester fiberfill
- Stitch markers
- Yarn needle / tapestry needle
- Scissors
- Lighter (for securing plush yarn ends)
Progress tracker
0 of the 52 rounds on this page are ticked.
The pattern, round by round
Kept in the order and the wording the source used. Tick a round as you finish it; the ticks stay on this device.
Legs (make 2)
Round 1
Ch 2, work 7 sc in the second ch from hook. (7)
Round 2
Inc in each st around. (14)
Round 3
1 sc, inc repeat around. (21)
Rounds 4–6
Sc in each st around. (21)
Round 7
3 sc, dec, dec, 1 sc, dec, 1 sc, dec, 1 sc, dec, dec, 3 sc. (15)
Round 8
3 sc, dec, dec, 1 sc, dec, dec, 3 sc. (11)
Rounds 9–11
Sc in each st around. (11)
Round 12
5 sc, dec, 4 sc. (10)Stuff the lower foot section now, paying extra attention to the toe area so it rounds out into a full, circular shape.
Rounds 13–22
Sc in each st around. (10)Fold the leg in half so the toe faces forward and the heel faces back. Work 1 additional sc if needed to align the edges evenly. Stuff the narrow upper leg section lightly.Fold flat and work 5 sc across both layers to close. Leave a yarn tail for attaching to the body.
Arms (make 2)
Round 1
Ch 2, work 6 sc in the second ch from hook. (6)
Round 2
Inc in each st around. (12)
Round 3
2 sc, inc repeat 4 times. (16)
Round 4
6 sc, dec, dec, 6 sc. (14)
Round 5
3 sc, dec, dec, dec, dec, 3 sc. (10)
Round 6
Dec, 6 sc, dec. (8)Stuff the hand section.
Rounds 7–13
Sc in each st around. (8)Work 1 additional sc at the end of Rnd 13 if needed so the arm folds evenly. Stuff the narrow arm section lightly.Fold flat and work 4 sc across both layers to close. Leave a yarn tail for attaching to the body.
Body & Head (worked in one continuous piece)
Round 1
Ch 2, work 7 sc in the second ch from hook. (7)
Round 2
Inc in each st around. (14)
Round 3
1 sc, inc repeat around. (21)
Round 4
2 sc, inc repeat around. (28)
Round 5
3 sc, inc repeat around. (35)
Round 6
6 sc, inc repeat 5 times. (40)
Round 7
Sc in each st around. (40)
Round 8
Join legs into this round — 13 sc, work 5 sc across the first leg, 4 sc, work 5 sc across the second leg, 13 sc. (40)Tie the yarn tails from the legs to your working yarn and weave them securely into the body.
Rounds 9–10
Sc in each st around. (40)
Round 11
6 sc, dec repeat 5 times. (35)
Round 12
Sc in each st around. (35)
Round 13
3 sc, dec repeat around. (28)
Rounds 14–15
Sc in each st around. (28)
Round 16
2 sc, dec repeat around. (21)
Round 17
Sc in each st around. (21)Stuff the body firmly before continuing.
Round 18
1 sc, dec repeat around. (14)
Round 19
Join arms into this round — 3 sc, work 4 sc across the first arm, 3 sc, work 4 sc across the second arm. (14)Tie the yarn tails from the arms to your working yarn and weave them securely into the body.Continue working upward — you are now crocheting the head.
Round 20
Inc in each st around. (28)
Round 21
3 sc, inc repeat around. (35)
Round 22
4 sc, inc repeat around. (42)
Round 23
13 sc, inc repeat 3 times. (45)
Rounds 24–27
Sc in each st around. (45)
Round 28
7 sc, dec repeat 5 times. (40)
Round 29
6 sc, dec repeat 5 times. (35)
Round 30
5 sc, dec repeat 5 times. (30)
Round 31
4 sc, dec repeat 5 times. (25)Stuff the head now. Pack the neck area firmly so the head holds its round shape and sits steadily on the body.
Round 32
3 sc, dec repeat 5 times. (20)
Round 33
2 sc, dec repeat 5 times. (15)
Round 34
1 sc, dec repeat 5 times. (10)Leave a yarn tail of approximately 8 inches. Thread through a yarn needle and sew through the front loops of the remaining stitches all the way around, then pull tight to close the opening. Fasten off and weave in the end.
Eye Whites (make 2) — White Plush Yarn
Round 1
Ch 2, work 6 sc in the second ch from hook. (6)
Round 2
Inc in each st around. (12)
Round 3
1 sc, inc repeat around. (18)Insert safety eyes through the center of each white piece now, before joining to the green eye pieces.
Eye Outer Layer (make 2) — Green Plush Yarn
Round 1
Ch 2, work 6 sc in the second ch from hook. (6)
Round 2
Inc in each st around. (12)
Round 3
1 sc, inc repeat around. (18)
Rounds 4–6
Sc in each st around. (18)Place the white eye piece inside the green eye piece, aligning the edges. Join the two layers together and stuff lightly, then work 18 sc around the joined edge to close.
Cheeks & Smile — Pink Cotton-Blend Yarn, US B-1 / 2.0 mm Hook
Ch 2, then work 11 dc in the second ch from hook. Join into a round with a sl st to form the first cheek. Continue by chaining 22 ch to form the connecting bridge. Work the second cheek in the same way at the end of the chain, then join. Sew both cheeks onto the face with matching thread.
Position the smile beginning at Round 23 and place the cheeks beginning at Round 25. Embroider the nose as a small V-shape (checkmark) at Round 27 using thin black yarn.
Join
Step 1Sew the completed eye pieces onto the head after Round 32, positioning them symmetrically. If desired, you may also tack the two eyes together at their inner edges to keep them close and stable.
Step 2Sew the cheeks onto the face as described, centered beneath the eyes beginning at Round 25.
Step 3Embroider the smile in pink starting at Round 23 and the nose in black at Round 27.
Step 4Optionally, add a crocheted or sewn bow, butterfly, or other decorative element behind or between the eyes.
Step 5Weave in all remaining yarn ends.
Check your count
- Legs (make 2) · Round 3: 21 sts
- Legs (make 2) · Round 8: 11 sts
- Legs (make 2) · Rounds 13–22: 10 sts
- Arms (make 2) · Round 2: 12 sts
- Arms (make 2) · Round 4: 14 sts
- Arms (make 2) · Round 6: 8 sts
Finish
- Stuff the legs, arms, and body-and-head piece firmly as work progresses, packing extra fill into the head before closing so the face holds its shape.
- Weave in all loose ends from the main yarn, the plush eye yarns, and the pink cheek yarn, tucking each one inside the piece rather than trimming it flush.
- Attach the stuffed legs and arms to the body, then sew the layered eyes in place before finishing with the embroidered smile and nose.
Bigger or smaller
- Larger
- Move up to a heavier yarn with a hook sized to match, which scales every round outward and produces a bigger finished frog without changing the stitch pattern.
- Smaller
- Drop to a lighter yarn with a smaller hook, which tightens the same round-by-round shaping into a more compact finished piece.
FAQs
Asked and answered
These answers came from whoever first published the pattern, kept word for word.
Can the body and head really be made without any seam?
Yes, the body and head are worked as one continuous spiral piece across 34 rounds. There is no join between them, only the usual increases and decreases that shape the transition from body to head.
Why do the eyes use plush yarn instead of the main yarn?
The white and green plush or chenille yarn gives the eyes a soft, textured finish that contrasts with the smoother main body yarn. The two colors are worked as separate layers, white inside green, then joined and stuffed together.
What is the lighter used for in the materials list?
The lighter is used to secure the ends of the plush or chenille yarn once they are trimmed. A brief, careful pass seals the tip so it will not fray or unravel over time.