 STITCH ROUND
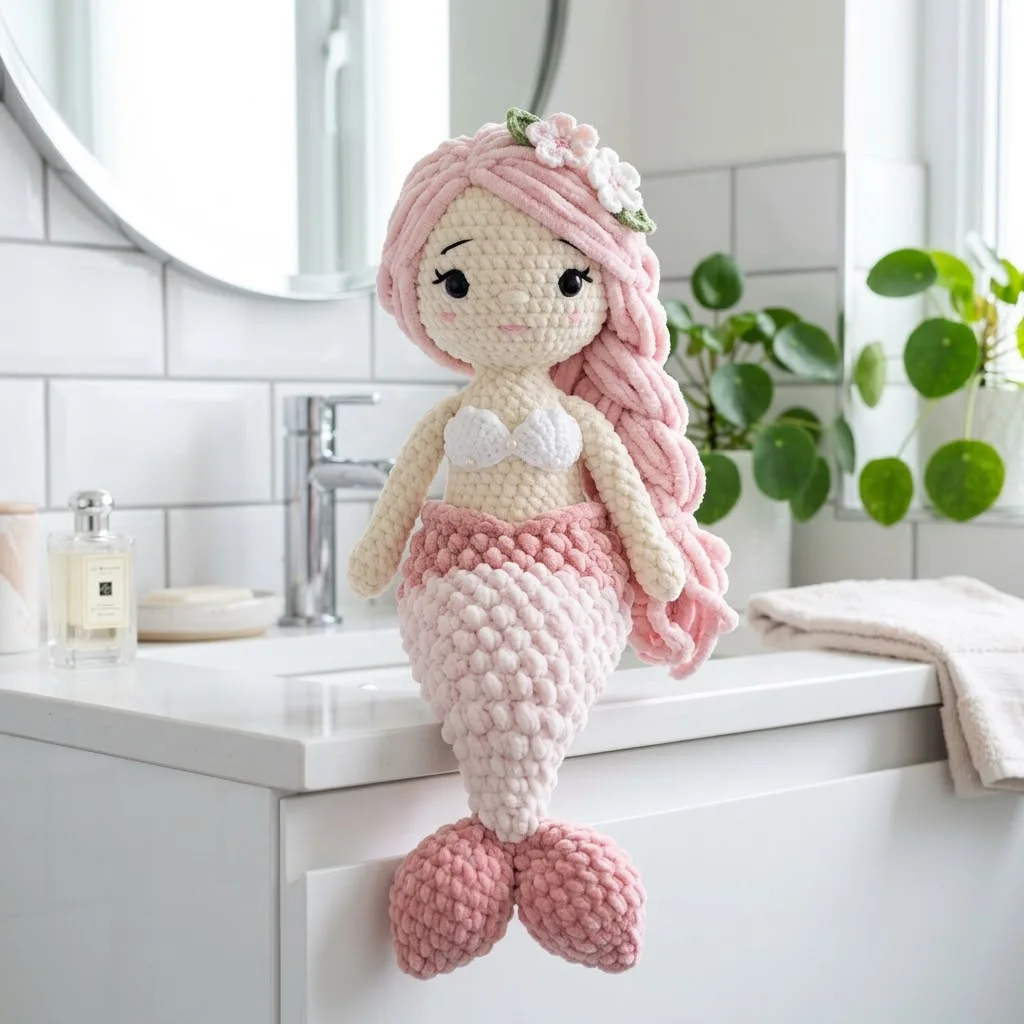
 Pink velvet mermaid doll with a scalloped shell top
30 rounds build this velvet-tailed mermaid doll with a scalloped shell top and flower trim.
- Skill
- Intermediate
- Rounds
- 38 rounds
- Yarn weight
- Mixed (Worsted/Chunky/Super Chunky)
- Hook
- 4.0 mm
- Time
- 6-9 hours

Intermediate
What the original page called it. Nothing here is graded a second time.

38 rounds
Each one gets its own line, with a box beside it to tick as you go.

Mixed (Worsted/Chunky/Super Chunky)
What the sample was made in. Any weight works — the size moves with it.
About this pattern
This mermaid doll builds up in distinct sections: a cream head and body worked over 30 rounds, two short arms, a scalloped shell top, a small flower, and a pair of leaves. Each piece is small enough to finish in one sitting, so the project ticks off part by part rather than demanding one long unbroken round count before anything feels finished.
The body shapes mostly through straightforward increase rounds, but the pace changes at the shell top, where short rows build a flat panel before the edge turns the corner into a scalloped border with extra stitches at each point. That transition, along with the magic ring starts on the arms and flower, is where it pays to slow down and count stitches rather than crochet on autopilot.
- Start with the cream head and body, working increases in a continuous spiral until the shaping is complete.
- Make the two arms separately in cream, leaving long tails ready for sewing them onto the body later.
- Crochet the small pink flower and the pair of green leaves as separate little embellishments.
- Bring in the velvet yarns for the tail, moving between chunky and super chunky weights as the pattern directs.
- Assemble everything last: sew on the arms, attach the shell top, add the safety eyes, and finish with hair.
What goes wrong
- Overstuffing the arms Packing fiberfill tightly into the arms makes them stick out stiffly instead of hanging naturally. Leave them unstuffed or add only a light touch of fill in the hand portion.
- Losing the stitch count on increase rounds Skipping a stitch marker on the head and body lets the increase pattern drift by the time the shaping finishes. Mark the start of every round and recount before moving to the next.
- Using one hook for every yarn weight Crocheting the chunky and super chunky velvet sections with the same hook used for the body leaves the tail loose and gappy. Swap to the 5.0mm or 6.0mm hook as each section calls for it.
- Rushing the scalloped shell edge Working the same number of stitches into every corner of the shell top flattens the scallop shape. Add the extra stitches at each corner point as directed so the curve stays pronounced.
Yarn, hook and the rest
Copied from the source pattern's own materials list.
- for Your Mermaid Doll
Body yarn
- Approximately 150 yards of worsted weight yarn in cream or skin tone (I used a soft acrylic blend)
Tail yarn
- Approximately 200 yards of chunky velvet yarn in light pink and medium rose pink
Hair yarn
- Approximately 100 yards of super chunky velvet yarn in dusty rose pink
Accent yarn
- Small amounts of white worsted weight for the shell top, green for leaves, and pink for the flower
Tools
- 4.0mm crochet hook for the body and shell top
- 5.0mm crochet hook for the velvet yarn tail sections
- 6.0mm crochet hook for the hair
- Stitch markers (at least 4)
- Tapestry needle with large eye
- Polyester fiberfill stuffing
- 10mm safety eyes in black
- Pink embroidery floss for the mouth
- Scissors
- Pins for assembly
Gauge
- Gauge is not critical for amigurumi, but your stitches should be tight enough that stuffing does not show through. If you see gaps, go down a hook size.
Progress tracker
0 of the 38 rounds on this page are ticked.
The pattern, round by round
Kept in the order and the wording the source used. Tick a round as you finish it; the ticks stay on this device.
Head and Body
Using cream yarn and 4.0mm hook.
Round 1
6 sc in magic ring (6 sts)
Round 2
Inc in each st around (12 sts)
Round 3
*Sc 1, inc* repeat around (18 sts)
Round 4
*Sc 2, inc* repeat around (24 sts)
Round 5
*Sc 3, inc* repeat around (30 sts)
Round 6
*Sc 4, inc* repeat around (36 sts)
Round 7
to 14: Sc in each st around (36 sts) for 8 rounds Insert safety eyes between rounds 9 and 10, approximately 8 stitches apart. Make sure they are secure before continuing. This is the point of no return for eye placement.
Round 15
*Sc 4, invdec* repeat around (30 sts)
Round 16
*Sc 3, invdec* repeat around (24 sts)
Round 17
*Sc 2, invdec* repeat around (18 sts) Stuff the head firmly now. Shape it nice and round.
Round 18
Sc in each st around (18 sts)
Round 19
*Sc 2, inc* repeat around (24 sts)Step by step: to 8: Sc in each st around (24 sts) for 4 rounds; *Sc 2, invdec* repeat around (18 sts).*Sc 1, invdec* repeat around (12 sts) Stuff lightly. The fins should be slightly puffy but flexible.Round 11: Invdec around (6 sts) Fasten off, leaving a long tail. Pinch the opening flat and sew closed. Attach both fins to the bottom of the tail, angling them outward like a real mermaid tail.
Round 20
Sc in each st around (24 sts)
Round 21
*Sc 3, inc* repeat around (30 sts)
Round 22
to 30: Sc in each st around (30 sts) for 9 rounds
Round 31
*Sc 3, invdec* repeat around (24 sts)
Round 32
*Sc 2, invdec* repeat around (18 sts) Stuff the body firmly. The body should be slightly smaller than the head for that cute amigurumi proportion.
Round 33
*Sc 1, invdec* repeat around (12 sts) Do not fasten off. Continue directly to the tail.Mermaid Tail Switch to light pink chunky velvet yarn and 5.0mm hook.
Round 34
Sc in each st around (12 sts)
Round 35
Working in back loops only, *sc 1, inc* repeat around (18 sts)
Round 36
Working in back loops only, *sc 2, inc* repeat around (24 sts)
Round 37
Working in back loops only, sc in each st around (24 sts)
Round 38
Working in back loops only, *sc 3, inc* repeat around (30 sts)
Round 39
to 42: Working in back loops only, sc in each st around (30 sts) for 4 rounds The back loop only technique creates those gorgeous horizontal ridges that look like scales. Keep consistent with this throughout the tail.
Round 43
Working in back loops only, *sc 3, invdec* repeat around (24 sts)
Round 44
to 46: Working in back loops only, sc in each st around (24 sts) for 3 rounds Switch to medium rose pink velvet yarn.
Round 47
Working in back loops only, *sc 2, invdec* repeat around (18 sts)
Round 48
to 50: Working in back loops only, sc in each st around (18 sts) for 3 rounds Stuff the tail as you go. Do not overstuff or it will lose that natural curve.
Round 51
Working in back loops only, *sc 1, invdec* repeat around (12 sts)
Round 52
Working in back loops only, sc in each st around (12 sts)Round 53: Invdec around (6 sts) Fasten off, leaving a long tail for sewing. Close the hole and weave in the end.
Tail Fins (Make 2)
Using medium rose pink velvet yarn and 5.0mm hook.
Arms (Make 2)
Using cream yarn and 4.0mm hook.
Round 1
6 sc in magic ring (6 sts)
Round 2
*Sc 1, inc* repeat around (9 sts)
Round 3
to 15: Sc in each st around (9 sts) for 13 rounds Do not stuff the arms, or stuff only the hand portion very lightly. Floppy arms look more natural on dolls.Fasten off, leaving a long tail for sewing. Flatten the opening and sew to the body at round 19, just below where the neck narrows.
Shell Top (Make 2)
Using white yarn and 4.0mm hook.
Part 4
Round 1
Ch 5, sc in 2nd ch from hook and each ch across, turn (4 sts)
Round 2
Ch 1, inc, sc 2, inc, turn (6 sts)
Round 3
Ch 1, inc, sc 4, inc, turn (8 sts)
Round 4
Ch 1, sc in each st across, turn (8 sts)
Round 5
Ch 1, invdec, sc 4, invdec (6 sts) Do not turn. Continue around the entire edge of the shell with sc, working 3 sc into each corner point to create the scalloped shell shape.Sl st to join. Fasten off, leaving a tail for sewing.Sew both shell pieces to the front of the body, positioned at chest level. A few small stitches through the center will secure them nicely.
Small Flower
Using pink yarn and 4.0mm hook.
Ch 4, sl st to form ring.
*Ch 3, dc in ring, ch 3, sl st in ring* repeat 5 times for 5 petals.
Fasten off and weave in ends.
Leaves (Make 2)
Using green yarn and 4.0mm hook.
Ch 6, sl st in 2nd ch from hook, sc, hdc, dc, 5 dc in last ch. Working along the other side of the chain, dc, hdc, sc, sl st.
Fasten off.
Arrange the flower with leaves tucked underneath and sew to the side of the head, nestled into the hair.
Face Details
Using pink embroidery floss and a needle, embroider a small curved line for the mouth. I placed mine between rounds 11 and 12, centered below the eyes.
For the eyebrows, use a small piece of brown or cream yarn. Make two small straight stitches above each eye, slightly angled for expression.
Take your time with the face. It is what gives your mermaid her personality. If you are nervous, practice on a scrap piece first.
Assembly Tips
Sew all pieces securely using a whip stitch or mattress stitch. I recommend pinning everything in place first and checking proportions before committing.
Check your count
- Head and Body · Round 15: 30 sts
- Head and Body · Round 34: 12 sts
- Head and Body · Round 51: 12 sts
- Head and Body · Round 52: 12 sts
- Arms (Make 2) · Round 1: 6 sts
- Arms (Make 2) · Round 2: 9 sts
Finish
- Weave in every yarn tail securely, especially where the velvet tail sections meet the cream body, before trimming close.
- Stuff the head and body firmly with polyester fiberfill while leaving the arms floppy or only very lightly filled.
- Pin the shell top, flower, and leaves in place before stitching them on, then insert the safety eyes and embroider the mouth last.
Bigger or smaller
- Larger
- Repeat one of the straight rounds in the velvet tail section an extra time before shaping continues, which lengthens the mermaid tail without touching the increase pattern.
- Smaller
- Work the entire doll with a finer yarn and a correspondingly smaller hook than listed, which shrinks the same round and row counts into a more petite finished piece.
FAQs
Asked and answered
These answers came from whoever first published the pattern, kept word for word.
Can the hair be made in a different yarn weight?
The hair uses a 6.0mm hook specifically to handle bulky texture, so swapping to a thinner yarn without sizing down the hook leaves loose, uneven loops. Match the hook size to whatever yarn weight ends up being used for the hair.
Why does the pattern call for three different hook sizes?
Hook size changes with yarn weight: 4.0mm for the body and shell top, 5.0mm for the chunky velvet tail, and 6.0mm for the hair. Each size keeps that particular yarn's stitches tight enough to hide stuffing or hold its shape.
Does the shell top need any lining or backing?
No lining is called for; the shell top is worked directly in white worsted yarn with short rows and a scalloped edge finished in single crochet. Attach it straight onto the body once both pieces are complete.
How floppy should the finished arms be?
The pattern recommends leaving the arms unstuffed, or adding only a light touch of fill in the hand portion, so they drape rather than stick out. Overstuffing is the main way to lose that natural, floppy movement.