 STITCH ROUND
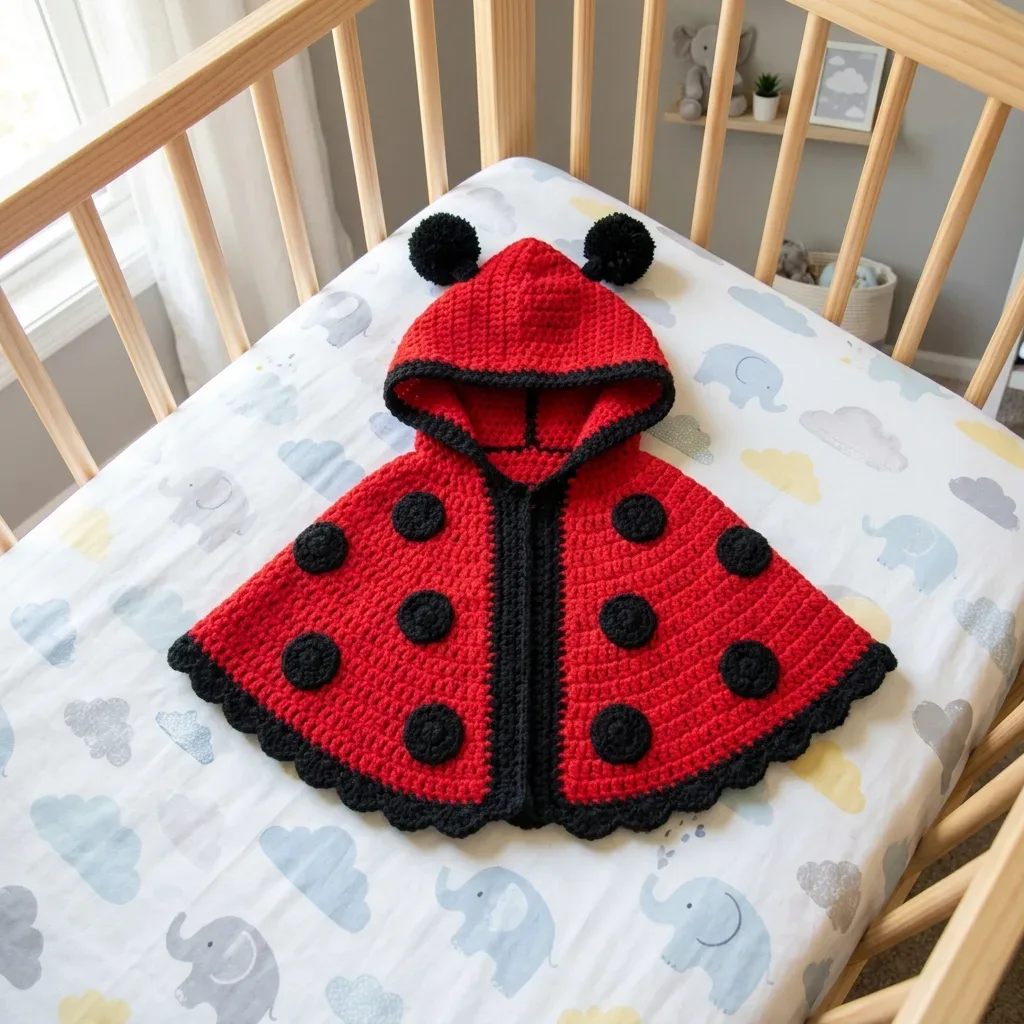
 Baby ladybug poncho crochet pattern with hood
58 rounds build two panels, a hood and polka dot appliques into a baby ladybug poncho.
- Skill
- Intermediate
- Rounds
- 58 rounds
- Yarn weight
- Worsted
- Hook
- 6.0 mm
- Time
- 10-14 hours

Intermediate
What the original page called it. Nothing here is graded a second time.

58 rounds
Each one gets its own line, with a box beside it to tick as you go.

Worsted
What the sample was made in. Any weight works — the size moves with it.
About this pattern
This baby ladybug poncho comes together from two identical panels worked flat across 28 rows each, a hood built in 24 continuous rounds with a 2-round border, and ten tiny polka dot appliques that only take 4 rounds apiece. Every piece uses single crochet, so the stitch itself never gets in the way. The satisfaction here comes from checking off each flat panel, each hood round, and each little black circle as it gets finished.
The panels carry the real shaping: regular increases at the edges build the gentle flare, so keep stitch counts honest row by row. Slow down at the neckline, where stitches are picked up around the edge before the hood goes on, and again during seaming, when the two panels join into a wearable shape. The scalloped edging finishes every raw edge, but it only looks right if the seams underneath lie flat first.
14 single crochet stitches and 16 rows = 4 inches / 10 cm worked flat in single crochet with a size J-10 / 6.0 mm hook, after blocking. Gauge matters here: a poncho that is too small will not fit over baby's head and shoulders, and one that is too large will slip right off. Make a swatch at least 5 x 5 inches and adjust your hook size if needed, going up a hook size if your swatch is too tight, down if it is too loose.
Poncho body length from shoulder to hem: approximately 10 inches / 25.5 cm. Width across each panel at hem: approximately 14 inches / 35.5 cm. Total width when worn, shoulder to shoulder across back: approximately 11 inches / 28 cm. Hood height: approximately 7 inches / 18 cm. Hood circumference at opening: approximately 14 inches / 35.5 cm. The poncho fits babies aged 6 to 12 months, with customization tips included if you need to size up or down.
The poncho is made of two identical flat panels worked from the neckline down, each starting with a chain of 39 for 38 working stitches. Increases happen at the edges of every row, plus additional paired increases on alternating rows. The center front stays open for easy dressing. Color A (Red) is used for all body and hood fabric, while Color B (Black) is used for scallop edging, applique circles, and hood trim. The turning chain of 1 does NOT count as a stitch throughout this pattern. Weave in ends as you go to minimize finishing time.
- Crochet two identical panels flat in single crochet, shaping the sides with regular increases as rows build.
- Seam the two panels together along the shoulders and sides, leaving the neckline open for the hood.
- Work the hood in continuous rounds, increasing at the back to curve it into shape before closing the border.
- Pick up stitches around the neckline and attach the finished hood so it sits neatly on the poncho.
- Crochet ten tiny polka dot circles separately, then pin and sew them onto the panels in a scattered pattern.
- Finish every open edge with the scalloped border stitch, then attach the pompom antennae to the hood.
What goes wrong
- Uneven panel increases Count increase stitches at the start of each row rather than guessing by eye, since a missed increase early on throws off the whole flare by the final rows.
- Appliques placed before seaming Sew on the ten polka dot circles only after the panels are joined and blocked, so placement follows the finished shape instead of a flat, unblocked panel.
- Scalloped edging worked too tight Keep the chain-3 and double crochet shells relaxed, since a tight scallop pulls the straight edge into a ruffle instead of a gentle wave.
- Picking up neckline stitches unevenly Space the picked-up stitches evenly around the neckline before starting the hood, or the hood will sit twisted to one side once attached.
Yarn, hook and the rest
Copied from the source pattern's own materials list.
Yarn
- Worsted weight yarn (category 4)
- Color A (Red): approximately 350 yards / 320 meters
- Color B (Black): approximately 100 yards / 91 meters
Suggested yarn options
- Lion Brand Pound of Love in Scarlet and Black
- Paintbox Yarns Simply DK held double
- Red Heart Soft in Really Red and Black
- Choose a smooth, machine washable yarn for baby items. Avoid fuzzy or textured yarns since they make stitch definition harder to see and applique placement tricky.
Hook
- US size J-10 / 6.0 mm crochet hook
Notions
- Yarn needle for seaming and weaving ends
- 4 stitch markers
- Scissors
- Two black pompoms, approximately 1.5 inches / 4 cm in diameter
- Rust-proof pins for blocking
Progress tracker
0 of the 58 rounds on this page are ticked.
The pattern, round by round
Kept in the order and the wording the source used. Tick a round as you finish it; the ticks stay on this device.
Polka Dot Applique Circle
These black spots bring the whole ladybug look together. You will make 10 total.
With Color B (Black), make a magic ring.
Round 1
Ch 1, work 6 sc into ring, sl st to first sc to join. (6 sc)
Round 2
Ch 1, work 2 sc in each sc around, sl st to first sc to join. (12 sc)
Round 3
Ch 1, (sc in next sc, 2 sc in next sc) 6 times, sl st to first sc to join. (18 sc)
Round 4
Ch 1, (sc in next 2 sc, 2 sc in next sc) 6 times, sl st to first sc to join. (24 sc)Fasten off, leaving a long tail for sewing. Each finished circle measures approximately 1.75 to 2 inches / 4.5 to 5 cm in diameter.
Poncho Panels (Make 2)
Both panels are identical. Work them the same way.
With Color A (Red), ch 39.
Round 1
(RS): Sc in 2nd ch from hook and in each ch across. Turn. (38 sc)
Round 2
Ch 1, 2 sc in first st, sc in each st across to last st, 2 sc in last st. Turn. (40 sc)
Round 3
Ch 1, 2 sc in first st, sc in next 9 sts, 2 sc in next st, sc in next 18 sts, 2 sc in next st, sc in next 9 sts, 2 sc in last st. Turn. (44 sc)
Round 4
Ch 1, 2 sc in first st, sc in each st across to last st, 2 sc in last st. Turn. (46 sc)
Round 5
Ch 1, 2 sc in first st, sc in next 11 sts, 2 sc in next st, sc in next 20 sts, 2 sc in next st, sc in next 11 sts, 2 sc in last st. Turn. (50 sc)
Round 6
Ch 1, 2 sc in first st, sc in each st across to last st, 2 sc in last st. Turn. (52 sc)
Round 7
Ch 1, 2 sc in first st, sc in next 12 sts, 2 sc in next st, sc in next 24 sts, 2 sc in next st, sc in next 12 sts, 2 sc in last st. Turn. (56 sc)
Round 8
Ch 1, 2 sc in first st, sc in each st across to last st, 2 sc in last st. Turn. (58 sc)
Round 9
Ch 1, 2 sc in first st, sc in next 14 sts, 2 sc in next st, sc in next 26 sts, 2 sc in next st, sc in next 14 sts, 2 sc in last st. Turn. (62 sc)
Round 10
Ch 1, 2 sc in first st, sc in each st across to last st, 2 sc in last st. Turn. (64 sc)
Round 11
Ch 1, 2 sc in first st, sc in next 15 sts, 2 sc in next st, sc in next 30 sts, 2 sc in next st, sc in next 15 sts, 2 sc in last st. Turn. (68 sc)
Round 12
Ch 1, 2 sc in first st, sc in each st across to last st, 2 sc in last st. Turn. (70 sc)
Round 13
Ch 1, 2 sc in first st, sc in next 17 sts, 2 sc in next st, sc in next 32 sts, 2 sc in next st, sc in next 17 sts, 2 sc in last st. Turn. (74 sc)
Round 14
Ch 1, 2 sc in first st, sc in each st across to last st, 2 sc in last st. Turn. (76 sc)
Round 15
Ch 1, 2 sc in first st, sc in next 18 sts, 2 sc in next st, sc in next 36 sts, 2 sc in next st, sc in next 18 sts, 2 sc in last st. Turn. (80 sc)
Round 16
Ch 1, 2 sc in first st, sc in each st across to last st, 2 sc in last st. Turn. (82 sc)
Round 17
Ch 1, 2 sc in first st, sc in next 20 sts, 2 sc in next st, sc in next 38 sts, 2 sc in next st, sc in next 20 sts, 2 sc in last st. Turn. (86 sc)
Round 18
Ch 1, 2 sc in first st, sc in each st across to last st, 2 sc in last st. Turn. (88 sc)
Round 19
Ch 1, 2 sc in first st, sc in next 21 sts, 2 sc in next st, sc in next 42 sts, 2 sc in next st, sc in next 21 sts, 2 sc in last st. Turn. (92 sc)
Round 20
Ch 1, 2 sc in first st, sc in each st across to last st, 2 sc in last st. Turn. (94 sc)
Round 21
Ch 1, 2 sc in first st, sc in next 23 sts, 2 sc in next st, sc in next 44 sts, 2 sc in next st, sc in next 23 sts, 2 sc in last st. Turn. (98 sc)
Round 22
Ch 1, 2 sc in first st, sc in each st across to last st, 2 sc in last st. Turn. (100 sc)
Round 23
Ch 1, 2 sc in first st, sc in next 24 sts, 2 sc in next st, sc in next 48 sts, 2 sc in next st, sc in next 24 sts, 2 sc in last st. Turn. (104 sc)
Round 24
Ch 1, 2 sc in first st, sc in each st across to last st, 2 sc in last st. Turn. (106 sc)
Round 25
Ch 1, 2 sc in first st, sc in next 26 sts, 2 sc in next st, sc in next 50 sts, 2 sc in next st, sc in next 26 sts, 2 sc in last st. Turn. (110 sc)
Round 26
Ch 1, 2 sc in first st, sc in each st across to last st, 2 sc in last st. Turn. (112 sc)
Round 27
Ch 1, 2 sc in first st, sc in next 27 sts, 2 sc in next st, sc in next 54 sts, 2 sc in next st, sc in next 27 sts, 2 sc in last st. Turn. (116 sc)
Round 28
Ch 1, sc in each st across. Turn. (116 sc) Fasten off Color A, leaving a long tail for seaming.
Checkpoint: Each panel should measure approximately 7 inches / 18 cm tall and approximately 14 inches / 35.5 cm wide at the hem. The piece will have a gently flared trapezoid shape.
Hood
The hood is worked in continuous rounds.
With Color A (Red), ch 49. Sl st to first ch to form a ring, being careful not to twist.
Round 1
Ch 1, sc in each ch around. (48 sc) Place a stitch marker in the first stitch of each round and move it up as you work.
Round 2
Sc in each sc around. (48 sc)
Round 3
Sc in next 22 sc, 2 sc in next sc, sc in next 2 sc, 2 sc in next sc, sc in rem 22 sc. (50 sc)
Round 4
Sc in each sc around. (50 sc)
Round 5
Sc in next 23 sc, 2 sc in next sc, sc in next 2 sc, 2 sc in next sc, sc in rem 23 sc. (52 sc)
Round 6
Sc in each sc around. (52 sc)
Round 7
Sc in next 24 sc, 2 sc in next sc, sc in next 2 sc, 2 sc in next sc, sc in rem 24 sc. (54 sc)
Round 8
Sc in each sc around. (54 sc)
Round 9
Sc in next 25 sc, 2 sc in next sc, sc in next 2 sc, 2 sc in next sc, sc in rem 25 sc. (56 sc)
Round 10
Sc in each sc around. (56 sc)
Round 11
Sc in next 26 sc, 2 sc in next sc, sc in next 2 sc, 2 sc in next sc, sc in rem 26 sc. (58 sc)
Round 12
Sc in each sc around. (58 sc)
Round 13
Sc in next 27 sc, 2 sc in next sc, sc in next 2 sc, 2 sc in next sc, sc in rem 27 sc. (60 sc)
Round 14
Sc in each sc around. (60 sc)
Round 15
Sc in next 28 sc, 2 sc in next sc, sc in next 2 sc, 2 sc in next sc, sc in rem 28 sc. (62 sc)
Round 16
Sc in each sc around. (62 sc)
Round 17
Sc in next 29 sc, 2 sc in next sc, sc in next 2 sc, 2 sc in next sc, sc in rem 29 sc. (64 sc)
Round 18
Sc in each sc around. (64 sc)
Round 19
Sc in next 30 sc, 2 sc in next sc, sc in next 2 sc, 2 sc in next sc, sc in rem 30 sc. (66 sc)
Round 20
Sc in each sc around. (66 sc)
Round 21
Sc in next 31 sc, 2 sc in next sc, sc in next 2 sc, 2 sc in next sc, sc in rem 31 sc. (68 sc)
Round 22
Sc in each sc around. (68 sc)
Round 23
Sc in next 32 sc, 2 sc in next sc, sc in next 2 sc, 2 sc in next sc, sc in rem 32 sc. (70 sc)
Round 24
Sc in each sc around. (70 sc) Sl st into next st. Fasten off Color A, leaving a long tail for sewing.
Checkpoint: The hood should measure approximately 7 inches / 18 cm in height and approximately 14 inches / 35.5 cm in circumference at the opening.
Hood Border
With Color B (Black) and RS facing, join yarn at the front lower right corner of the hood opening.
Round 1
Ch 1, sc evenly around the hood opening edge, working approximately 1 sc per row end. Work approximately 48 sc around the opening. Sl st to first sc to join. (48 sc)
Round 2
Ch 1, work scallop stitch as follows: (sl st in next sc, ch 3, 4 dc in same st, skip 2 sc) repeat around, sl st to base of first scallop. Fasten off Color B.Step by step for the scallop stitch: 1. Slip stitch into the indicated stitch. 2. Chain 3. 3. Work 4 double crochet stitches into the same stitch as the slip stitch. 4. Skip the next 2 stitches. 5. Slip stitch into the next (third) stitch. 6. Repeat steps 2 through 5 across the edge. Each scallop uses 3 stitches total, so keep this in mind for stitch count planning.
Antennae Attachment
Make 2 pompoms using Color B, each approximately 1.5 inches / 4 cm in diameter.
Sew one pompom firmly to the left side of the hood crown and one to the right side, spaced approximately 2 inches / 5 cm apart. Position them at the very top of the dome. Tie off all ends securely on the inside.
Hood Attachment
Pin the hood to the neckline opening, aligning the front edges of the hood with the front edges of the center neckline opening. The hood opening circumference should fit the neckline opening. Ease any difference evenly around.
Whipstitch the hood to the neckline from the inside using a yarn needle and Color A. Fasten off and weave in ends.
Applique Placement
Block each circle flat before sewing (this helps them lay nicely).
Pin the circles to both panels with RS facing. A suggested arrangement per panel:
Upper row: 2 circles placed symmetrically on either side of center, approximately 2 inches from the shoulder and 2 inches from the center edge
Middle row: 2 circles spaced evenly between the upper row circles, approximately 3 to 4 inches below the upper row
Lower row: 1 circle centered at the lower middle of the panel, approximately 2 inches above the hem Sew each circle using whipstitch. Fasten off and weave in ends to the inside.
Edging
Hem Edging: Join Color B at the lower right front corner of one panel.
Work the same scallop stitch used on the hood border along this edge: slip stitch into the indicated stitch, chain 3, work 4 double crochet stitches into that same stitch, skip the next 2 stitches, then slip stitch into the next (third) stitch. Repeat across the edge. Each scallop uses 3 stitches total.
Join
Step 1Weave in all remaining ends to the wrong side, working tails through several stitches in different directions.
Step 2Wet blocking: Submerge in cool water, gently press out excess water without wringing, lay flat on a towel or blocking mat. Shape panels flat and symmetrical, pin the hem to form a smooth curve. Allow to dry completely, typically 24 hours.
Step 3Steam blocking (for acrylic): Hold a steam iron approximately 1 inch above the surface and apply steam without touching the iron to the yarn. Do not press directly as acrylic can melt.
Check your count
- Polka Dot Applique Circle · Round 1: 6 sts
- Polka Dot Applique Circle · Round 2: 12 sts
- Polka Dot Applique Circle · Round 3: 18 sts
- Polka Dot Applique Circle · Round 4: 24 sts
- Poncho Panels (Make 2) · Round 9: 62 sts
- Poncho Panels (Make 2) · Round 18: 88 sts
Finish
- Weave in every loose end from the panels, hood, and all ten appliques before blocking anything.
- Pin the two black pompom antennae to the top of the hood and stitch them firmly in place.
- Wet block the full poncho flat, pinning the hem into a smooth curve, and let it dry completely before wearing.
Bigger or smaller
- Larger
- Work with a bulkier yarn and a larger hook than the J-10/6.0mm specified, which thickens every single crochet stitch and scales the panels, hood, and appliques up evenly.
- Smaller
- Repeat one fewer increase row on each panel and the hood before moving to the straight rows, which shortens the overall length and width without changing the stitch pattern itself.
FAQs
Asked and answered
These answers came from whoever first published the pattern, kept word for word.
Can the appliques be sewn on before blocking the panels?
Blocking first is best, since wet blocking can shift circle placement if appliques are already attached. Sew the ten polka dots on after the panels are shaped and dry.
Why does the pattern call for stitch markers?
The hood is worked in continuous rounds, and a stitch marker in the first stitch keeps track of where each round starts and ends. Move it up every round so increases land in the right place.
What yarn works best for this poncho?
A smooth, machine washable worsted weight yarn is best for a baby garment that needs regular washing. Avoid fuzzy or textured yarns, since they hide stitch definition and make lining up the appliques harder.
How long does this poncho actually take to finish?
Experienced intermediate crocheters can expect roughly 10 to 14 hours total, spread across two panels, ten appliques, the hood, and all the edging. Breaking it into a few evenings or one weekend both work well.