 STITCH ROUND
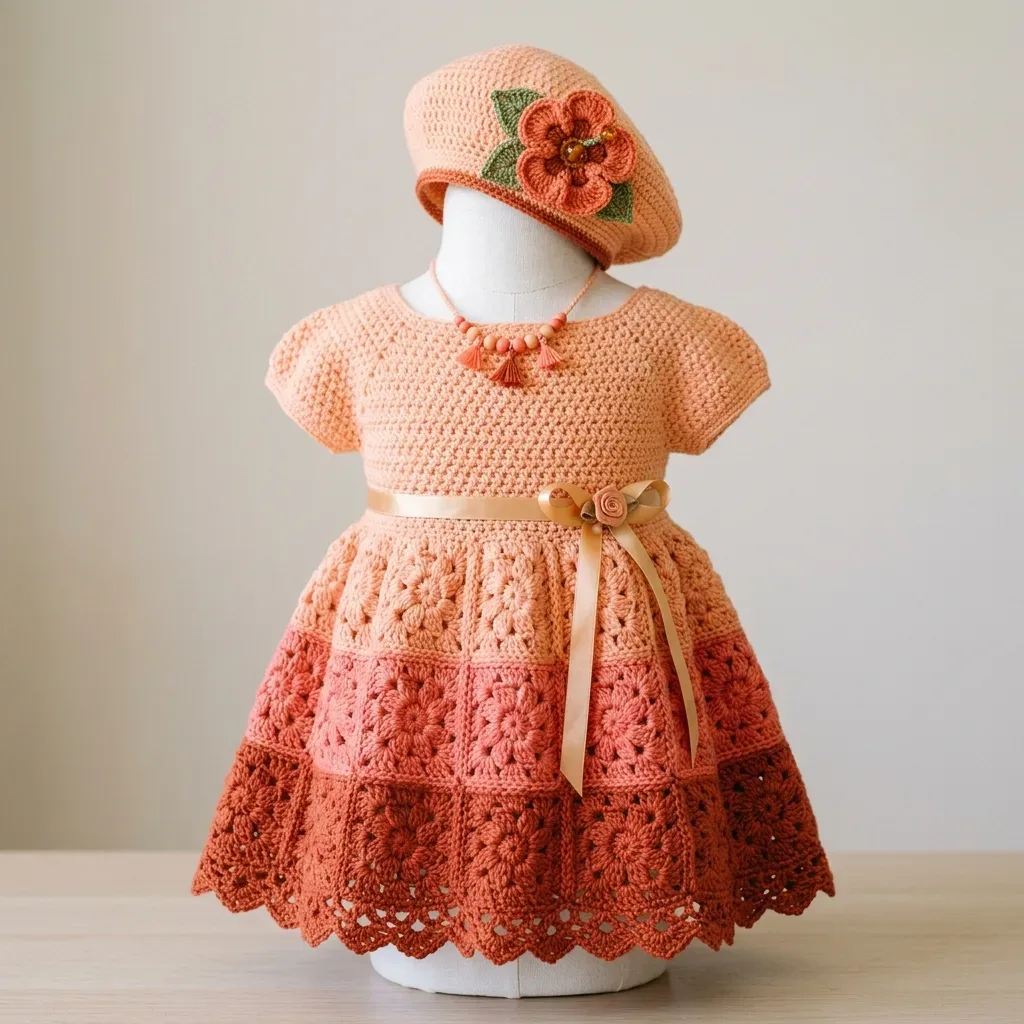
 Coral granny square baby dress with matching beret
37 rounds build this coral granny-square baby dress, matching beret, and flower appliqué.
- Skill
- Advanced
- Rounds
- 35 rounds
- Yarn weight
- DK
- Hook
- 3.5 mm
- Time
- 25-35 hours

Advanced
What the original page called it. Nothing here is graded a second time.

35 rounds
Each one gets its own line, with a box beside it to tick as you go.

DK
What the sample was made in. Any weight works — the size moves with it.
About this pattern
This coral sunset set pairs a half double crochet bodice with a three-tier granny square and lace skirt, then rounds out with a matching beret and flower appliqué. Tally the rounds and the make breaks into clear chunks: 13 for the bodice, 5 for each sleeve, 3 for every granny square motif repeated across the skirt tiers, 13 for the beret, and 3 more for the flower appliqué. Budget roughly 25 to 35 hours overall, since this is a long-haul, heirloom-style project rather than a weekend make.
The bodice shapes itself through raglan increases worked from four markers placed around the neckline ring, so the sleeve and body sections grow at the same rate. Slow down at the transition from bodice to sleeves and at the join-as-you-go Round 3 of each granny square, where chains are swapped for slip stitches at every edge that meets a finished neighbor. The lace border tier asks for a smaller hook, and the beret's flower appliqué is rolled and stitched rather than crocheted flat, so both deserve extra attention near the finish.
This pattern is written for size 12 months, fitting approximately 18 to 20 lb / 8 to 9 kg babies. Dress chest circumference: 19 in / 48 cm. Dress length (shoulder to hem): 16 in / 40.5 cm. Sleeve opening circumference: 6 in / 15 cm. Beret circumference (unstretched): 16 in / 40.5 cm. Beret diameter laid flat: approximately 7 in / 18 cm.
E-4 / 3.5 mm hook and DK weight yarn: 18 hdc x 14 rows = 4 in / 10 cm in half double crochet worked in the round. 1 completed granny square (worked to 3 rounds) = 3 in / 7.5 cm square blocked. With D-3 / 3.25 mm hook: 1 lace repeat of 12 stitches = 2.5 in / 6.5 cm. Gauge matters enormously for garment fit. Please swatch before diving into the bodice. Adjust your hook size up or down until you match these numbers.
- Build the bodice first, working half double crochet rounds with raglan increase points marked at the sleeve sections.
- Set the sleeves into the marked underarm stitches, shaping the cap with a few decrease rounds.
- Crochet granny square motifs in two colors for the first two skirt tiers, joining each square as its final round is worked.
- Crochet the beret separately on the larger hook, then make the matching rolled flower appliqué.
- Block the whole set before threading the satin ribbon through the neckline.
What goes wrong
- Forgetting the slip-stitch join Round 3 of any square that touches a finished neighbor, swap the chains for slip stitches at the corner and side spaces that meet that neighbor only. Leave every other edge worked with the regular chains so the square can still join on its remaining sides.
- Losing the raglan markers Move each of the four markers up into the matching stitch as soon as it is worked in a new round. If a marker drops, count back from the neckline ring to find the correct raglan point before increasing further.
- Flower appliqué unrolling after rolling Stitch through the base every half turn while rolling the strip into the flower, not just at the start and end. Flatten the back and stitch it closed with several passes so the rolled shape holds under handling.
Yarn, hook and the rest
Copied from the source pattern's own materials list.
Yarn (DK weight cotton or cotton-blend)
- Yarn A (lightest peach): approximately 250 yards / 229 m
- Yarn B (medium coral): approximately 180 yards / 165 m
- Yarn C (deep terracotta): approximately 200 yards / 183 m
Hooks
- US size E-4 / 3.5 mm crochet hook (for dress body and beret)
- US size D-3 / 3.25 mm crochet hook (for lace border tier only)
Notions
- 1 yard / 91 cm of 5/8 in / 1.5 cm wide satin ribbon in pale peach or gold
- Yarn needle for weaving ends
- At least 4 locking stitch markers
- Sharp scissors
- Straight pins for blocking
- Optional: 6 to 8 mm amber or topaz beads for necklace, small rose ribbon embellishment
Recommended Yarn Options
- Lion Brand 24/7 Cotton DK works beautifully here. The mercerized cotton gives excellent stitch definition for those granny squares. Paintbox Yarns Simply DK is a budget-friendly acrylic alternative that washes well for baby items. Drops Safran has a slight sheen from its polyamide content if you want a more polished look.
- Avoid fuzzy or bouclé yarns. They will obscure all that lovely granny square and lace detail you worked so hard to create.
Progress tracker
0 of the 35 rounds on this page are ticked.
The pattern, round by round
Kept in the order and the wording the source used. Tick a round as you finish it; the ticks stay on this device.
Granny Square (3-Round Version)
This is the building block for your skirt tiers.
Round 1
With designated color, make a MR. Ch 3 (counts as first dc), work 2 dc in ring, ch 2, [3 dc in ring, ch 2] 3 times. Sl st to top of beg ch-3 to join. Pull MR closed. (4 clusters of 3 dc, 4 ch-2 corner spaces)
Round 2
Sl st to first ch-2 sp. Ch 3 (counts as dc), work 2 dc in same sp, ch 2, 3 dc in same sp (corner made). Ch 1. [Work corner of (3 dc, ch 2, 3 dc) in next ch-2 sp. Ch 1.] 3 times. Sl st to top of beg ch-3. (8 clusters of 3 dc, 4 ch-2 corner sp, 4 ch-1 side sp)
Round 3
Sl st to first ch-2 sp. Ch 3 (counts as dc), work 2 dc in same sp, ch 2, 3 dc in same sp (corner). Ch 1, 3 dc in ch-1 side sp, ch 1. [Corner in next ch-2 sp, ch 1, 3 dc in ch-1 side sp, ch 1.] 3 times. Sl st to top of beg ch-3. (12 clusters of 3 dc, 4 ch-2 corner sp, 8 ch-1 sp)
Join-As-You-Go (JAYG) When beginning Round 3 of a new square that will join to an adjacent finished square, replace the chains at join points with slip stitches into the neighboring square: At a corner join: ch 1, sl st into corner sp of neighbor, ch 1 (replacing ch 2). At a side join: sl st into corresponding ch-1 sp of neighbor (replacing ch 1). This creates a nearly invisible flat join. Only join along edges that meet another square.
Fasten off leaving a 12 in / 30 cm tail for joining.
Section 1: Bodice
Work with YA and E-4 / 3.5 mm hook throughout this section.
Neckline foundation ring: Ch 72. Without twisting, sl st to first ch to form a ring.
Round 1
Neckline Ch 2 (does not count as st now or ever). Hdc in each ch around. Sl st to first hdc. (72 hdc)
Round 2
Set up yoke increase points Ch 2. Hdc in first 9 sts, place marker (raglan point 1). Hdc in next 12 sts, place marker (raglan point 2). Hdc in next 18 sts, place marker (raglan point 3). Hdc in next 12 sts, place marker (raglan point 4). Hdc in next 9 sts, hdc in remaining 12 sts. Sl st to first hdc. (72 hdc)
The 12-st sections between markers 1-2 and 3-4 are the sleeves. The 18-st sections are front and back.
Round 3
(yoke increase rnd 1): Ch 2. [Hdc to 1 st before marker, 2 hdc in next st, move marker to new st, 2 hdc in next st] 4 times. Hdc to end. Sl st to first hdc. (80 hdc)
Round 4
Ch 2. Hdc in each st around. Sl st to first hdc. (80 hdc)
Round 5
(yoke increase rnd 2): Ch 2. [Hdc to 1 st before marker, 2 hdc in next st, move marker, 2 hdc in next st] 4 times. Hdc to end. Sl st to first hdc. (88 hdc)
Round 6
Ch 2. Hdc in each st around. Sl st to first hdc. (88 hdc)
Round 7
(yoke increase rnd 3): Ch 2. [Hdc to 1 st before marker, 2 hdc in next st, move marker, 2 hdc in next st] 4 times. Hdc to end. Sl st to first hdc. (96 hdc)
Round 8
Ch 2. Hdc in each st around. Sl st to first hdc. (96 hdc)
Round 9
(yoke increase rnd 4): Ch 2. [Hdc to 1 st before marker, 2 hdc in next st, move marker, 2 hdc in next st] 4 times. Hdc to end. Sl st to first hdc. (104 hdc)
Round 10
Ch 2. Hdc in each st around. Sl st to first hdc. (104 hdc)
Round 11
(yoke increase rnd 5): Ch 2. [Hdc to 1 st before marker, 2 hdc in next st, move marker, 2 hdc in next st] 4 times. Hdc to end. Sl st to first hdc. (112 hdc)After rnd 11: Front panel has 28 hdc, each sleeve has 22 hdc, back panel has 40 hdc.
Round 12
Divide for sleeves and body Ch 2. Hdc across 28 front sts. Ch 4 (underarm bridge). Skip 22 sleeve sts. Hdc across 40 back sts. Ch 4 (underarm bridge). Skip 22 sleeve sts. Sl st to first hdc. (68 hdc plus 8 ch, total 76 working sts)
Rounds 13–18
Ch 2. Hdc in each st around. Sl st to first hdc. (76 hdc) Fasten off YA. Leave a long tail for attaching the skirt panel.
Checkpoint: The bodice tube should measure approximately 6 in / 15 cm tall with a lower edge circumference of approximately 17 in / 43 cm.
Section 2: Short Sleeves
Work both sleeves identically.
With RS facing, attach YA to any skipped sleeve st at the underarm.
Round 1
Ch 2. Hdc in each of the 22 skipped sleeve sts. Hdc in each of the 4 underarm ch. Sl st to first hdc. (26 hdc)
Round 2
Ch 2. Hdc in each st around. Sl st to first hdc. (26 hdc)
Round 3
Sleeve cap shaping Ch 2. [Hdc2tog, hdc in next 11 sts] twice. Sl st to first hdc. (24 hdc)
Round 4
Ch 2. Hdc in each st around. Sl st to first hdc. (24 hdc)
Round 5
Sleeve edge Ch 1 (does not count as st). Sc in each st around. Sl st to first sc. Fasten off. (24 sc)Repeat for second sleeve.
Section 5: Beret
Work with YA and E-4 / 3.5 mm hook.
Round 1
Make a MR. Ch 2. Work 10 hdc in ring. Sl st to first hdc. Pull ring closed. (10 hdc)
Round 2
Ch 2. Work 2 hdc in each st around. Sl st to first hdc. (20 hdc)
Round 3
Ch 2. [2 hdc in next st, hdc in next st] 10 times. Sl st to first hdc. (30 hdc)
Round 4
Ch 2. [2 hdc in next st, hdc in next 2 sts] 10 times. Sl st to first hdc. (40 hdc)
Round 5
Ch 2. [2 hdc in next st, hdc in next 3 sts] 10 times. Sl st to first hdc. (50 hdc)
Round 6
Ch 2. [2 hdc in next st, hdc in next 4 sts] 10 times. Sl st to first hdc. (60 hdc)
Round 7
Ch 2. [2 hdc in next st, hdc in next 5 sts] 10 times. Sl st to first hdc. (70 hdc)
Round 8
Ch 2. [2 hdc in next st, hdc in next 6 sts] 10 times. Sl st to first hdc. (80 hdc)
Rounds 9–11
Ch 2. Hdc in each st around. Sl st to first hdc. (80 hdc)
Round 12
(begin brim decrease): Ch 2. [Hdc2tog, hdc in next 6 sts] 10 times. Sl st to first hdc. (70 hdc)
Round 13
Ch 2. [Hdc2tog, hdc in next 5 sts] 10 times. Sl st to first hdc. (60 hdc)
Round 14
Ch 2. [Hdc2tog, hdc in next 4 sts] 10 times. Sl st to first hdc. (50 hdc)
Round 15
Brim edge Ch 1. Sc in each st around. Sl st to first sc. Fasten off. (50 sc)
Section 6: Beret Flower Applique
Flower (Crochet Rose method, worked in YC):
Row 1
Ch 30. Row 1: Work 2 dc in 4th ch from hook, then [3 dc in next ch] to end. (approximately 84 dc plus foundation chain)Fasten off leaving a long tail. Roll the strip from one end, using the tail to stitch through the base as you roll. Flatten the base and stitch securely closed at the back.Attach flower to beret slightly off-center.
Section 3: Granny Square Skirt
Tier 1 Squares: Make 8 squares in YA using the granny square instructions. Join in a strip using JAYG, then close into a ring.
Tier 2 Squares: Make 10 squares in YB. Join in a strip and close into a ring. Attach to the bottom edge of Tier 1 using JAYG. Space the extra 2 squares evenly around the ring to create the A-line flare.
Attaching Skirt to Bodice: Pin the top edge of Tier 1 to the lower bodice edge, aligning seams at back.
Join rnd: Attach YA to lower bodice edge. Ch 1. Working through both layers, sc evenly around, placing approximately 3 sc per granny square top edge side. Sl st to first sc. Fasten off. (approximately 24 sc)
Thread the satin ribbon through Rnd 18 of the bodice, weaving every 2 stitches. Tie at front.
Section 4: Lace Border Tier (Tier 3)
Shell Stitch Shell Stitch: Work (2 dc, ch 2, 2 dc) all in the same stitch or space.
Switch to D-3 / 3.25 mm hook and YC.
Foundation Rnd: Attach YC to any bottom corner ch-sp of Tier 2. Ch 1. Work sc evenly around, placing 3 sc per dc cluster and 2 sc in each corner ch-sp. Adjust to reach 120 sc total. Sl st to first sc. (120 sc)
Lace Rnd 1: Ch 4 (counts as first dc plus ch 1). Sk next sc. [Dc in next sc, ch 1, sk next sc] around. Sl st to 3rd ch of beg ch-4. (60 dc, 60 ch-1 sp)
Lace Rnd 2: Ch 1. Sc in same sp. Sk next ch-1 sp. [Shell (2 dc, ch 2, 2 dc) in next dc. Sk next ch-1 sp. Sc in next dc. Sk next ch-1 sp.] Rep around, ending with sl st to first sc. (20 shells, 20 sc)
Lace Rnd 3: Sl st to ch-2 sp of first shell. Ch 3 (counts as dc). Work (2 dc, ch 2, 3 dc) in same ch-2 sp. Ch 1. Sc in next sc. Ch 1. [Work (3 dc, ch 2, 3 dc) in ch-2 sp of next shell. Ch 1. Sc in next sc. Ch 1.] Rep around. Sl st to top of beg ch-3. (20 shell clusters, 20 sc)
Lace Rnd 4: Sl st to ch-2 sp. Ch 1. Sc in ch-2 sp. Ch 5. [Sc in next ch-2 sp. Ch 5.] Around. Sl st to first sc. (20 sc, 20 ch-5 sp)
Lace Rnd 5 (scallop hem): Ch 1. [Work 7 dc in ch-5 sp. Sc in next sc.] Around. Sl st to first sc. Fasten off YC. (20 scallops of 7 dc, 20 sc)
Join
Step 1Weave in all ends securely, working in opposite directions for at least 1 in / 2.5 cm.
Step 2Wet blocking is strongly recommended. Submerge the dress in cool water, gently press out excess without wringing. Lay flat on a blocking mat, pinning each lace scallop outward. Allow to air dry completely.
Step 3Block the beret over a balloon or 7 in / 18 cm diameter bowl. Dampen gently and allow to dry.
Step 4Thread the satin ribbon after blocking to avoid puckering.
Check your count
- Section 1: Bodice · Round 3: 80 sts
- Section 1: Bodice · Round 6: 88 sts
- Section 1: Bodice · Round 9: 104 sts
- Section 1: Bodice · Round 11: 112 sts
- Section 2: Short Sleeves · Round 1: 26 sts
- Section 2: Short Sleeves · Round 2: 26 sts
Bigger or smaller
- Larger or smaller overall
- Move up a hook size and pair it with a bulkier yarn weight to scale every round's gauge at once, enlarging the bodice, sleeves, skirt tiers, and beret together without changing stitch counts. Drop a hook size and a lighter yarn to shrink the whole set the same way.
- Wider or narrower skirt
- Work an extra granny square motif into a tier (or leave one out) to widen or narrow the A-line flare at the hem, since adding squares is what already separates the first tier from the second. This changes the skirt's width without touching the bodice or sleeve rounds.
FAQs
Asked and answered
These answers came from whoever first published the pattern, kept word for word.
Can the dress be made in one color instead of three?
Yes, Yarn A, B, and C can all be the same color if a solid look is preferred. The ombre effect only comes from using three distinct shades across the bodice and skirt tiers, so swapping to one color does not change the construction.
Why does the pattern call for two different hook sizes?
The E-4 / 3.5 mm hook is used for the bodice, sleeves, and beret, while the smaller D-3 / 3.25 mm hook tightens up the lace border tier so it does not gape against the granny square tiers above it. Keeping the two hooks separate preserves that contrast in density.
How are the granny squares joined without sewing them together afterward?
Each square is joined as its final round is worked, replacing the usual chains with slip stitches into the neighboring square's corner and side spaces. This is only done on edges that actually meet another square, leaving outer edges worked normally.
What yarn gives the clearest stitch definition for the granny squares?
A mercerized cotton DK yarn shows off the granny square texture and lace border most clearly. A smooth acrylic DK is a budget-friendly substitute that still holds up to washing for baby items, but fuzzy or bouclé yarns should be avoided since they blur the detail.