 STITCH ROUND
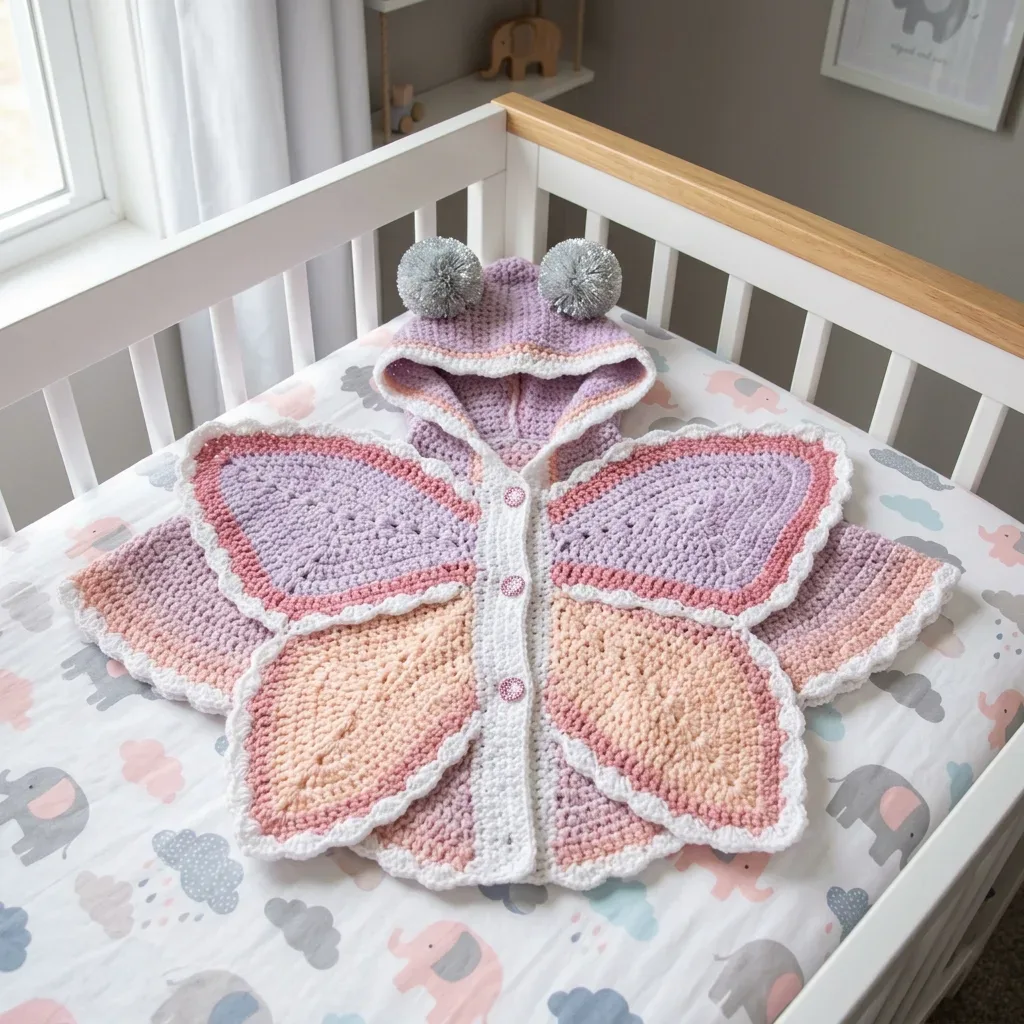
 Crochet baby poncho with butterfly wings and hood
73 rounds shape a hooded baby poncho with butterfly wings and scallop edging.
- Skill
- Intermediate
- Rounds
- 86 rounds
- Yarn weight
- DK
- Hook
- 3.5 mm
- Time
- 12-18 hours

Intermediate
What the original page called it. Nothing here is graded a second time.

86 rounds
Each one gets its own line, with a box beside it to tick as you go.

DK
What the sample was made in. Any weight works — the size moves with it.
About this pattern
This hooded poncho lays flat into a butterfly shape, built from four separate wing panels, a fitted bodice, and a pointed hood. The upper wings take 23 rounds each, the lower wings 22, the bodice 18, and the hood 10 — four pieces plus a yoke and hood to tick off before assembly begins. Every panel is worked flat in rows, so progress is easy to track row by row rather than in the round.
The shaping sits in the increases worked at both edges of every wing panel row, which pushes the fabric from a narrow starting chain out into a rounded upper wing or a pointed lower wing. Slow down through the bodice rows where the center-front opening is established, and again on the scallop border, since a missed skip or an extra stitch in the 5-dc shell throws off the scalloped edge on every wing and the front band.
- Work two upper wing panels flat, shaping each into a rounded outline with edge increases.
- Crochet two lower wing panels in the same way, ending in a sharper pointed tip.
- Build the bodice in rows to form the open center-front neckline and shoulder shaping.
- Shape the pointed hood as its own piece, worked separately from the wings and bodice.
- Join all four wing panels and the hood to the finished bodice along the seam lines.
- Add scallop edging to every wing, the hood, and the front bands, then sew on buttons and pom-pom antennae.
What goes wrong
- Counting the turning chain as a stitch The ch-1 at the start of each row is a turning chain only, not a stitch. Skip it when counting stitches across the row.
- Missing an increase on a wing panel Each wing panel increases at both ends on every shaping row. Skipping even one increase changes that panel's outline and leaves the pair mismatched.
- Losing the scallop repeat mid-row The scallop border repeats skip 2, 5 dc in one stitch, skip 2, sc as a single four-step unit. Mark the start of each repeat so the shell count stays even across the edge.
- Seaming wing panels on the right side Join the wings and hood to the bodice from the wrong side. A seam worked from the right side shows through the finished scallop edging.
Yarn, hook and the rest
Copied from the source pattern's own materials list.
- Option 1: Paintbox Yarns Simply DK (100% Acrylic, 137 yd / 125 m per 50 g skein). Widely available, soft, excellent stitch definition, machine washable. Ideal for a practical baby garment.
- Option 2: Lion Brand 24/7 Cotton DK (100% Mercerized Cotton, 186 yd / 170 m per 100 g skein). Breathable and soft for sensitive skin. Slight sheen gives a beautiful finish to the wing panels.
- Option 3: Drops Safran (70% Cotton / 30% Polyamide, 175 yd / 160 m per 50 g skein). Sturdy and soft with a slight luster. Holds shape well after washing.
Substitution note
- Any DK weight yarn that achieves the stated gauge may be substituted. Avoid loosely spun or fluffy yarns as stitch definition is important for the butterfly wing shaping. Always work a gauge swatch before beginning.
Yarn
- DK weight (CYCA #3 / Light), approximately 100% cotton or cotton-blend recommended for softness against baby skin.
- Color A (Lavender): approximately 120 yards or 110 meters
- Color B (Dusty Rose/Mauve): approximately 80 yards or 73 meters
- Color C (Peach/Apricot): approximately 100 yards or 91 meters
- Color W (White): approximately 150 yards or 137 meters
- Color G (Light Gray): approximately 20 yards or 18 meters (for pom-poms only)
Hook
- US size E-4 / 3.5 mm
Notions
- Yarn needle for seaming
- 5 small buttons, approximately 3/8 inch or 10 mm diameter (pink shown in sample)
- Stitch markers (at least 6)
- Scissors
- Cardboard or pom-pom maker for antennae (approximately 1.25 inches or 3 cm diameter)
Progress tracker
0 of the 86 rounds on this page are ticked.
The pattern, round by round
Kept in the order and the wording the source used. Tick a round as you finish it; the ticks stay on this device.
Section 1: Upper Wing Panels (Make 2)
Upper wings are the larger, rounder wing panels at the top. They are worked in Color A (Lavender) with Color B (Dusty Rose) accent stripes and Color W border.
With Color A, ch 12 loosely.
Round 1
(RS): Starting in 2nd ch from hook, sc across. (11 sc)
Round 2
(WS): Ch 1, turn. Inc in first st, sc to last st, inc in last st. (13 sc)
Round 3
(RS): Ch 1, turn. Inc in first st, sc to last st, inc in last st. (15 sc)
Round 4
(WS): Ch 1, turn. Inc in first st, sc to last st, inc in last st. (17 sc)
Round 5
(RS): Ch 1, turn. Inc in first st, sc to last st, inc in last st. (19 sc)
Round 6
(WS): Ch 1, turn. Inc in first st, sc to last st, inc in last st. (21 sc)
Round 7
(RS): Ch 1, turn. Sc across even. (21 sc)
Round 8
(WS): Ch 1, turn. Sc across even. (21 sc)
Round 9
(RS): Ch 1, turn. Inc in first st, sc to last st, inc in last st. (23 sc)
Round 10
(WS): Ch 1, turn. Sc across even. (23 sc)
Round 11
(RS): Ch 1, turn. Inc in first st, sc to last st, inc in last st. (25 sc)
Round 12
(WS): Ch 1, turn. Sc across even. (25 sc) Change to Color B at end of Row 12.
Round 13
(RS): Ch 1, turn. With Color B, sc across even. (25 sc)
Round 14
(WS): Ch 1, turn. Sc across even. (25 sc) Change to Color A at end of Row 14.
Round 15
(RS): Ch 1, turn. Sc across even. (25 sc)
Round 16
(WS): Ch 1, turn. Sc across even. (25 sc)
Round 17
(RS): Ch 1, turn. Dec over first 2 sts, sc to last 2 sts, dec over last 2 sts. (23 sc)
Round 18
(WS): Ch 1, turn. Dec over first 2 sts, sc to last 2 sts, dec over last 2 sts. (21 sc)
Round 19
(RS): Ch 1, turn. Dec over first 2 sts, sc to last 2 sts, dec over last 2 sts. (19 sc)
Round 20
(WS): Ch 1, turn. Dec over first 2 sts, sc to last 2 sts, dec over last 2 sts. (17 sc)
Round 21
(RS): Ch 1, turn. Dec over first 2 sts, sc to last 2 sts, dec over last 2 sts. (15 sc)
Round 22
(WS): Ch 1, turn. Dec over first 2 sts, sc to last 2 sts, dec over last 2 sts. (13 sc)
Round 23
(RS): Ch 1, turn. Dec over first 2 sts, sc to last 2 sts, dec over last 2 sts. (11 sc)Fasten off leaving a long tail for seaming.
Section 2: Lower Wing Panels (Make 2)
Lower wings are wider and shorter with a more pointed lower tip. Worked in Color C (Peach) with Color B (Dusty Rose) accent stripe and Color W border.
With Color C, ch 16 loosely.
Round 1
(RS): Starting in 2nd ch from hook, sc across. (15 sc)
Round 2
(WS): Ch 1, turn. Inc in first st, sc to last st, inc in last st. (17 sc)
Round 3
(RS): Ch 1, turn. Inc in first st, sc to last st, inc in last st. (19 sc)
Round 4
(WS): Ch 1, turn. Inc in first st, sc to last st, inc in last st. (21 sc)
Round 5
(RS): Ch 1, turn. Inc in first st, sc to last st, inc in last st. (23 sc)
Round 6
(WS): Ch 1, turn. Inc in first st, sc to last st, inc in last st. (25 sc)
Round 7
(RS): Ch 1, turn. Inc in first st, sc to last st, inc in last st. (27 sc)
Round 8
(WS): Ch 1, turn. Inc in first st, sc to last st, inc in last st. (29 sc)
Round 9
(RS): Ch 1, turn. Sc across even. (29 sc) Change to Color B at end of Row 9.
Round 10
(WS): Ch 1, turn. With Color B, sc across even. (29 sc)
Round 11
(RS): Ch 1, turn. Sc across even. (29 sc) Change to Color C at end of Row 11.
Round 12
(WS): Ch 1, turn. Sc across even. (29 sc)
Round 13
(RS): Ch 1, turn. Sc across even. (29 sc) Now begin shaping lower tip:
Round 14
(WS): Ch 1, turn. Dec over first 2 sts, sc to last 2 sts, dec over last 2 sts. (27 sc)
Round 15
(RS): Ch 1, turn. Dec over first 2 sts, sc to last 2 sts, dec over last 2 sts. (25 sc)
Round 16
(WS): Ch 1, turn. Dec over first 2 sts, sc to last 2 sts, dec over last 2 sts. (23 sc)
Round 17
(RS): Ch 1, turn. Dec over first 2 sts, sc to last 2 sts, dec over last 2 sts. (21 sc)
Round 18
(WS): Ch 1, turn. Dec over first 2 sts, sc to last 2 sts, dec over last 2 sts. (19 sc)
Round 19
(RS): Ch 1, turn. Dec over first 2 sts, sc to last 2 sts, dec over last 2 sts. (17 sc)
Round 20
(WS): Ch 1, turn. Dec over first 2 sts, sc to last 2 sts, dec over last 2 sts. (15 sc)
Round 21
(RS): Ch 1, turn. Dec over first 2 sts, sc to last 2 sts, dec over last 2 sts. (13 sc)
Round 22
(WS): Ch 1, turn. Dec over first 2 sts, sc to last 2 sts, dec over last 2 sts. (11 sc)Fasten off leaving a long tail for seaming.
Section 3: Bodice / Yoke
The bodice is worked flat (back and forth in rows) to create the center front opening. This is the central body of the poncho that the wings will attach to.
With Color A, ch 51.
Foundation Row (WS): Starting in 2nd ch from hook, sc across. (50 sc)
This creates the neckline. 50 stitches equals approximately 11 inches or 28 cm neckline, suitable for 6 to 12 month sizing.
Round 1
(RS): Ch 1, turn. (Sc 4, inc) repeat 10 times. (60 sc)
Round 2
(WS): Ch 1, turn. Sc across even. (60 sc)
Round 3
(RS): Ch 1, turn. (Sc 5, inc) repeat 10 times. (70 sc)
Round 4
(WS): Ch 1, turn. Sc across even. (70 sc)
Round 5
(RS): Ch 1, turn. (Sc 6, inc) repeat 10 times. (80 sc)
Round 6
(WS): Ch 1, turn. Sc across even. (80 sc) Change to Color B for accent stripe.
Round 7
(RS): Ch 1, turn. With Color B, sc across even. (80 sc)
Round 8
(WS): Ch 1, turn. Sc across even. (80 sc) Change to Color C.
Round 9
(RS): Ch 1, turn. With Color C, sc across even. (80 sc)
Round 10
(WS): Ch 1, turn. Sc across even. (80 sc)
Round 11
(RS): Ch 1, turn. (Sc 7, inc) repeat 10 times. (90 sc)
Round 12
(WS): Ch 1, turn. Sc across even. (90 sc)
Round 13
(RS): Ch 1, turn. (Sc 8, inc) repeat 10 times. (100 sc)
Round 14
(WS): Ch 1, turn. Sc across even. (100 sc)
Round 15
(RS): Ch 1, turn. (Sc 9, inc) repeat 10 times. (110 sc)
Round 16
(WS): Ch 1, turn. Sc across even. (110 sc) Change to Color A.
Round 17
(RS): Ch 1, turn. With Color A, sc across even. (110 sc)
Round 18
(WS): Ch 1, turn. Sc across even. (110 sc) Fasten off. Bodice is complete. Checkpoint: The bodice piece should measure approximately 10 inches or 25 cm wide and 4.5 inches or 11 cm tall. The top edge (neckline) should measure approximately 11 inches or 28 cm and the lower edge approximately 24 inches or 61 cm.
Section 4: Hood
The hood is worked flat and then the top seam is joined. It uses Color A for the main body and Color W for the border.
With Color A, ch 37.
Round 1
(RS): Starting in 2nd ch from hook, sc across. (36 sc)
Round 2
through 28: Ch 1, turn. Sc across even. (36 sc each row) At Row 28, the hood panel is a rectangle approximately 8 inches or 20 cm wide and 5.6 inches or 14 cm tall.
Round 29
(RS): Ch 1, turn. (Sc 4, dec) repeat 6 times. (30 sc)
Round 30
(WS): Ch 1, turn. Sc across even. (30 sc)
Round 31
(RS): Ch 1, turn. (Sc 3, dec) repeat 6 times. (24 sc)
Round 32
(WS): Ch 1, turn. Sc across even. (24 sc)
Round 33
(RS): Ch 1, turn. (Sc 2, dec) repeat 6 times. (18 sc)
Round 34
(WS): Ch 1, turn. Sc across even. (18 sc)
Round 35
(RS): Ch 1, turn. (Sc 1, dec) repeat 6 times. (12 sc)
Round 36
(WS): Ch 1, turn. (Dec) repeat 6 times. (6 sc) Fasten off leaving a long tail. Fold hood in half, RS together, matching the 6-stitch top edge. Thread yarn needle and whip stitch the top seam closed using the long tail. Turn RS out.
Upper Wing Edging
Round 1
Join Color W at any corner. Work 1 round of sc evenly around entire upper wing panel, working 3 sc in each corner point to keep the work flat, and working approx 1 sc per row end along the sides. Adjust to nearest multiple of 6 plus 4 (for scallop alignment).
Round 2
Target outer edge stitch count: 72 sc around each upper wing. Join with sl st to first sc.
Round 3
Scallop Edging Round: Ch 1. (Sk 2 sts, 5 dc in next st, sk 2 sts, 1 sc in next st) repeat around. (12 scallops total around each upper wing panel)Fasten off Color W. Weave in ends.
Checkpoint: Each finished upper wing panel should measure approximately 5 inches or 13 cm at widest point and 4.5 inches or 11 cm tall before edging.
Lower Wing Edging
Round 1
Join Color W at top right corner. Work 1 round of sc evenly around entire lower wing, working 3 sc in each pointed tip to keep flat. Adjust total to nearest multiple of 6 plus 4.
Round 2
Target outer edge stitch count: 78 sc around each lower wing. Join with sl st.
Round 3
Scallop Edging Round: Ch 1. (Sk 2 sts, 5 dc in next st, sk 2 sts, 1 sc in next st) repeat around. (13 scallops total around each lower wing panel)Fasten off Color W. Weave in ends.
Checkpoint: Each finished lower wing panel should measure approximately 6 inches or 15 cm at widest point and 5.5 inches or 14 cm tall before edging.
Hood Edging
Join Color W at bottom left corner of hood opening. Work 1 row of sc evenly along the bottom opening edge of the hood, approximately 1 sc per stitch across the 36-stitch foundation edge, adjusting to 36 sc total .
Hood Face Opening Edging
Round 1
With Color W, join at front lower corner. Work sc evenly up the right side, across top (if visible), and down the left side. Adjust to multiple of 6 plus 4.
Round 2
Target stitch count for face opening border: 30 sc (5 scallops) .
Round 3
Scallop Round: Ch 1. (Sk 2 sts, 5 dc in next st, sk 2 sts, 1 sc in next st) 5 times. (5 scallops)Fasten off Color W.
Hood Attachment
With WS of hood facing the RS of the bodice neckline, pin the 36-stitch bottom edge of the hood evenly along the top (neckline) edge of the bodice. Center the hood so 7 stitches of neckline are free at each front edge (for button band). The hood covers the center 36 stitches of the 50-stitch neckline.
Seam with Color W using whip stitch.
Checkpoint: The hood when attached should sit centrally at the neckline. The hood opening should frame a baby face comfortably with the pom-pom tips pointing upward at the two top corners of the seamed hood.
Section 5: Wing Attachment
Layout the bodice flat with RS facing up. The bodice will be the butterfly body (the vertical center strip).
Upper Wing Attachment
Lay the left upper wing against the left side of the bodice, aligning the straight inner edge of the wing (the side that runs from Row 1 through Row 23 of the upper wing) with the left side edge of the bodice. The top of the wing should align with the upper portion of the bodice (approximately Row 1 through Row 9 of the bodice).
Pin and seam using Color W and whip stitch. Seam approximately 9 inches or 23 cm along the inner edge.
Repeat for right upper wing on the right side of the bodice.
Lower Wing Attachment
Align the inner edge of the left lower wing with the lower-left side edge of the bodice, just below the upper wing attachment. The lower wing should sit flush to the upper wing along the center of the bodice, creating the butterfly silhouette.
Pin and seam using Color W and whip stitch. Seam approximately 9 inches or 23 cm along the inner edge.
Repeat for right lower wing.
Checkpoint: When laid flat, the finished garment should resemble a butterfly. The bodice forms the body, upper wings extend outward from the upper bodice, and lower wings extend outward from the lower bodice. All wing edges should have scallop edging facing outward.
Section 6: Center Front Button Band
The center front of the bodice is the open edge. Work button bands along both front edges.
Right Front Band (Button Loops)
With Color W, join at bottom right corner of bodice center front opening. Work sc evenly up the right front edge of the bodice, approximately 1 sc per row end. Work 18 sc total up the right front edge.
Next Row (button loop row): Ch 1, turn. (Sc 2, ch 2, sk 2) 4 times, sc 2. This creates 4 button loops. Then sc remaining sts to end. (18 sc + 4 ch-2 loops)
Next Row: Ch 1, turn. Sc across working 2 sc in each ch-2 sp. (18 sc)
Fasten off Color W.
Left Front Band (Button Side)
With Color W, join at top left corner of bodice center front opening. Work sc evenly down the left front edge, 18 sc total.
Next Row: Ch 1, turn. Sc across even. (18 sc)
Next Row: Ch 1, turn. Sc across even. (18 sc)
Fasten off Color W.
Mark button positions on left front band to match button loop positions on right front band. Sew 4 buttons to left band at marked positions. Sew 1 additional button at the neckline/hood join point on the left band.
Note: The neckline button (5th button) secures the hood overlap at center front. Work a ch-2 button loop at the corresponding position on the right neckline edge when working the hood border if desired.
Section 7: Outer Scallop Border
Round 1
The Color W scallop edging has already been worked on each wing panel individually. After all pieces are assembled, work one final round of sc followed by a scallop round around the entire outer perimeter of the poncho to unify the look.
Round 2
Join Color W at the lower center back of the poncho (bottom of the lower back wing tips). Work 1 rnd of sc evenly around the entire outer perimeter of the complete poncho, working 3 sc in each outer wing tip point and sc evenly along all seam joinings. Adjust total to a multiple of 6 plus 4.
Round 3
Target perimeter sc count: approximately 192 sc .
Round 4
Scallop Round: Ch 1. (Sk 2 sts, 5 dc in next st, sk 2 sts, 1 sc in next st) 32 times. (32 scallops)Fasten off Color W. Weave in all ends.
Section 8: Pom-Pom Antennae
Make 2 pom-poms using Color G (Light Gray).
Using a 1.25 inch or 3 cm pom-pom maker or two cardboard circles, wrap Color G yarn approximately 60 times. Tie securely at center and trim to a neat round shape approximately 1 inch or 2.5 cm in diameter.
Leave a long tie tail of approximately 6 inches or 15 cm.
Using the tie tail, sew each pom-pom firmly to the top two corners of the hood, one at each side of the top seam point. The pom-poms should sit upright and represent butterfly antennae.
Secure ends firmly and weave in to inside of hood. Double-knot and use a dab of fabric glue if desired for extra security on baby items.
Join
Step 1Weave in all remaining ends. Thread yarn needle and close any small gaps at wing attachment seams from the wrong side. Ensure all seams are secure and smooth on the wrong side.
Step 2Check all button attachments are secure. Use double thread when sewing buttons and make a shank if buttons are flat to prevent fabric puckering.
Check your count
- Section 1: Upper Wing Panels (Make 2) · Round 7: 21 sts
- Section 1: Upper Wing Panels (Make 2) · Round 16: 25 sts
- Section 1: Upper Wing Panels (Make 2) · Round 23: 11 sts
- Section 2: Lower Wing Panels (Make 2) · Round 6: 25 sts
- Section 2: Lower Wing Panels (Make 2) · Round 15: 25 sts
- Section 2: Lower Wing Panels (Make 2) · Round 21: 13 sts
Finish
- Weave in all ends and close any small gaps at the wing attachment seams from the wrong side.
- Sew on the five buttons with double thread, making a shank under flat buttons so the front band lies smooth.
- Attach the pom-pom antennae to the hood point and give the finished poncho a light steam to even out the scallop edging.
Bigger or smaller
- Larger
- Move up to a larger hook, or substitute a slightly heavier DK yarn than the materials list. A looser gauge increases the bodice circumference and scales the wing panels up to match.
- Smaller
- Drop to a smaller hook size, or work one fewer repeat of the wing panel increase rows before starting the edging. This tightens the gauge or shortens the wing length without changing the stitch pattern itself.
FAQs
Asked and answered
These answers came from whoever first published the pattern, kept word for word.
What size does this poncho fit?
The pattern is written for 6 to 12 months, with a bodice circumference of approximately 20 inches and a length of about 11 inches from shoulder to back hem.
Why does the finished piece look like a butterfly?
The four wing panels are worked as flat shaped pieces with increases on both edges, flaring into rounded upper wings and pointed lower wings once they are laid flat and seamed to the bodice.
Can a different yarn be used instead of the suggested options?
Any DK weight yarn that matches the stated gauge will work. Avoid loosely spun or fluffy yarns, since crisp stitch definition is needed for the wing shaping and scallop edging to read clearly.