 STITCH ROUND
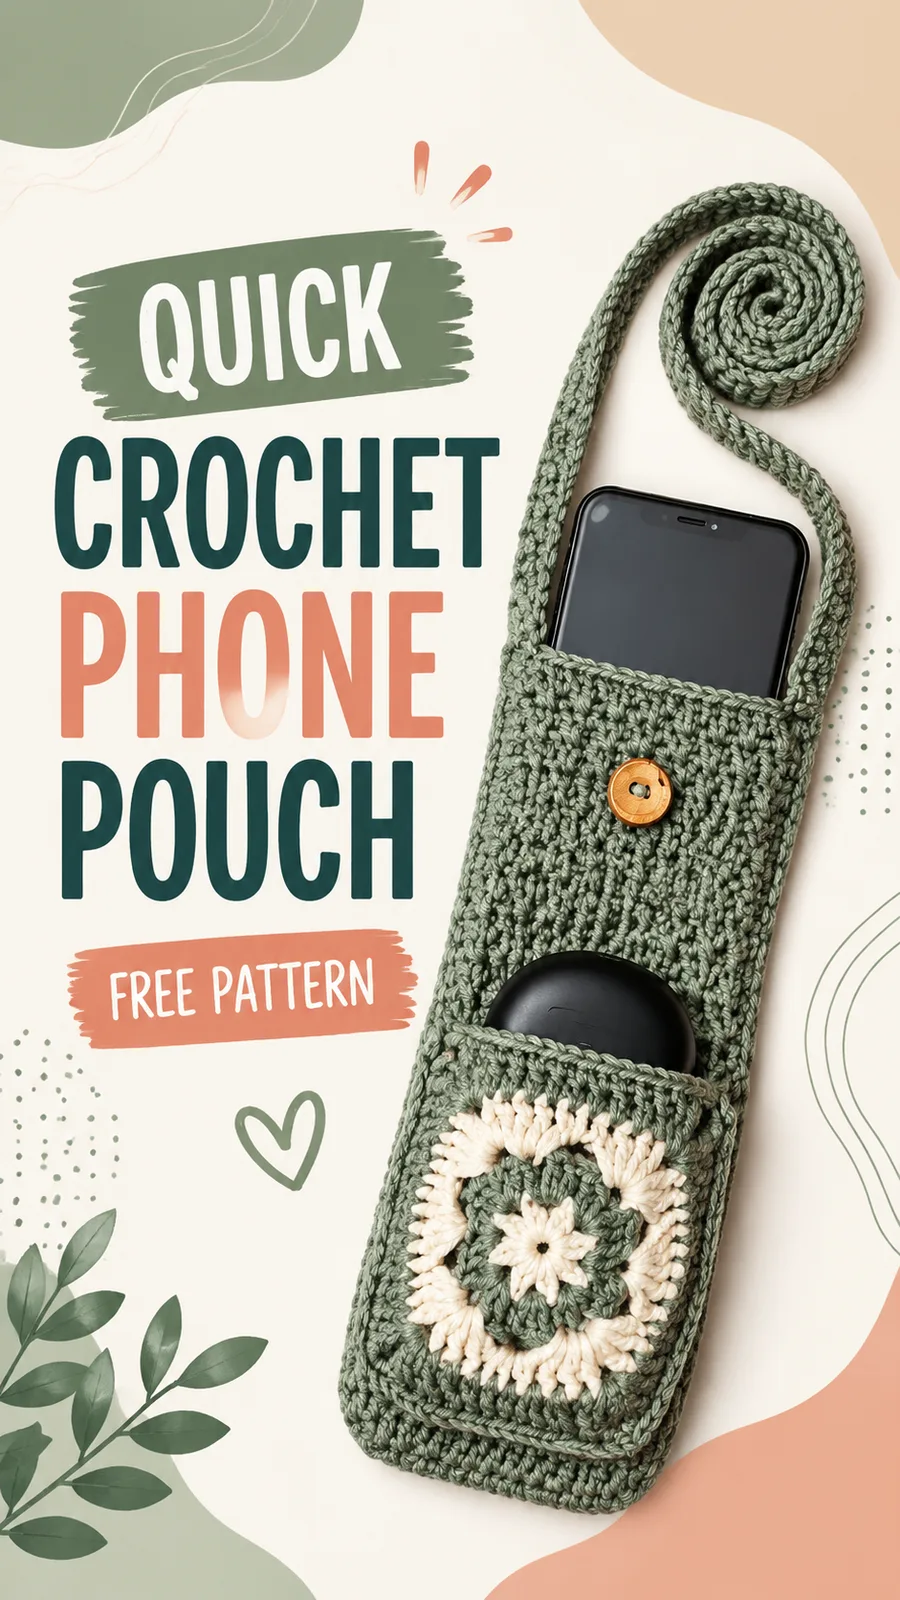
 Crochet phone bag pattern with crossbody strap and flower motif
15 rounds tick off this crochet crossbody phone bag with flap, strap and flower motif.
- Skill
- Confident Beginner
- Rounds
- 15 rounds
- Yarn weight
- Worsted
- Hook
- 4 mm
- Time
- 4-6 hours

Confident Beginner
What the original page called it. Nothing here is graded a second time.

15 rounds
Each one gets its own line, with a box beside it to tick as you go.

Worsted
What the sample was made in. Any weight works — the size moves with it.
About this pattern
This crochet phone bag ticks off across five parts: a Main Bag Body, a Decorative Flower Motif, a Crochet Strap, a Flap Section, and a Special Stitch Explanation that backs up the texture work. Counted by rounds, that is four for the body, four for the motif, two for the strap, and five for the flap. Each part is small enough to finish in a single sitting, which makes the whole pouch easy to check off piece by piece before assembly begins.
The shaping here is mostly about rhythm rather than increases and decreases. The main panel alternates regular single crochet rows with back loop only rows, so the real slowdown point is tracking which row comes next before folding the panel upward into the pouch shape. The flower motif also deserves a careful pace, since each round builds directly on the chain spaces left by the one before it.
- Chain the foundation and build the main panel in rows, keeping the stitch count steady across each row.
- Alternate regular single crochet rows with back loop only rows to create the raised horizontal ridge texture.
- Fold the finished panel upward and seam the sides together to form the pouch before anything else is added.
- Crochet the flap section separately and position it so it folds over the top opening for the button closure.
- Work the flower motif in contrasting yarn through its rounds, then attach it to the front of the flap.
- Crochet the long strap in rows and seam it to the sides so the pouch can be worn crossbody.
What goes wrong
- Losing track of back loop rows Use a stitch marker on the right side at the start of each back loop only row so the alternating pattern stays consistent.
- Folding the panel before checking orientation Lay the finished panel flat and confirm which edge becomes the base before folding upward, since seaming the wrong side first is hard to undo.
- Skipping chain spaces in the flower motif Slip stitch into the chain space itself, not the stitch beside it, before beginning the next round so the three single crochet groups sit evenly.
- Attaching the button before fitting the flap Fold the flap over the closed pouch first and mark the button position, then sew it on so the closure sits snug rather than loose or strained.
Yarn, hook and the rest
Copied from the source pattern's own materials list.
- Worsted weight cotton yarn in main color, approximately 180 yards (165 meters).
- Small amount of contrasting yarn for decorative motif, approximately 40 yards (36 meters).
- 4 mm US G-6 crochet hook.
- 1 wooden or plastic button approximately 3/4 inch (2 cm).
- Yarn needle.
- Scissors.
- Stitch marker for keeping track of rows if desired.
Progress tracker
0 of the 15 rounds on this page are ticked.
The pattern, round by round
Kept in the order and the wording the source used. Tick a round as you finish it; the ticks stay on this device.
Main Bag Body
Foundation: Chain 33.
Round 1
Single crochet in the second chain from hook and each chain across. Turn. (32 sts)
Round 2
Chain 1, single crochet across. Turn. (32 sts)
Round 3
Chain 1, work single crochet in back loop only across. Turn. (32 sts)
Round 4
34 Repeat Rows 2-3, alternating regular single crochet and back loop only single crochet rows. Turn after each row. (32 sts)
The completed rectangle should measure approximately 14 inches (35.5 cm) long and 7 inches (18 cm) wide.
Decorative Flower Motif
Make 1 motif.
Round 1
Using contrast color, make a magic ring. Chain 1, work 8 single crochet into ring. Join with slip stitch. (8 sts)
Round 2
Chain 1, work 2 single crochet in each stitch around. Join with slip stitch. (16 sts)
Round 3
Chain 2, half double crochet in same stitch, chain 1, skip next stitch. Repeat around. Join with slip stitch. (8 spaces)
Round 4
Slip stitch into next chain space. Chain 1, work 3 single crochet in each space around. Join with slip stitch. (24 sts)Fasten off. Block the motif lightly and sew it centered on the front of the bag.
Crochet Strap
Foundation: Chain 7.
Round 1
Single crochet in second chain from hook and across. Turn. (6 sts)
Round 2
150 Chain 1, single crochet across. Turn. (6 sts) The strap should measure approximately 38 inches (96.5 cm). Adjust length by adding or removing rows.
Flap Section
Continue from the top edge of the rectangle.
Round 35
Chain 1, single crochet across. Turn. (32 sts)
Round 36
Chain 1, single crochet 12 sts, decrease over the next 2 sts, single crochet 16 sts, decrease over the next 2 sts. Turn. (30 sts)
Round 37
Chain 1, single crochet across. Turn. (30 sts)
Round 38
Chain 1, single crochet 11 sts, decrease over next 2 sts, single crochet 15 sts, decrease over next 2 sts. Turn. (28 sts)
Rounds 39–45
Chain 1, single crochet across. Turn. (28 sts) Fasten off and weave in ends.
Special Stitch Explanation
Ribbed Single Crochet: Work single crochet stitches into the back loop only of the previous row. This creates a raised ridge texture while keeping the fabric dense.
Join
Step 1Block the finished pouch lightly by shaping it flat and allowing it to dry completely. Blocking helps even out stitches and improves the appearance of the decorative motif. Avoid stretching the strap too aggressively because the yarn may relax over time.
Check your count
- Main Bag Body · Round 1: 32 sts
- Main Bag Body · Round 2: 32 sts
- Main Bag Body · Round 3: 32 sts
- Main Bag Body · Round 4: 32 sts
- Decorative Flower Motif · Round 1: 8 sts
- Decorative Flower Motif · Round 2: 16 sts
Finish
- Weave in every yarn end left from the main body, flap, strap, and flower motif before joining any pieces together.
- Sew the button onto the flap and check the closure against the pouch opening for a fit that holds without straining the yarn.
- Block the assembled pouch flat, easing the flap and motif into shape, and let it dry fully before the strap takes any weight.
Bigger or smaller
- Resize with hook and yarn
- Swap the worsted weight cotton for a different yarn weight and matching hook size to scale the whole pouch, flap, and strap up or down while keeping the same row sequence.
- Resize by repeating rows
- Add or remove pairs of alternating rows in the Main Bag Body before folding, or adjust the number of rows in the Crochet Strap, to change the pouch depth or strap length without changing the stitch pattern.
FAQs
Asked and answered
These answers came from whoever first published the pattern, kept word for word.
Can this phone bag fit a larger phone case?
The finished pouch measures approximately 7 x 4.5 inches excluding the strap, which allows some room for a case. The pattern notes it can be adapted for different devices by adjusting the panel size before folding.
What happens if the contrasting yarn runs short for the motif?
The motif uses a small amount of contrasting yarn, around 40 yards, which is enough for the four rounds as written. Any leftover worsted cotton in a second color can be substituted without affecting the rest of the bag.
Can the back loop only rows be skipped?
Skipping them removes the raised horizontal ridge texture described in the Special Stitch Explanation. Working all rows as regular single crochet still produces a sturdy panel, just with a smoother surface.
How is the strap attached once it is finished?
The Crochet Strap is worked separately in rows for strength, then seamed to the sides of the folded Main Bag Body. This keeps the strap flexible while the body stays dense enough to hold small items securely.