 STITCH ROUND
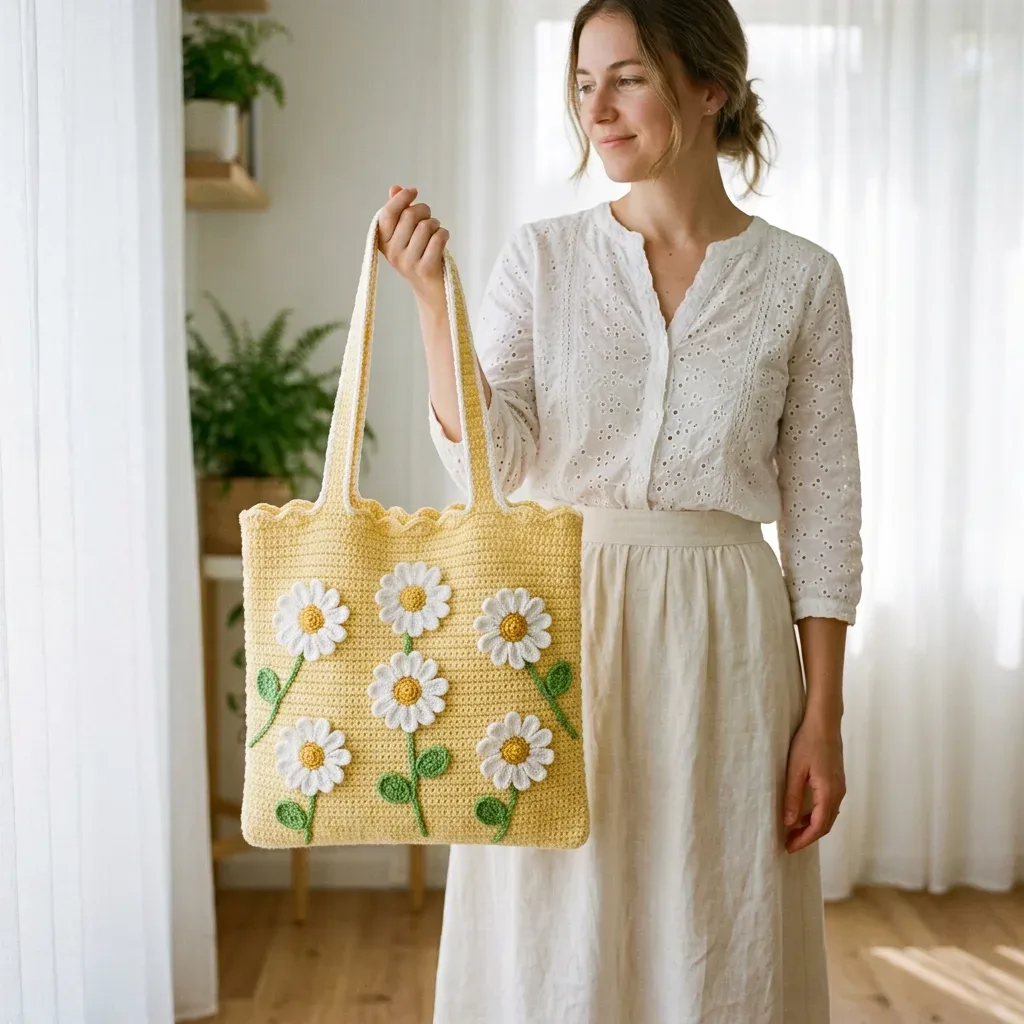
 Daisy appliqué tote with scalloped edge and long straps
18 rounds to tick off for a daisy-appliqué crochet tote with a scalloped edge and long straps.
- Skill
- Intermediate
- Rounds
- 18 rounds
- Yarn weight
- Worsted
- Hook
- 4.0 mm
- Time
- 4-6 hours

Intermediate
What the original page called it. Nothing here is graded a second time.

18 rounds
Each one gets its own line, with a box beside it to tick as you go.

Worsted
What the sample was made in. Any weight works — the size moves with it.
About this pattern
This tote sits firmly in single crochet, with two flat panels worked in straightforward rows and a short set of flower rounds layered on top. Tick off the flower center in three rounds, then settle into the long, repetitive panel rows that build the bag body and straps. None of the counts are tricky here; the work is simply steady.
The shaping comes less from increases and more from assembly: seaming the two panels along three sides, working the scalloped edge around the top, then placing ten daisies with their petals, centers, stems, and leaves. Slow down at the applique stage, where small pieces need careful placement and neat whipstitching rather than fast stitch counts.
The finished bag measures approximately 14 inches wide by 14 inches tall, not including the straps. The straps add another 22 inches of length, giving a comfortable 11 inch shoulder drop — a substantial tote for farmers market trips, library runs, or carrying a current project.
Skill level: intermediate. The bag body uses only single crochet worked back and forth, which beginners handle easily; the intermediate rating comes from crocheting the small flower petals, assembling the daisies, embroidering stems, and sewing everything neatly onto the finished bag. Time estimate: plan for 12 to 18 hours total — roughly 4 to 6 hours for the two bag panels and another 6 to 10 hours for the applique work.
- Crochet two matching panels in single crochet, working straight rows from the bottom edge up.
- Wet block both panels flat before seaming so the finished bag holds an even shape.
- Seam the panels together along three sides with right sides held together for a clean inside ridge.
- Work a scalloped edging around the top opening to soften the straight panel line.
- Make the doubled straps separately, fold each one lengthwise, and whipstitch the long edge closed.
- Crochet the daisy pieces, assemble each flower, embroider stems, and sew everything onto the bag front.
What goes wrong
- Skipping the panel block before seaming Wet block both panels to their intended size before joining them. Seaming unblocked panels locks in uneven edges that no amount of steaming will fix later.
- Seaming panels with the wrong sides facing Hold the panels right sides together while seaming so the ridge lands inside the bag. Check this before the first stitch, since it is hard to redo once several seams are in.
- Choosing acrylic yarn for the body Stick with cotton or a cotton blend for Yarn A. Acrylic stretches under the weight of a loaded tote and will not hold the bag's shape over time.
Yarn, hook and the rest
Copied from the source pattern's own materials list.
- Yarn
- Yarn A (butter yellow): approximately 500 yards of worsted weight cotton or cotton blend yarn for the bag body
- Yarn B (white): approximately 150 yards of worsted weight cotton for the daisy petals
- Yarn C (golden yellow): approximately 30 yards of worsted weight cotton for the flower centers
- Yarn D (green): approximately 60 yards of worsted weight cotton for stems and leaves
- Recommended Yarn Brands
- Lion Brand 24/7 Cotton in Butter, White, Goldenrod, and Grass
- Paintbox Yarns Simply DK Cotton (runs heavy, check gauge carefully)
- WeCrochet Dishie in Custard, White, Canary, and Aloe
Important
- Avoid acrylic yarn for this project. Cotton or cotton blend yarns provide the structural integrity a loaded tote bag needs. Acrylic stretches and distorts under weight.
- Gauge: with the G-6 hook and Yarn A, 18 sc by 22 rows = 4 inches by 4 inches (10 cm by 10 cm) in single crochet, blocked. Accurate gauge keeps both panels matching and lets the bag hold its shape when filled with books, produce, or yarn.
- US size G-6 (4.0 mm) crochet hook for the bag body and straps
- US size E-4 (3.5 mm) crochet hook for flower petals and leaves (the smaller hook creates crisper detail work)
- Yarn needle for seaming and weaving in ends
- 4 to 6 stitch markers
- Scissors
Optional
- lightweight fusible interfacing cut to 13.5 by 13.5 inches per panel for extra stiffness
Progress tracker
0 of the 18 rounds on this page are ticked.
The pattern, round by round
Kept in the order and the wording the source used. Tick a round as you finish it; the ticks stay on this device.
Bag Panels (Make 2)
Foundation: With Yarn A and G-6 hook, ch 64.
Round 1
(WS): Sc in 2nd ch from hook and in each ch across. Ch 1, turn. (63 sc)
Round 2
(RS): Sc in each st across. Ch 1, turn. (63 sc)
Round 3
Sc in each st across. Ch 1, turn. (63 sc)
Round 4
through 77: Repeat Row 2 (sc in each st across, ch 1, turn) for 74 more rows. (63 sc at the end of every row)Pattern note: the turning chain counts as 0 stitches throughout this pattern — chain 1 to turn, skip no stitches, and work the first sc into the first stitch of the previous row.After Row 77, your panel should measure approximately 14 inches tall and 14 inches wide.Fasten off the first panel, leaving a long tail.For the second panel, do not fasten off. Leave a long tail of approximately 24 inches for seaming.Checkpoint: Each finished panel measures approximately 14 inches wide by 14 inches tall. The stitch count at the top of each panel is 63 sc. Confirm both panels are the same size before seaming.
Joining the Panels
Place the two panels with RS held together (WS facing out). Align all edges carefully. Pin or use stitch markers to hold them in place.
With Yarn A and G-6 hook, join yarn at the bottom right corner.
Bottom Seam
Working through both panels at once, sc across 63 sts along the bottom edge. (63 sc) At the corner, work 2 sc to turn the corner.
Right Side Seam
Sc up 77 row-end stitches along the right side, working through both panels. (77 sc) At the corner, work 2 sc to turn the corner. Do not seam the top opening. Fasten off and weave in ends.
Left Side Seam
With RS still held together, join yarn at the bottom left corner. Sc up 77 row-end stitches along the left side. (77 sc) Fasten off and weave in ends.Turn the bag RS out. The seam ridges are now on the inside.Checkpoint: The bag body is now a rectangular pouch open at the top, approximately 14 inches wide by 14 inches tall.
Scalloped Top Edging
Setup Round: With RS facing and Yarn A, join yarn at the right side seam at the top edge. Work 1 sc in each stitch around the top opening as follows:
Setup Round
Sc across 63 sts of the front panel. At the left side seam, sc into the seam st (1 sc). Sc across 63 sts of the back panel. At the right side seam, sc into the seam st (1 sc). Join with sl st to first sc. (128 sc)
Decrease Round
Sc in first 31 sts, sc2tog over next 2 sts, sc in next 30 sts across the remainder of the front, sc in the seam st, sc in first 31 sts of back, sc2tog over next 2 sts, sc in remaining 30 sts of back, sc in the seam st, join with sl st. (126 sc)
Scallop Round
Ch 1 (does not count as a st). Working around the top: sk 2 sts, 5 dc in next st, sk 2 sts, sl st in next st. Repeat around until all 126 sts are consumed, ending with sl st. (21 scallops total)Scallop stitch detail: skip 2 stitches, work 5 dc into the next stitch, skip 2 stitches, slip stitch into the next stitch. This creates one shell over 6 stitches, repeated across.Fasten off Yarn A.
Straps (Make 2)
With Yarn A and G-6 hook, ch 102.
Round 1
Sc in 2nd ch from hook and in each ch across. Ch 1, turn. (101 sc)
Round 2
Sc in each st across. Ch 1, turn. (101 sc)
Round 3
Sc in each st across. Ch 1, turn. (101 sc)
Round 4
Sc in each st across. Do not ch or turn. (101 sc) Fold the strap in half lengthwise with WS together. Using Yarn A and a yarn needle, whipstitch the long open edge to the last row edge to create a doubled strap tube.
The finished strap measures approximately 22 inches long and 0.75 inch wide.
Make 2 straps.
Strap Attachment: On the front panel, measure in 3.5 inches from each side seam along the top edge. Insert the short end of one strap between the scallop edge and the top of the panel, approximately 1 inch down from the top. Sew a square of stitches (back and forth at least 4 times in two directions) to secure each strap end firmly.
Repeat on the back panel, aligning the strap attachment points to match the front.
Flower Center
With Yarn C and E-4 hook, make a magic ring: make a loop with the yarn, insert hook through the loop, pull up a loop of working yarn, chain 1 to secure. Work stitches into the ring, then pull the tail to close the center hole tightly.
Round 1
Ch 1, work 6 sc into the ring, pull ring closed, join with sl st to first sc. (6 sc)
Round 2
Ch 1, work 2 sc in each st around, join with sl st to first sc. (12 sc)
Round 3
Ch 1, work 2 sc in each st around, join with sl st to first sc. (24 sc) Fasten off Yarn C, leaving a tail for sewing. The center is approximately 1 inch in diameter.
Petals
With Yarn B and E-4 hook, ch 11. Starting in the 2nd ch from hook: sc in next st, hdc in next st, dc in next 3 sts, hdc in next st, sc in next st, sl st into the last ch of the original chain. Each finished petal measures approximately 0.75 inch long.
Without fastening off, ch 11 again and work another petal the same way. Continue making petals connected at their base until 14 petals are complete.
After the 14th petal, sl st to the base of the first petal to form a ring. Fasten off, leaving a tail for sewing.
Assembly: Center the Yarn C disc on top of the petal ring. Using the tail, sew the center disc to the petal ring with a few stitches around the perimeter of the disc.
Make 10 daisies total.
Leaves (Make 20 Total)
Leaf Pattern
With Yarn D, ch 10. Row 1: Starting in the 2nd ch from hook, sc in next 3 sts, hdc in next 2 sts, dc in next 2 sts, 3 dc in last ch (this is the tip of the leaf). Now working back along the opposite side of the foundation chain: dc in next 2 sts, hdc in next 2 sts, sc in next 3 sts, sl st to first sc to join. Fasten off, leaving a tail for sewing.Use the E-4 hook for each leaf. Make 20 leaves total, 2 per stem.
Join
Step 1Before seaming the panels, wet block them by soaking in cool water for 10 minutes. Squeeze out excess water gently, lay flat, and pin to 14 by 14 inches. Allow to dry completely.
Step 2After all assembly is complete, lightly steam block the finished bag by holding a steam iron 1 inch above the surface. Do not press directly onto the crochet.
Step 3Weave in all remaining ends, pulling them through at least 6 loops in two different directions.
Step 4Optional Lining: Cut two pieces of cotton quilting fabric to 15 by 15 inches. Sew them together along three sides with a 0.5 inch seam allowance. Fold the top edge down 1 inch and press. Insert the lining into the bag and slip stitch the folded top edge to the inside of the bag just below the scalloped edging.
Check your count
- Bag Panels (Make 2) · Round 1: 63 sts
- Bag Panels (Make 2) · Round 2: 63 sts
- Bag Panels (Make 2) · Round 3: 63 sts
- Joining the Panels · Bottom Seam: 63 sts
- Joining the Panels · Right Side Seam: 77 sts
- Joining the Panels · Left Side Seam: 77 sts
Finish
- Weave in every loose end from the panels, straps, and flowers, pulling each tail through several loops in two directions so nothing works free under the weight of a loaded bag.
- Attach the straps securely at the top edge before adding any flowers, so the bag can be tested for fit and balance while it is still easy to handle.
- Steam block the finished tote by holding the iron just above the surface, then set it aside to dry completely before using it.
Bigger or smaller
- Larger
- Add more rows to the panels and straps before the scalloped edge. This lengthens the bag and the shoulder drop without changing the stitch pattern.
FAQs
Asked and answered
These answers came from whoever first published the pattern, kept word for word.
Can beginners attempt this tote?
The bag body is plain single crochet worked back and forth, which beginners manage easily. The daisy appliques are what push this into intermediate territory, so a first-timer willing to practice small flower pieces can still finish it.
Why does gauge matter so much here?
The panels need to match each other so the seams line up evenly. Loose gauge also leaves the bag unable to hold its shape once filled with books or produce.
What yarn works best for this bag?
Worsted weight cotton or a cotton blend is recommended throughout, since it gives the structure a loaded tote needs. Acrylic should be avoided because it stretches and distorts under weight.
Is interfacing necessary for this project?
The fusible interfacing cut to size for each panel is optional but adds extra stiffness to the finished bag. Skip it for a softer, more relaxed tote, or include it for a structured one.