 STITCH ROUND
 Easy ribbed beanie crochet pattern for a one-day make
66 rows to tick off, then a ribbed beanie ready for a 55-57 cm head.
- Skill
- Easy
- Rounds
- 6 rounds
- Yarn weight
- Bulky
- Hook
- 7 mm
- Time
- 4-6 hours

Easy
What the original page called it. Nothing here is graded a second time.

6 rounds
Each one gets its own line, with a box beside it to tick as you go.

Bulky
What the sample was made in. Any weight works — the size moves with it.
About this pattern
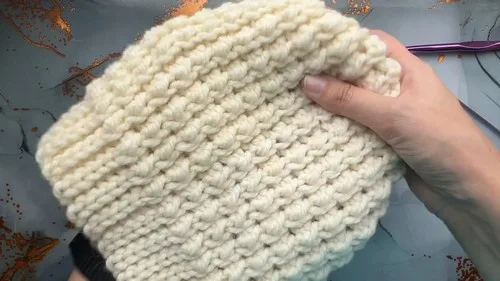
This is a ribbed beanie built from one small repeat, worked flat and seamed at the end. The six-row main pattern runs eleven times for a total of 66 rows, so the tick-box is short and the rhythm repeats fast. Each pass through the six rows adds another band of rib, and the strip grows in a straight line until it is long enough to wrap around the head before closing into a hat.
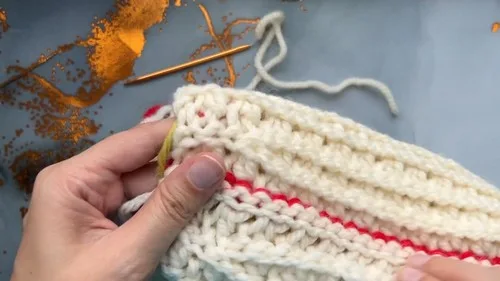
Shaping happens inside that six-row repeat, where Row 2 pulls in stitches at the edge to curve the crown rather than leave it straight. On the final repeat, Row 6 is worked with a contrasting thread instead of the main color, marking the seam path through the last 30 slip stitches; leave a 2-meter tail for sewing. Rushing that last stretch is the easiest way to lose the seam line.
- Chain a foundation row that sets the working height of the beanie before the pattern starts.
- Work the main pattern's six rows in sequence, alternating half double crochet and slip stitch across the ribbing.
- Repeat that six-row sequence until the strip wraps comfortably around the head; a 55-57 cm hat needs 11 repeats (66 rows total).
- the final repeat, work Row 6 in a contrasting thread instead of the main color to mark the seam path through the last 30 slip stitches, leaving a 2-meter tail for sewing.
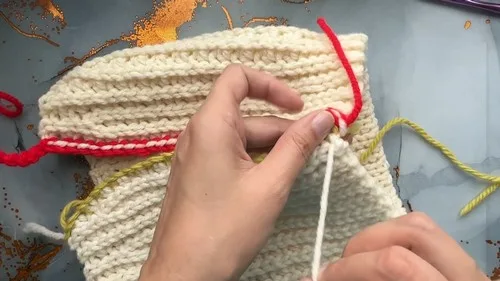
- Fold the finished strip wrong side out and sew the side seam along that marked thread, then remove it.
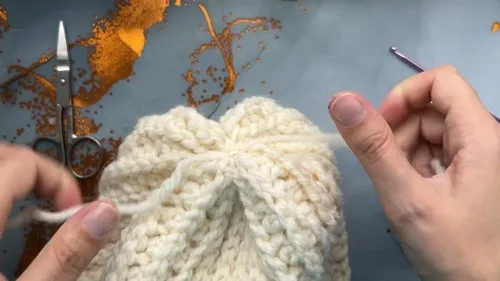
- Close the open top with a new length of yarn worked through the edge stitches in two passes, then pull both tails tight and weave in the ends.
What goes wrong
- Skipping back loop only Working into both loops flattens the rib texture the whole pattern depends on. Check each row and work into the back loop only unless the row says otherwise.
- Forgetting the marker row the final repeat, Row 6 should be worked in a contrasting thread instead of the main color to mark the seam path through the last 30 slip stitches. Skipping that color swap makes the seam harder to sew straight, so mark the last repeat before starting it.
- Losing the seam marker thread The contrasting thread needs to stay visible through the last 30 slip stitches or the seam line drifts. Keep it loose and easy to spot while working that stretch, and leave a 2-meter tail for sewing before removing the marker thread.
- Closing the top in one pass Threading only every other edge stitch on the first pass leaves gaps at the crown. Work a second round into the skipped stitches before pulling both tails tight.
Yarn, hook and the rest
Copied from the source pattern's own materials list.
- 100g yarn (50% wool, 50% acrylic; 123m per 100g)
- 7 mm crochet hook
- Yarn needle
- Scissors
Progress tracker
0 of the 6 rounds on this page are ticked.
The pattern, round by round
Kept in the order and the wording the source used. Tick a round as you finish it; the ticks stay on this device.
Main Pattern
Row 1
Wrong Side Chain 1 for turning. Work Slip Stitch in the second chain from hook.Alternate Half Double Crochet and Slip Stitch until the last six stitches.Make six Slip Stitches for ribbing. (30 stitches total)
Row 2
Right Side Chain 1 and turn. Work Slip Stitches in back loop only. Stop before the last four stitches to shape the crown. (26 stitches total)
Row 3
Wrong Side Chain 1 and turn. Begin with a Slip Stitch, then alternate Half Double Crochet and Slip Stitch until the last six stitches.Work six Slip Stitches for ribbing. (30 stitches total)
Row 4
Right Side Chain 1 and turn. Slip Stitch across all stitches. For the special join at the crown, insert the hook into the bump of the previous step and the back loop of the next stitch together, making a Slip Stitch through all loops.Continue to the end. (30 stitches total)
Row 5
Wrong Side Chain 1 and turn. Start with a Slip Stitch, then alternate Half Double Crochet and Slip Stitch until the last six stitches.Finish with six Slip Stitches for ribbing. (30 stitches total)
Row 6
Right Side Chain 1 and turn. Work 30 Slip Stitches in the back loop to the end. (30 stitches total)Repeat Rows 1 through 6 until the piece wraps comfortably around your head. For a 55–57 cm hat, repeat the pattern 11 times (66 rows total).
Foundation
Chain 30 stitches to determine the height of the beanie.
Work all stitches in the back loop only unless stated otherwise.
Pattern fits a 55–57 cm head size.
Check your count
- Main Pattern · Row 2: 26 sts
- Main Pattern · Row 6: 30 sts
Finish
- the final repeat, work Row 6 with a contrasting thread instead of the main color to mark the seam path along the last 30 slip stitches, leaving a 2-meter tail for sewing.
- Fold the beanie with the wrong side out and use the tail to sew the side seam along the marked thread, then remove the contrasting thread once done.
- Using a new yarn piece, insert the needle into every other edge stitch along the top opening and pull slightly, then make a second round by inserting into the skipped stitches for full closure. Pull both yarn ends tight to close the top completely and tie securely.
- Weave in all loose ends and turn the beanie right side out to finish.
Bigger or smaller
- Larger or smaller
- Work the six-row main pattern more or fewer times than the 11 repeats used for a 55-57 cm head, which lengthens or shortens the strip before seaming.
Photographs of this one
Every photograph on this page was taken by whoever published the pattern, and they are printed in the order the source listed them.
FAQs
Asked and answered
These answers came from whoever first published the pattern, kept word for word.
Can this beanie be made in a different head size?
Yes, add or remove repeats of the six-row main pattern to change the circumference. A hook or yarn weight change also shifts the fit without altering the row count.
Why is the last repeat's Row 6 a different color?
Row 6 of the final repeat is worked in a contrasting thread instead of the main color so it marks the seam path through the last 30 slip stitches. That marker thread is removed once the seam is sewn.
What is the contrasting thread actually for?
It marks the seam path through the last 30 slip stitches so the side seam can be sewn in a straight line, using a 2-meter tail left for sewing. It gets removed once the seam is sewn.
How does a flat, seamed piece turn into a closed hat?
The side seam is sewn along the marked thread with the hat turned wrong side out. The open top is then closed with a fresh yarn length worked through alternating edge stitches, a second round fills the skipped stitches, and both tails are pulled tight and tied off.