 STITCH ROUND
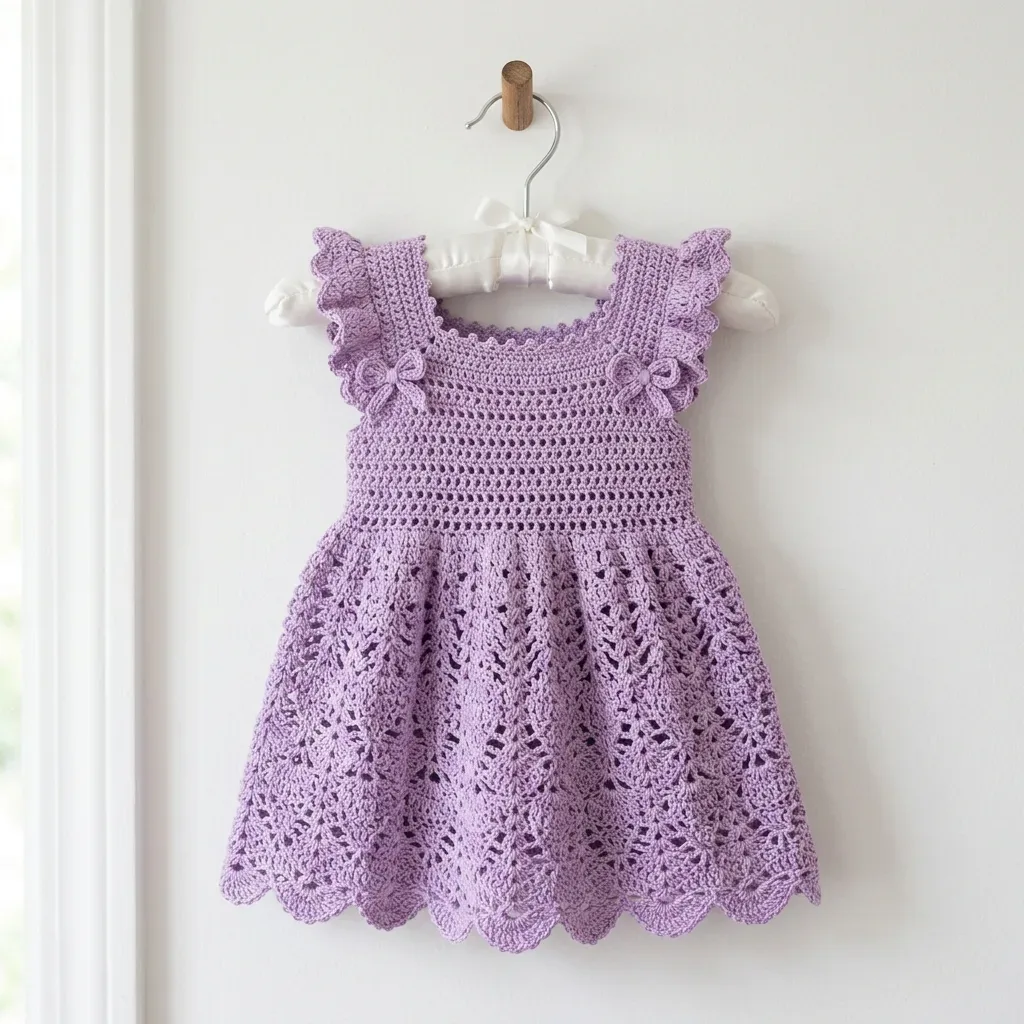
Lavender lace baby dress crochet pattern with flutter sleeves
34 rounds tick off this lavender lace baby dress with flutter sleeves and a scalloped hem.
- Skill
- Intermediate
- Rounds
- 48 rounds
- Yarn weight
- DK
- Hook
- 3.5 mm
- Time
- 6-9 hours

Intermediate
What the original page called it. Nothing here is graded a second time.

48 rounds
Each one gets its own line, with a box beside it to tick as you go.

DK
What the sample was made in. Any weight works — the size moves with it.
About this pattern
This lavender lace baby dress starts as a flat, top-down bodice before opening into a full lace skirt worked in the round. The front bodice panel ticks off in a run of rows, the back bodice panel adds a short run of its own with a center-back opening, and the lace skirt rounds carry the piece the rest of the way. Taken together, it is a project built from small, repeatable sections rather than one long unbroken stretch.
The real shaping happens in the transition from bodice to skirt, where the stitch pattern shifts from straight rows into a repeating fan-and-shell lace that widens with built-in increases round by round. Slow down at that first lace round, since it sets the spacing every later round relies on, and again at the back bodice opening, where the loop needs to be worked back into as regular stitches to keep the row count even.
- Work the front bodice panel flat from the neckline down, building a straight square-neck piece row by row.
- Work the back bodice panel the same way, leaving a center-back gap that forms the button or tie loop.
- Join the two bodice panels and transition into working in the round for the lace skirt.
- Repeat the fan-and-shell lace rounds so each fan widens naturally through the built-in increases.
- Finish the skirt edge with the scalloped picot hem, then add the flutter sleeve ruffles and neckline edging.
- Attach the small crocheted bows at the shoulders and thread the tie cords through the back loop.
What goes wrong
- Skipping the back-neck loop step The ch-3 gap on the back bodice panel needs to be worked back into as regular stitches on the next row, not skipped. Missing this throws the stitch count off for every row that follows.
- Losing count in the lace repeats Each lace round repeats the same fan-and-shell sequence many times around, so it is easy to drift off by one. Drop a stitch marker at the join point before starting each round to catch mistakes early.
- Pinning the fans flat instead of outward Blocking pins placed straight down flatten the lace motifs instead of opening them. Angle each pin outward at the fan points so the lace spreads properly while it dries.
- Letting front and back panels drift apart The front and back bodice panels need to match each other row for row before joining, not just match their own row counts. Lay them side by side before moving on to the skirt.
Yarn, hook and the rest
Copied from the source pattern's own materials list.
- Option 1: Paintbox Yarns Simply DK in Dusty Lilac. This yarn has excellent stitch definition, is machine washable, and holds the lace motifs crisp after blocking. It is widely available and budget-friendly.
- Option 2: Scheepjes Catona 50g in Lilac Mist (520). A mercerized cotton DK-weight yarn that gives gorgeous drape and stitch clarity. The slight sheen elevates the lace to a truly heirloom look. Ideal for warmer climates or summer wear.
- Option 3: WeCrochet Capra DK in Lavender. A wool-cotton blend that offers a beautiful balance of drape and structure. Blocks beautifully and gives the lace sections excellent definition.
Substitution Note
- Choose any smooth DK weight yarn with good stitch definition. Avoid fluffy, bouclé, or highly textured yarns, as the lace motifs will not be visible. Cotton and cotton blends will produce the crispest lace effect after blocking.
Yarn
- Approximately 400 yards / 366 meters of DK weight (light weight, #3) yarn in lavender
Hook
- US size E-4 / 3.5 mm crochet hook, or size needed to meet gauge
Notions
- Tapestry needle for weaving ends
- 2 stitch markers
- Small piece of scrap yarn for markers
- One 3/8-inch / 10 mm button (optional, for back closure)
- Scissors
- Rust-proof blocking pins
- Blocking board or foam mat
- Spray bottle with water or basin for wet blocking
Progress tracker
0 of the 48 rounds on this page are ticked.
The pattern, round by round
Kept in the order and the wording the source used. Tick a round as you finish it; the ticks stay on this device.
Front Bodice Panel
The front bodice is worked from the top neckline downward in rows. This is the easy part, I promise.
Foundation Chain: Chain 44.
Round 1
(WS): Starting in the 2nd chain from hook, sc across. Turn. (43 sc)
Round 2
(RS): Ch 1, sc in each st across. Turn. (43 sc)
Round 3
Ch 1, sc in each st across. Turn. (43 sc)
Round 4
Neckline shaping Ch 1, sc in first 2 sts, inc in next st, sc to last 3 sts, inc in next st, sc in last 2 sts. Turn. (45 sc)
Round 5
Ch 1, sc in each st across. Turn. (45 sc)
Round 6
Ch 1, sc in first 2 sts, inc in next st, sc to last 3 sts, inc in next st, sc in last 2 sts. Turn. (47 sc)
Round 7
Ch 1, sc in each st across. Turn. (47 sc)
Round 8
Ch 1, sc in first 2 sts, inc in next st, sc to last 3 sts, inc in next st, sc in last 2 sts. Turn. (49 sc)
Round 9
Ch 1, sc in each st across. Turn. (49 sc)
Round 10
Ch 1, sc in first 2 sts, inc in next st, sc to last 3 sts, inc in next st, sc in last 2 sts. Turn. (51 sc)
Round 11
through 14: Ch 1, sc in each st across. Turn. (51 sc each row)
Round 15
Waist definition, decrease row Ch 1, sc in first 2 sts, dec over next 2 sts, sc to last 4 sts, dec over next 2 sts, sc in last 2 sts. Turn. (49 sc)
Round 16
Ch 1, sc in each st across. Turn. (49 sc)
Round 17
Ch 1, sc in first 2 sts, dec over next 2 sts, sc to last 4 sts, dec over next 2 sts, sc in last 2 sts. Turn. (47 sc)
Round 18
Ch 1, sc in each st across. Turn. (47 sc)
Round 19
Ch 1, sc in first 2 sts, dec over next 2 sts, sc to last 4 sts, dec over next 2 sts, sc in last 2 sts. Turn. (45 sc)
Round 20
through 24: Ch 1, sc in each st across. Turn. (45 sc each row)
Round 25
Waist accent, textured band Ch 2, hdc in each st across. Turn. (45 hdc)
Round 26
Ch 2, hdc in each st across. Turn. (45 hdc)
Round 27
Ch 1, sc in each st across. Turn. (45 sc) Do not fasten off. Set aside. This is the front bodice panel.Checkpoint: After completing Row 27, the piece should measure approximately 6 inches / 15 cm tall from the top chain edge to the last row.
Back Bodice Panel
The back bodice panel is worked identically to the front panel through Row 27, with one modification at Row 1 for the center back opening.
Foundation Chain: Chain 44.
Round 1
(WS): Starting in the 2nd chain from hook, sc in first 20 sts, ch 3, sk 3 sts, sc in remaining 20 sts. Turn. (40 sc plus ch-3 loop = 43 working positions)The ch-3 gap forms the button or tie loop at the center back neckline. On subsequent rows, work into the 3 chains of the loop as regular stitches so the stitch count restores to 43.
Round 2
(RS): Ch 1, sc across all 43 sts including the 3 chain sts of the loop. Turn. (43 sc)Rows 3 through 27: Work exactly as Rows 3 through 27 of Front Bodice Panel. Turn after each row. Stitch counts are identical to the front panel throughout.After Row 27, fasten off. Weave in ends on the back panel only at this point.
Lace Skirt Rounds
Here is where the magic happens. Take a deep breath. You are just repeating the same moves over and over.
Lace Round 1: Ch 1, sc in same st as join. Working across the transition round: [sk next ch-1 sp, 5 dc (fan) in next dc, sk next ch-1 sp, sc in next dc, ch 5, sk next 2 dc and their ch-1 sps, sc in next dc] rep 13 times around, ending last rep without final sc. Join with sl st to first sc. (13 fans, 26 sc, 13 ch-5 loops)
Lace Round 2: Sl st to center dc of first fan, ch 1, sc in center dc of fan. [Ch 5, sc in center ch of ch-5 loop, ch 5, sc in center dc of next fan] rep 12 times. Ch 5, sc in center ch of last ch-5 loop. Ch 5. Join with sl st to first sc. (26 sc, 26 ch-5 loops)
Lace Round 3: Ch 3 (counts as dc), 4 dc in same sc (half fan to start), sc in center ch of next ch-5 loop. [Ch 3, sc in center ch of next ch-5 loop, 5 dc (fan) in next sc, sc in center ch of next ch-5 loop] rep 12 times. Ch 3, sc in center ch of last ch-5 loop. Join with sl st to top of ch-3. (13 fans, 26 sc, 13 ch-3 loops)
Lace Round 4: Ch 1, sc in same st as join. [Ch 3, sc in center dc of next fan, ch 3, sc in center ch of next ch-3 loop] rep 12 times. Ch 3, sc in center dc of last fan. Ch 3. Join with sl st to first sc. (26 sc, 26 ch-3 loops)
Lace Round 5 (expansion round): Ch 3 (counts as dc), 4 dc in same sc. [Sc in center ch of next ch-3 loop, ch 5, sc in center ch of next ch-3 loop, 5 dc (fan) in next sc] rep 12 times. Sc in center ch of next ch-3 loop, ch 5, sc in center ch of last ch-3 loop. Join with sl st to top of ch-3. (13 fans, 26 sc, 13 ch-5 loops)
Rounds 6 through 7: Rep Lace Rounds 2 and 3 above.
Round 8: Rep Lace Round 4.
Round 9
Second expansion round Rep Lace Round 5, but substitute ch 7 wherever ch 5 is indicated. (13 fans, 26 sc, 13 ch-7 loops)
Round 10
Ch 1, sc in same st as join. [Ch 4, sc in center dc of next fan, ch 4, sc in center ch of next ch-7 loop] rep 12 times. Ch 4, sc in center dc of last fan. Ch 4. Join with sl st to first sc. (26 sc, 26 ch-4 loops)
Round 11
Ch 3 (counts as dc), 4 dc in same sc. [Sc in center ch of next ch-4 loop, ch 5, sc in center ch of next ch-4 loop, 5 dc (fan) in next sc] rep 12 times. Sc in center ch of next ch-4 loop. Ch 5. Sc in center ch of last ch-4 loop. Join with sl st to top of ch-3. (13 fans, 26 sc, 13 ch-5 loops)
Round 12
Rep Lace Round 2. (26 sc, 26 ch-5 loops)
Round 13
Rep Lace Round 3. (13 fans, 26 sc, 13 ch-3 loops)
Round 14
Rep Lace Round 4. (26 sc, 26 ch-3 loops)
Round 15
Third expansion round Ch 3 (counts as dc), 4 dc in same sc. [Sc in center ch of next ch-3 loop, ch 7, sc in center ch of next ch-3 loop, 5 dc (fan) in next sc] rep 12 times. Sc in center ch of next ch-3 loop. Ch 7. Sc in center ch of last ch-3 loop. Join with sl st to top of ch-3. (13 fans, 26 sc, 13 ch-7 loops)
Round 16
Ch 1, sc in same st as join. [Ch 4, sc in center dc of next fan, ch 4, sc in center ch of next ch-7 loop] rep 12 times. Ch 4, sc in center dc of last fan. Ch 4. Join with sl st to first sc. (26 sc, 26 ch-4 loops)
Round 17
Ch 3 (counts as dc), 4 dc in same sc. [Sc in center ch of next ch-4 loop, ch 5, sc in center ch of next ch-4 loop, fan in next sc] rep 12 times. Sc in center ch of next ch-4 loop. Ch 5. Sc in center ch of last ch-4 loop. Join with sl st to top of ch-3. (13 fans, 26 sc, 13 ch-5 loops)
Round 18
Rep Lace Round 2. (26 sc, 26 ch-5 loops)
Round 19
Rep Lace Round 3. (13 fans, 26 sc, 13 ch-3 loops)
Round 20
Rep Lace Round 4. (26 sc, 26 ch-3 loops) Checkpoint: After Round 20, the skirt section should measure approximately 10 to 11 inches / 25.5 to 28 cm from the first lace round.
Skirt
The skirt is worked in rounds, beginning at the bodice waist and working downward. You will work into the bottom edge of the joined bodice.
Round 1
Set-Up Round: With RS facing, attach yarn to any st at the lower edge of the bodice. Ch 1, sc in each st around the full lower edge of both front and back panels. Join with sl st to first sc. (90 sc)
Round 2
Increase Round 1: Ch 3 (counts as dc), dc in same st as join, [dc in next 2 sts, 2 dc in next st] rep around, end dc in last 1 st as needed to complete round. Join with sl st to top of ch-3. (120 dc)
Round 3
Increase Round 2: Ch 3 (counts as dc), dc in same st as join, [dc in next 3 sts, 2 dc in next st] rep around. Join with sl st to top of ch-3. (150 dc)
Round 4
Increase Round 3 (transition to lace multiple): Ch 3 (counts as dc), dc in next 4 sts, 2 dc in next st, [dc in next 24 sts, 2 dc in next st] 5 times, dc in remaining sts to end of round. Join with sl st to top of ch-3. (156 dc)
Round 5
Transition Round (creates foundation arches for lace): Ch 4 (counts as dc plus ch 1), sk 1 st, [dc in next st, ch 1, sk 1 st] rep around. Join with sl st to 3rd ch of beg ch-4. (78 dc, 78 ch-1 spaces = 156 working positions)
Scalloped Hem
Round 1
Hem Round 1 (foundation for scallops): Ch 1, sc in same st as join. [5 sc in next ch-3 loop, sc in next sc] rep 12 times. 5 sc in last ch-3 loop. Join with sl st to first sc. (78 sc total)
Round 2
Hem Round 2 (scallop points): Ch 1, sc in first sc. [Sk 1 sc, 5 dc in next sc, sk 1 sc, sc in next sc, sk 1 sc, 5 dc in next sc, sk 1 sc, sc in next sc] rep 12 times adjusting as needed to complete round. Join with sl st to first sc.
Round 3
Hem Round 3 (picot edging): Ch 1, sc in first dc of any scallop. [Picot, sc in next dc] rep across entire round, working sc into each dc and sc of the scallop round, and working picot between each. Join with sl st to first sc. Fasten off.
Flutter Sleeve Ruffle
Work along each armhole opening. The armhole is the open edge at the top of each side panel.
Round 1
Sleeve Round 1: With RS facing, attach yarn at the bottom of one armhole opening at the side seam. Ch 1, work 2 hdc in each row end around the full armhole opening (approximately 26 row ends = approximately 52 hdc). Join with sl st to first hdc. (52 hdc)
Round 2
Sleeve Round 2: Ch 1, (sc, ch 2, sc) in each hdc around. Join with sl st to first sc. (52 sc, 52 ch-2 arches)
Round 3
Sleeve Round 3 (picot ruffle finish): Ch 1, sc in first sc. [Picot, sc in next sc] rep around. Join with sl st to first sc. Fasten off. (52 picots)Repeat for second armhole.
Neckline Edging
Round 1
Neckline Round 1: With RS facing, attach yarn at the center back opening. Ch 1, sc evenly around the full neckline edge. Work 1 sc per st across the top chains and 1 sc per row end along any vertical edges. Join with sl st to first sc. Target count: 56 sc around the neckline.
Round 2
Neckline Round 2: Ch 1, sc in first sc. [Sk 1 sc, 3 dc in next sc, sk 1 sc, sc in next sc] rep around. Join with sl st to first sc. (14 small shell units)
Round 3
Neckline Round 3: Ch 1, sc in same st. [Picot, sc in center dc of next 3-dc group, picot, sc in next sc] rep around. Fasten off. (28 picots)
Crocheted Bow Embellishments
Make 2 bows as described in the Special Stitches section. Sew one bow to the front of each strap, centered at the point where the strap meets the neckline, approximately 1 inch / 2.5 cm from the neckline edge on each side.
Back Closure Tie Cords
Make 2 tie cords: Chain 40. Slip stitch back down the entire chain to form a firm, rounded cord. Fasten off, leaving a 4-inch / 10 cm tail.
Attach one cord to each side of the center back neckline opening, sewing securely at the topmost corner of each back panel.
Join
Step 1Step 1: Weave in all remaining loose ends using the tapestry needle. Pull ends through at least 1 inch / 2.5 cm in two different directions to secure.
Step 2Step 2: For wet blocking (recommended for cotton or cotton blend yarns): Submerge the finished dress in cool water. Gently press out water without wringing. Roll in a clean dry towel and press to remove excess moisture. Lay flat on the blocking board. Pin the skirt lace points gently outward to open the fan lace motifs. Pin the scallop hem points to emphasize the shape.
Step 3Step 3: For steam blocking (recommended for wool or wool blend yarns): Lay the dress flat on the blocking board. Hold a steam iron or handheld steamer 1 to 2 inches above the surface. Do not press the iron onto the yarn.
Step 4Step 4: Allow the dress to dry completely flat before unpinning, usually 12 to 24 hours.
Check your count
- Front Bodice Panel · Round 6: 47 sts
- Front Bodice Panel · Round 15: 49 sts
- Front Bodice Panel · Round 25: 45 sts
- Front Bodice Panel · Round 26: 45 sts
- Back Bodice Panel · Round 2: 43 sts
- Skirt · Round 1: 90 sts
Finish
- Weave in every loose end with a tapestry needle, running each tail through stitches in two directions to lock it in place.
- Wet block the finished dress and pin the skirt's lace points outward so each fan motif opens fully as it dries.
- Once blocking is dry, attach the crocheted bow embellishments at the shoulders and work the back closure tie cords through the loop.
Bigger or smaller
- Larger
- Move up to a slightly bigger hook, or hold the DK yarn a touch looser, to open the gauge and scale the whole dress up evenly without changing the stitch pattern.
- Smaller
- Drop to a smaller hook, or work the DK yarn snugger, to tighten the gauge so the bodice and lace skirt both come out smaller in proportion.
FAQs
Asked and answered
These answers came from whoever first published the pattern, kept word for word.
Which yarn gives the sharpest lace detail?
Cotton or cotton-blend DK yarns block into the crispest lace, since the fan-and-shell motifs rely on clean stitch definition. Fluffy, bouclé, or heavily textured yarns will blur the lace and are best avoided.
Is this dress suitable for warmer weather?
Yes, a mercerized cotton DK yarn gives the lace skirt drape and a slight sheen that suits summer wear well. A wool-cotton blend works better for cooler seasons while still blocking the lace cleanly.
How does the back closure actually work?
The back bodice panel leaves a small loop at the center back neckline, formed by a chain gap on the first row. That loop pairs with either a button or the crocheted tie cords for closing the dress.
Do the flutter sleeves get made separately?
The flutter sleeve ruffle is worked as trim added after the bodice and skirt are assembled, rather than as a standalone piece. The neckline edging and picot details follow in the same finishing stage.