 STITCH ROUND
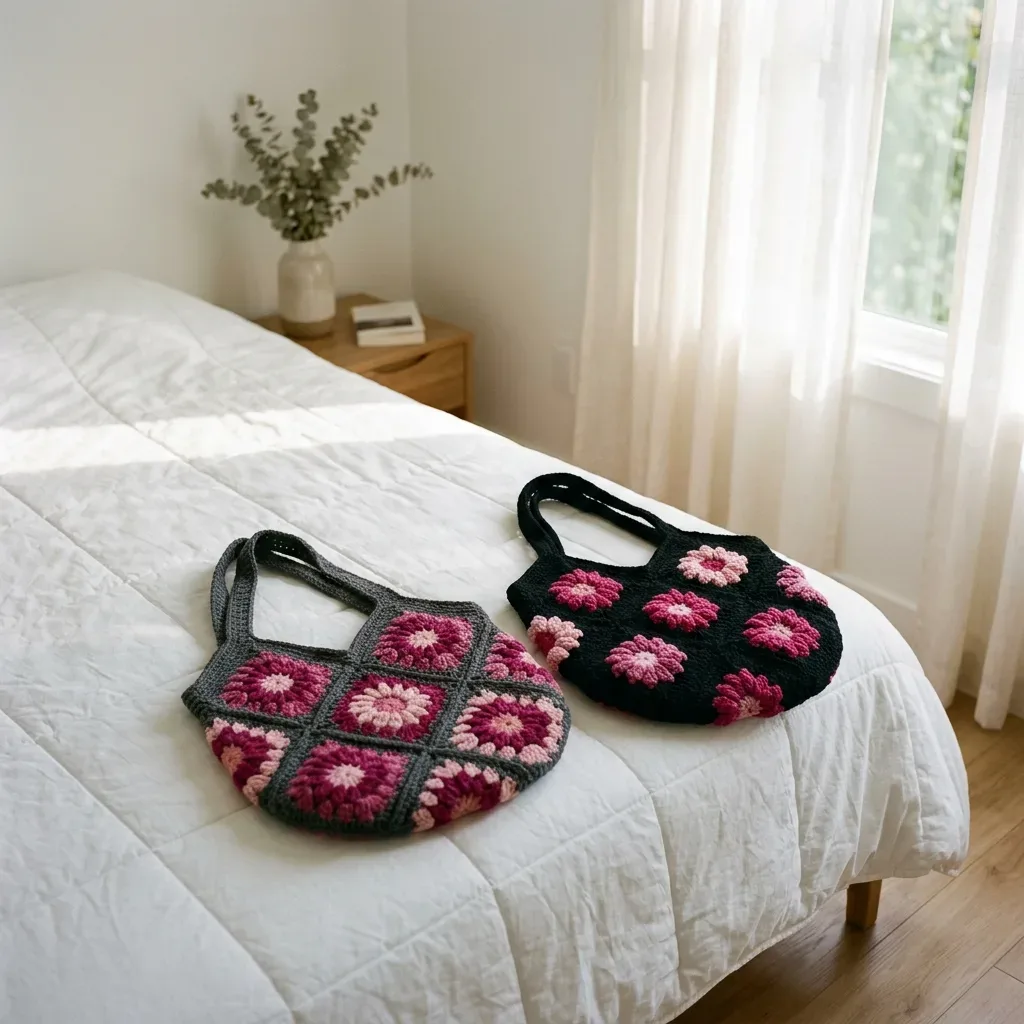
Peony motif granny square tote crochet pattern
Five rounds complete each peony motif in this granny square tote pattern.
- Skill
- Intermediate
- Rounds
- 9 rounds
- Yarn weight
- Worsted
- Hook
- 4.0 mm
- Time
- 10-14 hours

Intermediate
What the original page called it. Nothing here is graded a second time.

9 rounds
Each one gets its own line, with a box beside it to tick as you go.

Worsted
What the sample was made in. Any weight works — the size moves with it.
About this pattern
This tote is built from twelve peony motif squares, six for the front panel and six for the back, each one ticked off round by round until the whole stack is ready to join. The motif itself grows through a short run of rounds before getting framed in a charcoal border, so progress shows up fast and the project never feels like one long, shapeless task.
Shaping happens entirely in those early petal rounds, where soft pink blooms outward through dusty rose and deep rose before the charcoal frame locks everything square. Slow down right after the third round and lay the motif flat on a table; if it curves upward like a bowl, loosen the chain-1 spaces, and if it ruffles at the edge, tighten them slightly before moving on to the frame.
- Start each motif with a magic ring center that blooms in soft pink before the color changes begin.
- Build the petal rounds outward through dusty rose and then deep rose for layered dimension.
- Frame the finished motif square with the charcoal border round to square up the edges.
- Join twelve motifs into a three by two layout to form the front and back panels.
- Seam the panels together and work the structured rim upward in plain single crochet rounds.
- Crochet the padded straps separately, edge them densely, and attach them as the reinforced handles.
What goes wrong
- Skipping the lie-flat checkpoint Check after Round 3 that the motif lies flat with sixteen petal groups. Loosen tight chain-1 spaces if it cups, or tighten them slightly if it ruffles.
- Carrying yarn between petal rounds Fasten off at the end of each petal round instead of carrying the strand, since every round starts fresh in a new color.
- Ignoring motif gauge before joining Block one finished motif and compare it to the 4.5 inch target before making the rest. Adjust hook size up or down if it runs large or small.
- Stretching handles during blocking Shape the panels and rim firmly but leave the straps unstretched so the padded, densely edged handles keep their shape and density.
Yarn, hook and the rest
Copied from the source pattern's own materials list.
Yarn Requirements
- Worsted weight yarn, category 4
- MC (Main Color) Charcoal Gray: approximately 390 yards / 357 meters
- C1 Dusty Rose: approximately 105 yards / 96 meters
- C2 Deep Rose: approximately 105 yards / 96 meters
- C3 Soft Pink: approximately 75 yards / 69 meters
Suggested Yarn Brands
- Lion Brand Basic Stitch Anti-Pilling
- Paintbox Yarns Simply Aran
- Cascade 220 Superwash or another smooth worsted wool/acrylic blend
- Choose a smooth worsted yarn with good stitch definition. Fuzzy or heavily textured yarns will hide those pretty petal details. If you’re substituting, match motif size after blocking rather than relying only on the ball band gauge.
Tools
- 4.0 mm / G-6 crochet hook
- Yarn needle
- Scissors
- Removable stitch markers
Progress tracker
0 of the 9 rounds on this page are ticked.
The pattern, round by round
Kept in the order and the wording the source used. Tick a round as you finish it; the ticks stay on this device.
Main Pattern
Round 1
Make a magic ring. Ch 3, work 15 dc into ring, pull ring closed, join to top of beg ch-3. Fasten off. (16 dc)
Round 2
Join C1 Dusty Rose in any space between dc. Ch 3, dc in same sp, ch 1. 2 dc in next sp between dc, ch 1; rep from around, join. Fasten off. (16 2-dc groups, 16 ch-1 sps)
Round 3
Join C2 Deep Rose in any ch-1 sp. Ch 3, 2 dc in same sp, ch 1. 3 dc in next ch-1 sp, ch 1; rep from around, join. Fasten off. (16 3-dc groups, 16 ch-1 sps)Checkpoint: After Round 3, the flower should lie flat with 16 petal groups. If it cups (curves upward like a bowl), loosen the ch-1 spaces. If it waves or ruffles, tighten them slightly.
Main Pattern
Round 1
Join MC at one side seam. Ch 1, sc 51 evenly across front top edge, sc in side seam, sc 51 evenly across back top edge, sc in opposite side seam, join. (104 sc)
Round 2
through 6: Ch 1, sc in each st around, join. Fasten off after Rnd 6. (104 sc each rnd)
Main Pattern
Round 1
Ch 89. Sc in 2nd ch from hook and each ch across, turn. (88 sc)
Round 2
through 6: Ch 1, sc in each st across, turn. Fasten off after Row 6, leaving a long sewing tail. (88 sc)Strap Edging: Join MC at one long edge, sl st evenly around strap perimeter for a dense corded edge. Fasten off. (approximately 188 sl sts)
Square Frame and Border
Continue each motif with MC Charcoal Gray .
Round 4
Join MC in any ch-1 sp. Ch 3, work 2 dc in same sp, ch 2, 3 dc in same sp. 3 dc in each of next 3 ch-1 sps, (3 dc, ch 2, 3 dc) in next ch-1 sp; rep from 3 more times, omitting final corner group on last repeat because it has already been worked. Join. (60 dc, 4 ch-2 corner sps)
Round 5
Ch 1. (Sc, ch 2, sc) in corner ch-2 sp, sc in each of next 15 dc; rep from around, join to first sc. Fasten off, leaving a 12 inch / 30 cm tail if using this motif for joining. (68 sc, 4 ch-2 corner sps)Motif Checkpoint: Block each square to 4.5 inches / 11.5 cm. Each side has 17 sc between corner spaces when counted from corner sc to corner sc.
Color Placement Tip
For a lively garden look, alternate whether C1 or C2 is the strongest visible petal color from square to square. Keep MC consistent for the final square frame. This creates variety while maintaining cohesion.
Attaching the Straps
Attach each strap to the inside of the rim, centered over the outer motif columns. Sew a 1.25 inch / 3 cm square patch at each strap end, then sew an X through the patch for strength.
Finished handle drop is approximately 9 inches / 23 cm.
Join
Step 1Weave in all ends on the WS with a yarn needle
Step 2Steam or wet block lightly, shaping the panels square and the rim smooth
Step 3Do not stretch the handles aggressively while blocking
Step 4Let the tote dry completely before use
Check your count
- Main Pattern · Round 1: 16 sts
- Main Pattern · Round 1: 104 sts
- Main Pattern · Round 2: 104 sts
- Main Pattern · Round 1: 88 sts
- Main Pattern · Round 2: 88 sts
Finish
- Weave in every yarn end on the wrong side before any blocking begins.
- Steam or wet block each panel and the rim so the squares sit flat and the top stays smooth.
- Attach the padded, densely edged straps to the rim without stretching them during blocking.
Bigger or smaller
- Larger
- Move up to a larger hook or a slightly thicker worsted yarn. The looser stitches enlarge each motif and push the whole tote beyond its stated 13.5 by 12 inch finished size.
- Smaller
- Work fewer rounds of the plain single crochet rim before fastening off. The top edge sits lower and the finished tote stands a bit shorter without changing the panel size.
FAQs
Asked and answered
These answers came from whoever first published the pattern, kept word for word.
Can a different yarn be substituted for this tote?
Yes, choose a smooth worsted weight yarn with good stitch definition, since fuzzy or heavily textured yarn hides the petal layers. Match the finished motif size after blocking rather than relying on the ball band gauge alone.
Why does gauge matter so much for this project?
All twelve motifs need to line up exactly once they join into the three by two panel layout. A motif that runs even a little large or small will throw off the seams across the whole bag.
How should the yarn be budgeted across the pieces?
The charcoal main color covers the border rounds, the rim, and both straps, not just the motif outlines. Set aside most of the approximately 390 yards for those pieces before worrying about the motif colors.
What does it mean if the motif cups or ruffles?
Check the motif right after Round 3 while it is still flat on a table. A motif that cups needs looser chain-1 spaces, while one that ruffles needs them tightened slightly.