 STITCH ROUND
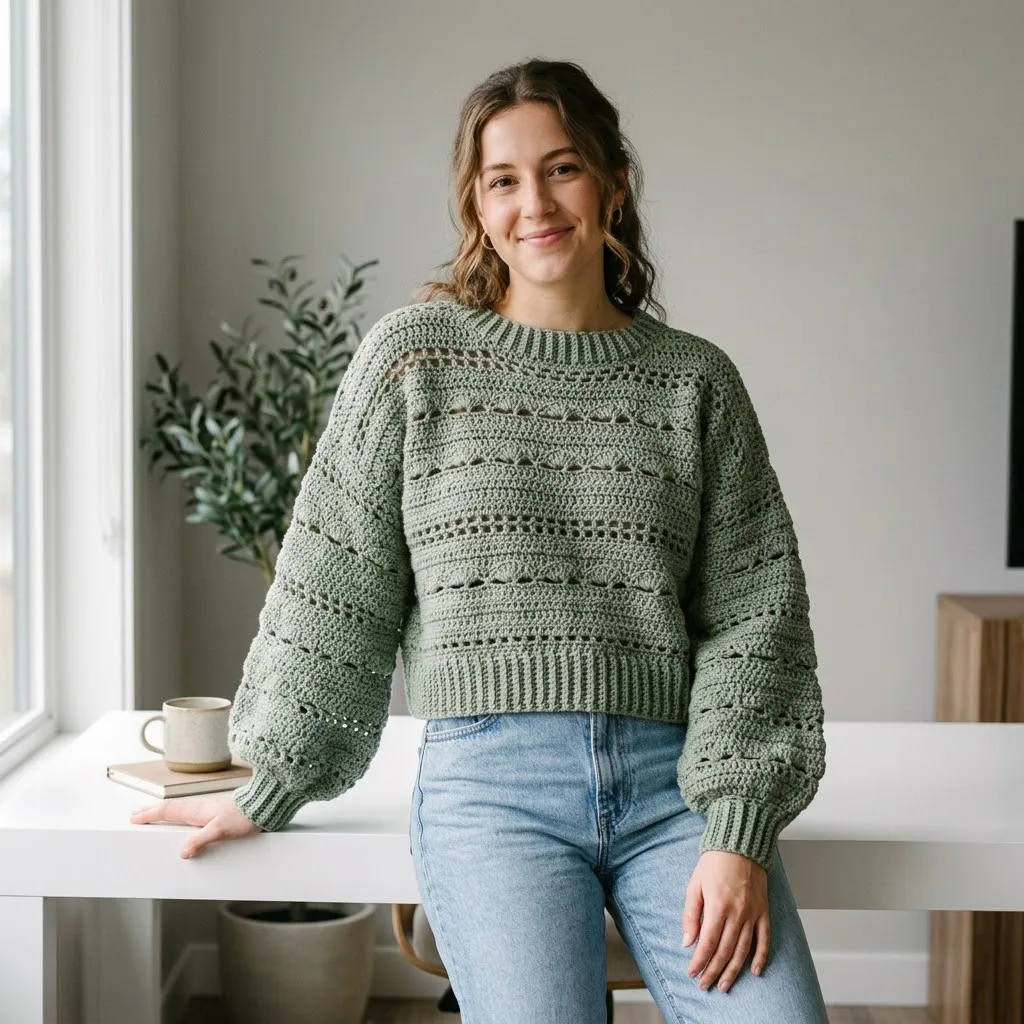
 Sage green boho lace crochet pullover pattern
Nine pattern parts tick off a lace-stitch pullover with raised bobble rows and shaped sleeves.
- Skill
- Intermediate
- Rounds
- 17 rounds
- Yarn weight
- Worsted
- Hook
- 5.0 mm
- Time
- 4-6 hours

Intermediate
What the original page called it. Nothing here is graded a second time.

17 rounds
Each one gets its own line, with a box beside it to tick as you go.

Worsted
What the sample was made in. Any weight works — the size moves with it.
About this pattern
This pullover builds across nine pattern parts: a lace foundation, two foundation rows that set up the body panels and sleeves, then the shaping sections that bring it all together. Each part is checked off in turn, starting with a swatch-style foundation before moving into the full-width rows. Working through the ribbing, the open lace row, and the bobble row in sequence keeps the sage green cotton-acrylic blend showing its stitch definition the way the sample does.
Shaping shows up in three places: shoulder shaping, neck shaping, and sleeve cap shaping, each its own tick-box part with no round count attached. Slow down at the ch-1 spaces in the lace row, since skipping or adding one there shifts the whole openwork column out of alignment for every row after it. The increase rows on the sleeve ask for the same care, since each repeat changes the stitch count going forward.
- Start with the lace foundation rows, working the open ch-1 spacing row that sets the pullover's signature texture.
- Add the bobble row across the body panel, spacing the raised stitches evenly between sections of single crochet.
- Repeat the established foundation sequence for a second body panel and again for the sleeve piece.
- Work the sleeve's increase rows at the set interval to widen it gradually from cuff to underarm.
- Finish shaping through the shoulder, neck, and sleeve cap sections before assembling the pieces.
What goes wrong
- Losing the ch-1 spacing in the lace row Count skipped stitches carefully in the lace row so the ch-1 spaces stay evenly placed. An uneven count here throws off every lace row that follows.
- Pulling bobbles too tight Keep tension relaxed when pulling through all 6 loops on the bobble stitch so the bump sits raised rather than flattened. A too-tight pull also distorts the surrounding single crochet stitches.
- Skipping the gauge swatch Check the 16 stitches and 14 rows over 4 inches before starting the body panels. The lace and bobble pattern makes gauge harder to eyeball mid-project, so confirm it up front.
Yarn, hook and the rest
Copied from the source pattern's own materials list.
Yarn
- Approximately 1200 to 1400 yards of worsted weight yarn, depending on your size. Look for a soft cotton blend or a smooth acrylic that has good stitch definition. The sample uses a cotton and acrylic blend in a muted sage green.
Hook
- 5.0mm (H/8) crochet hook for the main body. 4.5mm (7) crochet hook for the ribbing sections.
Notions
- Yarn needle for weaving ends and seaming
- Stitch markers
- Measuring tape
- Scissors
- Blocking mats and pins (optional but recommended)
Gauge
- 16 stitches and 14 rows = 4 inches in the main stitch pattern using the 5.0mm hook. Please check your gauge before starting.
- Skill Level
- Stitch Abbreviations and Definitions
- Ch (Chain): Yarn over, pull through the loop on your hook. This creates the foundation and is used for turning and spacing.
- Sl st (Slip Stitch): Insert hook, yarn over, pull through both loops. Used for joining and creating a tight, flat stitch.
- Sc (Single Crochet): Insert hook, yarn over, pull up a loop (2 loops on hook), yarn over, pull through both loops. Creates a short, dense stitch.
- Hdc (Half Double Crochet): Yarn over, insert hook, yarn over, pull up a loop (3 loops on hook), yarn over, pull through all 3 loops. Slightly taller than single crochet.
- Dc (Double Crochet): Yarn over, insert hook, yarn over, pull up a loop, yarn over, pull through 2 loops, yarn over, pull through remaining 2 loops. Creates a taller, more open stitch.
- Bobble (Bob): Work 5 double crochets into the same stitch, but stop each one before the final yarn over. You will have 6 loops on your hook. Yarn over and pull through all 6 loops at once. This creates a raised, textured bump on the right side of your work.
- Sk (Skip): Pass over the indicated stitch without working into it.
- FLO (Front Loop Only): Work into only the front loop of the stitch.
- Size Information
- The Main Stitch Pattern
Foundation
- Chain a multiple of 6 plus 3.
Progress tracker
0 of the 17 rounds on this page are ticked.
The pattern, round by round
Kept in the order and the wording the source used. Tick a round as you finish it; the ticks stay on this device.
Foundation
Round 1
Wrong Side Sc in 2nd ch from hook, sc in each ch across. Turn.
Round 2
Right Side Ch 1, sc in each st across. Turn.
Round 3
Ch 3 (counts as dc), dc in each st across. Turn.
Round 4
Ch 3, dc in next st, *ch 1, sk 1, dc in next 2 sts; repeat from * across. Turn. This creates the lace openwork row.
Round 5
Ch 3, dc in each dc and ch-1 space across. Turn.
Round 6
Ch 1, sc in first 3 sts, *bobble in next st, sc in next 5 sts; repeat from * across, ending with sc in last 3 sts. Turn.
Round 7
Ch 1, sc in each st across. Turn.
Round 8
Ch 3, dc in each st across. Turn. Repeat Rows 2 through 8 for the pattern.
Foundation Row
Round 1
through 4: Ch 1, sc in each st across. Turn. Now begin the main stitch pattern:
Round 5
Ch 3 (counts as dc here and throughout), dc in each st across. Turn. (76, 84, 92, 100 sts)
Round 6
Ch 3, dc in next st, *ch 1, sk 1, dc in next 2 sts; repeat from * across. Turn.
Round 7
Ch 3, dc in each dc and ch-1 space across. Turn. (76, 84, 92, 100 sts)
Round 8
Ch 1, sc in first 3 sts, *bobble in next st, sc in next 5 sts; repeat from * across, adjusting the final repeat as needed to end evenly. Turn.
Round 9
Ch 1, sc in each st across. Turn.
Round 10
Ch 3, dc in each st across. Turn.
Round 11
through 12: Ch 1, sc in each st across. Turn. Repeat Rows 5 through 12 until the panel measures approximately 11 (11.5, 12, 12.5) inches from the foundation, ending on a wrong side row.
Foundation Row
Round 1
through 4: Ch 1, sc in each st across. Turn. Begin the main stitch pattern as established for the body panels.
Increase Row:
Work 2 sts in the first st, continue in pattern to last st, work 2 sts in last st. Turn. (42, 44, 46, 48 sts)
Continue in pattern, working an increase row every 6th row a total of 8 (9, 10, 11) times. (56, 60, 64, 68 sts)
Work even until the sleeve measures 16 (16.5, 17, 17.5) inches from foundation.
Notions
Yarn needle for weaving ends and seaming Stitch markers Measuring tape Scissors Blocking mats and pins (optional but recommended)
Next Row
Continue in pattern for an additional 7 (7.5, 8, 8.5) inches.
Shoulder Shaping
Work across first 20 (22, 24, 26) sts. Fasten off. Skip center 26 (28, 30, 32) sts for the neck. Rejoin yarn and work across remaining 20 (22, 24, 26) sts. Fasten off.
Neck Shaping
Work across first 26 (28, 30, 32) sts. Turn, leaving remaining sts unworked.
Next Row
Continue decreasing 1 st at the neck edge every row 3 more times. (20, 22, 24, 26 sts)
Work even until the front matches the back length to shoulder. Fasten off.
Rejoin yarn to work the second shoulder, reversing all shaping.
Sleeve Cap Shaping
Sl st in first 5 (6, 7, 8) sts, work in pattern to last 5 (6, 7, 8) sts. Turn.
Decrease 1 st at each edge every row 4 times.
Decrease 1 st at each edge every other row until 16 (18, 20, 22) sts remain.
Fasten off.
Finish
- Weave in every yarn tail along the wrong side with a yarn needle, running each end through a few stitches to secure it.
- Seam the shoulder, neck, and side sections together using the yarn needle, matching stitch rows so the lace pattern lines up across seams.
- Block the finished pullover flat with mats and pins to open up the lace spacing and smooth the bobble texture before wear.
Bigger or smaller
- Larger
- Move up to a slightly larger hook than the 5.0mm called for in the main body, which loosens the lace and bobble stitches and increases overall size without changing the written stitch counts.
- Smaller
- Work the sleeve's increase row interval less often than the stated repeat count, which slows the sleeve's widening and produces a narrower finished sleeve.
FAQs
Asked and answered
These answers came from whoever first published the pattern, kept word for word.
Can a smooth acrylic replace the cotton blend yarn
Yes, the materials list allows either a soft cotton blend or a smooth acrylic, as long as it holds stitch definition for the lace pattern. Choose whichever fiber matches the drape wanted for the finished pullover.
Why does the pattern use two different hook sizes
The 4.5mm hook is reserved for the ribbing sections, while the 5.0mm hook works the main lace and bobble body. Using the correct hook for each section keeps the ribbing snug and the lace open.
How is the bobble stitch different from a regular double crochet
A bobble gathers five unfinished double crochets into one stitch, then pulls through all six loops at once. This bundles the stitches together into a raised bump instead of a flat stitch.
Does the lace row need stitch markers
Stitch markers are listed in the materials and help track the skipped stitches through the ch-1 spacing row. Placing one at the start of each repeat makes it easier to spot a missed skip before it compounds.