 STITCH ROUND
 Sunny shell stitch baby dress crochet pattern
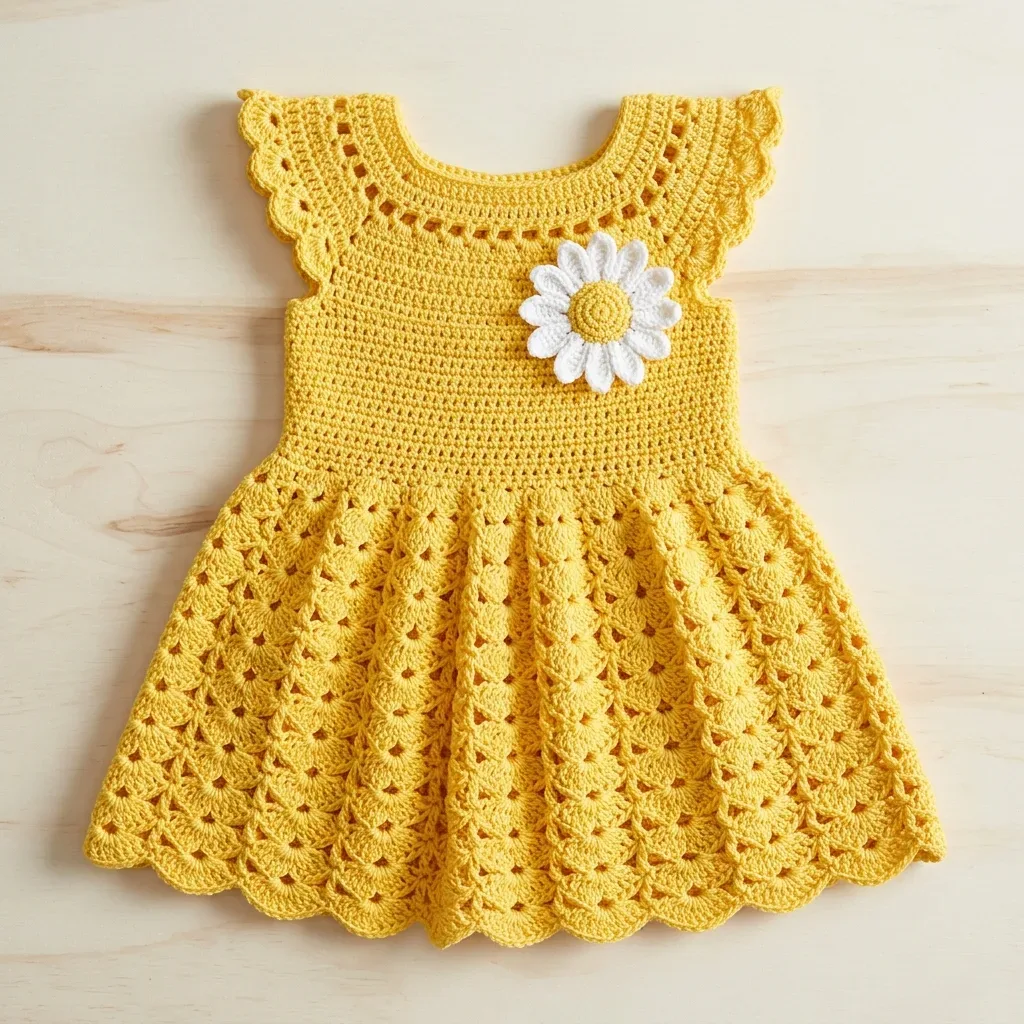
16 rounds build the yoke, 7 shape the skirt: a shell-stitch baby dress with scalloped hem and sleeves.
- Skill
- Intermediate
- Rounds
- 38 rounds
- Yarn weight
- Worsted
- Hook
- 4.00 mm
- Time
- 4-6 hours

Intermediate
What the original page called it. Nothing here is graded a second time.

38 rounds
Each one gets its own line, with a box beside it to tick as you go.

Worsted
What the sample was made in. Any weight works — the size moves with it.
About this pattern
This is a top-down baby dress built in ten labeled parts, starting with a flat-then-joined yoke of 16 rounds that shapes the back keyhole opening. From there the piece splits for armholes, settles into a smooth bodice, then flares into a seven-round shell-stitch skirt. Edging rounds finish the sleeves, neckline, and back closure, and a small daisy applique rounds out the trim. Tick off each labeled part in order and the shaping stays manageable.
The shaping logic lives in the shells: the skirt starts at 5-dc shells, grows to 7-dc, then to 9-dc, opening the hem without any increase math to track. Slow down at the divide for body and armholes, since that round sets up the fit of both the bodice and the sleeve edging that follows. Take the transition into the skirt at an easy pace too, since that single increase round determines how the shell pattern falls for the rest of the piece.
Gauge: 18 sc = 4 inches / 10 cm and 10 rows sc = 4 inches / 10 cm. Work a 4 inch square swatch in single crochet, block it, then measure; go up a hook size if you're getting more stitches per inch, down a hook size if you're getting fewer. Finished measurements for the 6 to 12 month size: chest circumference approximately 18 inches / 46 cm, dress length (shoulder to hem) approximately 13 inches / 33 cm, yoke depth approximately 3 inches / 7.5 cm, bodice length approximately 3.5 inches / 9 cm, and skirt length approximately 6.5 inches / 16.5 cm.
- Work the yoke flat first to shape the back keyhole, then join it to continue in the round.
- Divide the joined yoke to separate the armhole openings from the body of the dress.
- Work the plain bodice section for a fitted contrast against the skirt that follows.
- Increase into the skirt with a single transition round, then build the shell pattern down in stages.
- Add the scallop edging to the hem, the flutter sleeves, and both neckline finishes.
- Stitch the button loop and daisy applique, then block the piece to open the shells fully.
What goes wrong
- Uneven shell placement around the skirt Count stitches between shells carefully on each increase round so the fans stay evenly spaced rather than bunching on one side.
- Skipping the stitch count check before scallops Confirm the armhole or hem stitch total is a clean multiple before starting the scallop round, since an off count throws the shell rhythm off partway around.
- Choosing a textured or chenille yarn Stick to a smooth worsted like the mustard yellow called for so each shell's five stitches stay visible instead of blurring together.
- Skipping the wet block Pin the hem and neckline scallops open while damp and let the dress dry fully flat, since this step is what opens the shells into their finished shape.
Yarn, hook and the rest
Copied from the source pattern's own materials list.
- Lion Brand Pound of Love in Butterscotch gives you excellent stitch definition and machine washability. Perfect for baby items that will see lots of laundry days.
- Paintbox Yarns Simply Worsted in Mustard Yellow offers great value and consistent tension. The color range is excellent if you want to make this dress in other shades.
- Cascade 220 Superwash in Sunflower brings luxurious softness and beautiful drape. It's machine washable on gentle cycle, which matters enormously for baby clothes.
- Avoid highly textured or chenille yarns. They'll obscure the shell stitch detail that makes this skirt so special.
Yarn
- Main Color (MC): Worsted weight (category 4), approximately 350 to 400 yards in sunshine or mustard yellow
- Contrast Color (CC): Approximately 25 yards in white for the daisy applique
Hooks
- US size G-6 / 4.00 mm for the dress body
- US size E-4 / 3.50 mm for the daisy applique
Notions
- Stitch markers, at least 4
- Yarn needle for weaving ends
- Scissors
- One small button or snap, approximately 0.5 inch diameter, for back closure
- Sewing needle and thread to match yarn
Progress tracker
0 of the 38 rounds on this page are ticked.
The pattern, round by round
Kept in the order and the wording the source used. Tick a round as you finish it; the ticks stay on this device.
Yoke
The yoke starts flat to create the back keyhole opening, then joins in the round.
Foundation Row (RS): With MC and larger hook, ch 61.
Round 1
(RS): Sc in 2nd ch from hook and in each ch across. Turn. (60 sc)
Round 2
(WS): Ch 1, sc in each st across. Turn. (60 sc)
Round 3
(RS): Ch 1, sc in each st across. Turn. (60 sc)
Round 4
Eyelet Row (WS): Ch 3 (counts as dc), sk next st, (dc in next st, ch 1, sk next st) across to last st, dc in last st. Turn. (31 dc, 29 ch-1 sp)
This creates those pretty little holes you see near the neckline in the photos.
Round 5
(RS): Ch 1, sc in first dc, (sc in ch-1 sp, sc in next dc) across. Turn. (60 sc)
Round 6
(WS): Ch 1, sc in each st across. Turn. (60 sc)
Round 7
Increase Row (RS): Ch 1, sc in first st, inc in next st, (sc in next 3 sts, inc in next st) rep across to last 2 sts, sc in last 2 sts. Turn. (74 sc)
Round 8
(WS): Ch 1, sc in each st across. Turn. (74 sc)
Round 9
Increase Row (RS): Ch 1, sc in first st, inc in next st, (sc in next 4 sts, inc in next st) rep across to last 2 sts, sc in last 2 sts. Turn. (88 sc)
Round 10
(WS): Ch 1, sc in each st across. Turn. (88 sc)
Round 11
Join Round: Ch 1, sc in each st across to end of row. Do not turn. Work 4 sc evenly down the left back edge of the keyhole opening, then sl st to join to the first sc of Row 11. Place marker for beginning of round. (88 sc in the main round)From this point forward, you work in continuous rounds on 88 stitches.
Round 12
Ch 1, sc in each st around. Sl st to join. (88 sc)
Round 13
Increase Round Ch 1, (sc in next 10 sts, inc in next st) 8 times. Sl st to join. (96 sc)
Round 14
Ch 1, sc in each st around. Sl st to join. (96 sc)
Round 15
Increase Round Ch 1, (sc in next 11 sts, inc in next st) 8 times. Sl st to join. (104 sc)
Round 16
Ch 1, sc in each st around. Sl st to join. (104 sc) Checkpoint: Your yoke should measure approximately 3 inches from the top edge and look like a shallow bowl shape. Count those 104 stitches before moving on.
Flutter Sleeve Edging
Join MC at the underarm chain of one armhole opening.
Round 1
Ch 1, sc evenly around the armhole opening, working approximately 28 to 30 sc total. Sl st to join. (28 sc)Aim for a multiple of 7 stitches for the scallop math to work cleanly.Special Stitch – Scallop Edging: Used at the hem, neckline, and sleeve edges. You work shells separated by slip stitches to create a wavy, decorative border.
Round 2
Scallop: (Sk 2 sts, work 5 dc shell in next st, sk 2 sts, sl st in next st) rep around. Sl st to join. Fasten off. Weave in ends.With 28 stitches, you’ll get exactly 4 lovely scallops. Repeat for the second armhole.
Back Neckline Edge and Button Loop
Join MC at the top right corner of the back opening.
Round 1
Ch 1, sc down the right back edge, sc across the back neck top, sc up the left back edge. Turn.
Round 2
Ch 1, sc across to last 3 sts of left edge. Ch 4 (button loop), sk 2 sts, sc in last st. Fasten off. Weave in ends.Sew your button to the right back edge, aligned with the button loop.
Yoke Neckline Edge
Join MC at the back neckline.
Round 1
Ch 1, sc evenly around neckline edge, sl st to join. (approximately 60 sc)
Round 2
Scallop: (Sk 2 sts, 5 dc in next st, sk 2 sts, sl st in next st) rep around. Sl st. Fasten off. Weave in ends.With 60 stitches, you’ll get 10 pretty neckline scallops.
Daisy Applique
Switch to CC white and the smaller hook (E-4 / 3.50 mm).
Magic ring with CC white.
Round 1
Ch 1, work 10 sc in ring. Pull ring tight. Sl st to first sc. (10 sc)
Round 2
Petal Round (Ch 7, sl st in 2nd ch from hook, sc in next ch, hdc in next ch, dc in next 2 ch, hdc in last ch, sl st in next sc of Round 1) 10 times. (10 petals)Fasten off white. Join MC yellow at center.
Round 3
Center: Working over the magic ring center, (sc, hdc, sc) in magic ring 3 times to create a small raised yellow center. Sl st to join. Fasten off. Weave in ends.
Pin the daisy to the upper left chest area of the dress front. Sew securely around the center and at 2 to 3 petal bases using your yarn needle.
Divide for Body and Armholes
Now you’ll separate the front from the back and create armhole openings.
Round 17
Divide Round Ch 1. Sc in next 24 sts (back left panel). Ch 6, skip next 16 sts (left armhole). Sc in next 24 sts (front). Ch 6, skip next 16 sts (right armhole). Sc in next 24 sts (back right panel). Sl st to join. (72 sc plus 12 ch)
Round 18
Ch 1. Sc in each sc and each ch around. Sl st to join. (84 sc)
Round 19
Ch 1, sc in each st around. Sl st to join. (84 sc)
Bodice
The bodice is straightforward. Just single crochet rounds to create that smooth fitted section.
Rounds 20–30
through 30: Ch 1, sc in each st around. Sl st to join at end of each round. (84 sc per round)Work 11 rounds total. Simple and meditative.
Checkpoint: The bodice should measure approximately 3.5 inches from the armhole divide. Total dress length from shoulder should be about 6.5 inches at this point.
Skirt Transition Increase Round
Here’s where the math matters. You need a stitch count that’s a multiple of 6 plus 1 for the shell pattern to work properly.
Round 31
Skirt Increase Round Ch 1. Work (sc in next st, inc in next st) 37 times. Sc in last 10 sts. Sl st to join. (121 sc)Quick math check: 84 plus 37 increases equals 121 stitches. 121 minus 1 equals 120, which divides evenly by 6 for 20 shell repeats. Perfect.
Skirt
Now for the fun part. The shell pattern creates those beautiful layered fans.
Special Stitch – Shell Stitch: The shell is the star of this pattern's skirt section. It's simply 5 double crochets worked into the same stitch or space, creating a fan shape. Step by step: identify your target stitch; work 5 dc all into that single stitch; that cluster of 5 dc is one complete shell. Later in the pattern, shells grow to 7 dc, then 9 dc — same concept, just more stitches fanning out.
Round 32
Shell Setup Round Ch 3 (counts as first dc), work 2 more dc in same st as join (half shell at beg), sk 2 sts, sc in next st, sk 2 sts, (shell of 5 dc in next st, sk 2 sts, sc in next st, sk 2 sts) 19 times, work 2 dc in same st as beginning ch-3 (completing the beg half shell), sl st to top of ch-3. (20 shells, 20 sc)Don’t stress about counting individual stitches in shell rounds. Just count your shells and single crochets. You should have 20 of each.
Round 33
Sl st across first 2 dc of beg shell to reach center dc. Ch 1, sc in center dc of first shell. (Sk 2 dc, shell of 5 dc in next sc, sk 2 dc, sc in center dc of next shell) rep around. Sl st to first sc. (20 shells, 20 sc)
Round 34
Sl st across first 2 dc to center dc. Ch 1, sc in center dc of first shell. (Sk 2 dc, shell of 5 dc in next sc, sk 2 dc, sc in center dc of next shell) rep around. Sl st to first sc. (20 shells, 20 sc)
Round 35
Increase Round: Time to grow those shells. Sl st to center of first shell. Ch 1, sc in center dc. (Sk 2 dc, work 7 dc shell in next sc, sk 2 dc, sc in center dc of next shell) rep around. Sl st to first sc. (20 shells of 7 dc, 20 sc)
From now on, shells are 7 dc.
Rounds 36–38
through 38: Sl st across 3 dc to center dc of first shell. Ch 1, sc in center. (Sk 3 dc, 7 dc shell in next sc, sk 3 dc, sc in center of next shell) rep around. Sl st to first sc. (20 shells of 7 dc, 20 sc)
Round 39
Second Increase Round Sl st to center of first shell. Ch 1, sc in center. (Sk 3 dc, work 9 dc shell in next sc, sk 3 dc, sc in center of next shell) rep around. Sl st to first sc. (20 shells of 9 dc, 20 sc)
Rounds 40–42
through 42: Sl st across 4 dc to center. Ch 1, sc in center. (Sk 4 dc, 9 dc shell in next sc, sk 4 dc, sc in center of next shell) rep around. Sl st to first sc. (20 shells of 9 dc, 20 sc)
Checkpoint: The skirt should measure approximately 5 inches from the skirt join. Those shells should be visibly layered and fanning outward beautifully.
Hem Scallop Edging
Round 43
Scallop Round: After completing Round 42, join yarn at any sc between shells. Work a scallop round as follows: (Sc in sc, ch 3, dc in same sc to form picot fan, sc in center dc of next shell, ch 3, dc in same center dc, sc in 9th dc of that shell, ch 3, dc in same last dc, sc in next sc between shells) rep 20 times around. Sl st to first sc. Fasten off. Weave in ends.
The goal is 20 evenly spaced scallop peaks matching your 20 shell columns. Adjust as needed to get that wavy edge.
Join
Step 1Weave in all ends on the wrong side, running each tail through at least 1 inch of stitching.
Step 2Wet blocking is essential for this pattern. Submerge the finished dress in cool water. Gently squeeze out excess water without wringing. Roll in a clean towel to remove more moisture. Lay flat on a blocking mat, pin the hem scallops and neckline scallops open, and gently stretch the skirt to open up those shell stitches. Let dry completely, usually 12 to 24 hours.
Step 3Blocking transforms closed, bunchy shells into the beautiful open fan shapes you see in the photos. Don’t skip this step.
Check your count
- Yoke · Round 5: 60 sts
- Yoke · Round 9: 88 sts
- Yoke · Round 14: 96 sts
- Yoke · Round 15: 104 sts
- Flutter Sleeve Edging · Round 1: 28 sts
- Daisy Applique · Round 1: 10 sts
Finish
- Weave in every tail on the wrong side, threading each one through at least an inch of stitching so it holds after washing.
- Sew the button to the right back edge so it lines up with the button loop worked into the back neckline row, then stitch on the daisy applique.
- Wet block the finished dress: submerge, squeeze out water without wringing, roll in a towel, then pin the hem and neckline scallops open on a mat and let dry fully before removing the pins.
Bigger or smaller
- Larger
- Move up a hook size for the dress body, or use a slightly heavier worsted yarn, to grow every round without changing the stitch pattern.
- Longer skirt
- Repeat one of the later skirt rounds an extra time before starting the hem scallop edging to add length while keeping the same shell progression.
FAQs
Asked and answered
These answers came from whoever first published the pattern, kept word for word.
Can the dress be made in a different color?
Yes, the main color yarn suggested here comes in a wide shade range, and any smooth worsted weight will show the shell stitches just as clearly. Keep the contrast color reserved for the small daisy applique.
Why does the yoke start flat instead of in the round?
Working the foundation rows flat before joining creates the back keyhole opening that the button loop later closes. Once that opening is shaped, the yoke joins to continue in rounds.
What happens if the skirt feels too long on the model?
The top-down construction lets the dress be tried on as the skirt rounds are worked. Stop before the final skirt rounds or before the hem scallop edging if the length looks right sooner.
Does the daisy applique need the same hook as the dress?
No, the applique is worked with the smaller hook size in the contrast color, separate from the larger hook used for the dress body. Attach it during finishing once the main pieces are blocked.