 STITCH ROUND
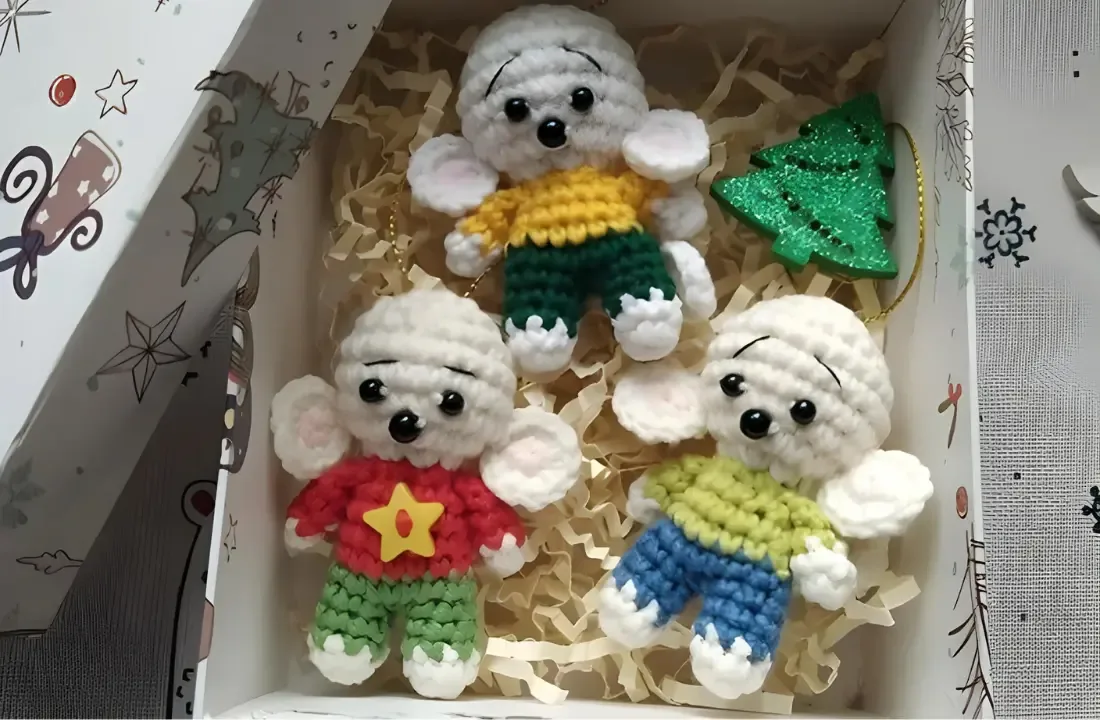
 Tiny amigurumi mouse crochet pattern with joined legs
12 rounds shape this tiny amigurumi mouse, legs joined straight into one body and head.
- Skill
- Intermediate
- Rounds
- 12 rounds
- Yarn weight
- Worsted
- Hook
- 2.0 mm
- Time
- 4-6 hours

Intermediate
What the original page called it. Nothing here is graded a second time.

12 rounds
Each one gets its own line, with a box beside it to tick as you go.

Worsted
What the sample was made in. Any weight works — the size moves with it.
About this pattern
This tiny mouse is worked as legs, body and head in a single continuous piece, with the two legs made first and then joined in round 5 before the shape rises into the body. Twelve rounds take the piece from two separate leg tubes to a finished head, so there is no assembly seam to plan for later.
- Start by crocheting the two legs separately before anything else is joined.
- Join the legs with a connecting chain so both sit side by side as one base.
- Work a combined round over both legs and the chain to merge them into a single tube.
- Finish the head shaping, then add bead eyes and nose and stuff the piece before closing.
What goes wrong
- Misaligning the leg join round Count 7 sc on each leg plus 1 sc in each chain stitch before moving on. Recheck the 16-stitch total before starting round 6.
- Positioning eyes before stuffing Fiberfill shifts the surface as it goes in, so beads placed too early can end up crooked. Stuff the head first, then set the eyes and nose against the firmed-up shape.
Yarn, hook and the rest
Copied from the source pattern's own materials list.
- YarnArt Jeans yarn (55% cotton, 45% acrylic, 50 g/160 m)
- 2.0 mm crochet hook
- Black beads for eyes and nose
- Yarn needle and scissors
- Fiberfill
Progress tracker
0 of the 12 rounds on this page are ticked.
The pattern, round by round
Kept in the order and the wording the source used. Tick a round as you finish it; the ticks stay on this device.
Legs
Make 1 ch and join with the first leg.
Continue crocheting in the body:
Round 5
7 sc on the first leg, 1 sc in 1 ch, 7 sc on the second leg, 1 sc in 1 ch (opposite side) [16]
Round 6
16 sc Change to red yarn:
Round 7
BLO 16 sc
Round 8
3 sc, dec, 6 sc, dec, 3 sc [14]
Round 9
3 sc, dec, 5 sc, dec, 2 sc [12]
Round 10
(1 sc, dec) repeat 6 times [8] Change to white yarn:
Round 11
(inc) repeat 6 times [16]
Round 12
(1 sc, inc) repeat 8 times [24]
Rounds 13–16
24 sc (4 rows)
Round 17
(2 sc, dec) repeat 6 times [18]
Round 18
(1 sc, dec) repeat 6 times [12]
Round 19
(dec) repeat 6 times [6] Fasten off. Ready to Learn More? Open the next page for Further Guidance!
Pages:
You will need
YarnArt Jeans yarn (55% cotton, 45% acrylic, 50 g/160 m)
2.0 mm crochet hook Black beads for eyes and nose Black embroidery floss for eyebrows Yarn needle and scissors Fiberfill
Abbreviations: R – row ch – chain sc – single crochet inc – increase (2 sc in one stitch) dec – decrease (2 sc together)
BLO – back loop only […] – number of stitches you should have at the end of the row (…) – repeat whatever is between the brackets the given number of times
Legs, body and head (single part)
Check your count
- Legs · Round 8: 14 sts
- Legs · Round 11: 16 sts
- Legs · Round 17: 18 sts
- Legs · Round 18: 12 sts
Finish
- Weave in every yarn end as it occurs, especially at the leg join and the color change into red, so no loose tails sit inside the body.
- Stuff the legs, body and head firmly with fiberfill as the rounds close in, working stuffing in gradually rather than packing it all in at the end.
- Attach the black beads for the eyes and nose once the head is complete, positioning them before the final rounds pull too tight to adjust placement.
Bigger or smaller
- Larger
- Move up to a thicker yarn with a matching larger hook than the 2.0 mm called for here. The same 12 rounds will produce a noticeably bigger mouse without changing any stitch counts.
- Smaller
- Drop to a finer thread-weight yarn with a hook sized for it, keeping the same round-by-round structure. The legs, body and head will shrink together since they are joined as one piece.
FAQs
Asked and answered
These answers came from whoever first published the pattern, kept word for word.
What does the back loop only round actually change?
round 7 onward, working into the back loop only leaves the front loops free, creating a subtle ridge line around the body. It is a texture choice, not a shaping one, so stitch counts stay the same.
Why are the eyes and nose beads instead of embroidery?
Black beads give the mouse's face a firmer, more defined look than embroidered stitches would on such a small piece. They also attach after stuffing, which makes it easier to judge placement on the filled head.
Is there a separate pattern piece for the head?
No, the legs, body and head are listed as a single part worked in one continuous set of 12 rounds. There is no separate head piece to crochet and sew on afterward.