 STITCH ROUND
 Crochet a beaded snowflake bracelet in ten rounds
Tick off 10 rounds to crochet a beaded snowflake bracelet with a sliding knot closure.
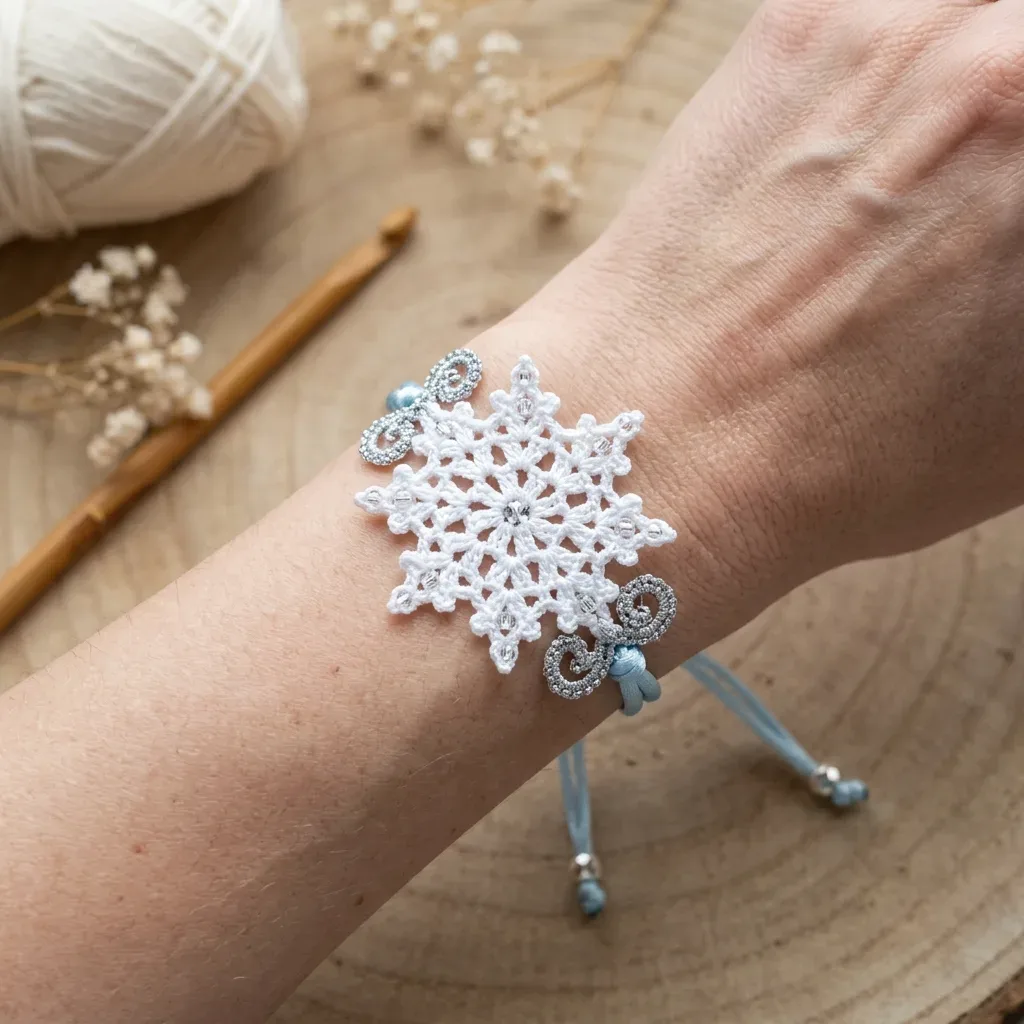
- Skill
- Intermediate
- Rounds
- 10 rounds
- Yarn weight
- Lace
- Hook
- 1.65 mm
- Time
- 2-4 hours

Intermediate
What the original page called it. Nothing here is graded a second time.

10 rounds
Each one gets its own line, with a box beside it to tick as you go.

Lace
What the sample was made in. Any weight works — the size moves with it.
About this pattern
This bracelet starts as a flat lace medallion and asks for ten rounds before it becomes a finished, cord-strung piece. The Main Pattern builds from a magic ring at the center outward, moving from simple treble crochet into the lacy chain spaces and picot points that give the snowflake its six-fold symmetry. Ticking off each round takes the work from a tight little disc to full lace width, and the project is compact enough to finish in one sitting.
The shaping work happens in the chain-5 spaces of round two and the dc fan-outs that follow, where six identical sections need to stay even for the hexagon to lie flat. Beads get locked in as the rounds progress, so slow down right before each bead-placement stitch and slide it flush against the front of the work first. The picot tips at the arm ends are the other place to work carefully, since a loose chain-3 loop blunts the point instead of sharpening it.
This pattern sits at the advanced beginner to intermediate skill level. The stitches themselves are simple, nothing beyond treble crochet, but working with size 10 thread and a tiny steel hook requires patience and steady tension; if you have never worked with crochet thread before, practice on a small doily or coaster first. Finishing this project, including assembly, takes about three to five hours total.
Gauge: working single crochet (sc) in the round with size 10 cotton thread and a US steel size 7 hook, 10 sc equals 1 inch (2.5 cm) and 10 rows equals 1 inch (2.5 cm). Swatching is not essential, but consistent tension matters a lot: if the motif cups upward your tension is too tight (try a larger hook); if it ruffles, you are too loose (go smaller). The finished snowflake measures approximately 2.75 inches or 7 cm from point to point, and the bracelet's sliding knot adjusts to fit wrist circumferences from 5.5 inches to 8 inches (14 cm to 20 cm).
- Start with a magic ring at the center and build the first tier of treble crochet stitches.
- Slide a pre-strung bead into place before each stitch that calls for one, locking it flush against the right side.
- Fan five double crochet stitches into each loop to round out the hexagonal body.
- Work the remaining rounds outward, adding picots at the arm tips to form the snowflake's points.
- Join every round with a slip stitch so the motif lies flat instead of cupping.
What goes wrong
- Bead placed on the wrong side Slide the bead flush against the front of the work before working the dc, not after. Working the stitch first traps the bead on the back where it will not show.
- Picot closed into the wrong chain Slip stitch into the very first chain made, closest to the hook, not the second or third. Joining into the wrong chain leaves the point lopsided instead of sharp.
- Tension too tight on joins Loosen up if the motif starts to cup instead of lying flat, as the checkpoint warns. A snug join is fine, but each round should still sit flush against the one before it.
- Unpinning before the stiffener dries Spray with fabric stiffener while the piece is still pinned to the blocking board, then let it dry fully. Removing pins early lets the points relax back out of their stretched shape.
Yarn, hook and the rest
Copied from the source pattern's own materials list.
Crochet Thread
- Size 10 crochet cotton thread in white, approximately 25 yards or 23 meters. This fine thread creates the delicate lace structure.
Hook
- US steel hook size 7, which measures 1.65 mm. If you tend to crochet loosely, drop down to a US steel hook size 8 at 1.50 mm instead.
Beads
- 12 clear or white crystal bicone or rondelle beads, approximately 3 mm to 4 mm in size. The holes must be at least 0.5 mm in diameter to fit your crochet thread. Test this before you buy.
Cord
- 24 inches or 61 cm of 1 mm satin rattail cord or waxed nylon cord in light blue.
Charms
- 2 silver filigree swirl charms with attachment loops, approximately 12 mm to 15 mm in size.
Cord End Beads
- 2 light blue pearl or opaque glass beads, approximately 6 mm to 8 mm.
Findings
- 4 small silver crimp beads or bead tip findings for securing cord ends.
Tools
- Tapestry needle, scissors, fabric stiffener or blocking spray (optional but highly recommended), and pins for blocking.
Progress tracker
0 of the 10 rounds on this page are ticked.
The pattern, round by round
Kept in the order and the wording the source used. Tick a round as you finish it; the ticks stay on this device.
Main Pattern
Before You Begin Pre-String Your Beads: This step is essential. Thread all 12 beads onto your ball of thread BEFORE making your first stitch. Use a fine wire needle threader or beading needle to get the thread through the bead holes. Push all beads down the thread, out of your way. You will slide them into position one at a time when the pattern calls for a bead-dc.
Round 1
Make a magic ring (MR) . Chain 4, this counts as your first treble crochet (tr) . Work 11 more tr into the ring. Join with slip stitch (sl st) to the top of your beginning ch-4. Pull the ring closed snugly. (12 tr)
Round 2
Ch 1, this does not count as a stitch. Single crochet (sc) in the same stitch as your join. Ch 5. Skip 1 tr. Sc in the next tr. Ch 5. Repeat this pattern around, working sc into every other tr with ch 5 between each. Join with sl st to the first sc. (6 sc, 6 ch-5 spaces)
Round 3
Sl st into the first ch-5 space. Ch 3, this counts as your first double crochet (dc) . Work 4 more dc into the same ch-5 sp for 5 dc total in that space. Ch 2. Work 5 dc into the next ch-5 sp. Ch 2. Continue around, placing 5 dc into each ch-5 space with ch-2 bridges between groups. Join with sl st to the top of your beginning ch-3. (30 dc, 6 ch-2 spaces)
Round 4
Ch 1, does not count as a stitch. Sc in the same stitch as your join. Sc in the next 4 dc. Ch 3. Sc in the next 5 dc. Ch 3. Continue around. Join with sl st to the first sc. (30 sc, 6 ch-3 spaces)Checkpoint: Your motif should be a small flat hexagonal disc about 0.75 inches or 2 cm across. Six groups of 5 sc should be clearly visible with ch-3 arches between them. If it cups, loosen your tension.
Round 5
Sl st into a ch-3 space. Ch 3 (counts as first dc). Work 2 dc into the same space. Ch 3. Work 3 dc into the same space again. Ch 2. Move to the next ch-3 sp and work 3 dc, ch 3, 3 dc. Ch 2. Continue around. Join with sl st to the top of your beginning ch-3. (36 dc total, 6 ch-3 arch spaces, 6 ch-2 spaces)
Round 6
Sl st across 2 dc to reach the ch-3 arch at the center of your first cluster. Sl st into the ch-3 space. Ch 4 (counts as first tr). Work 4 tr into the same ch-3 sp. Ch 1. Work 5 tr into the same ch-3 sp again. This V-fan forms a snowflake arm. Ch 3 for the bridge to the next arm. Work 5 tr into the next ch-3 sp, ch 1, 5 tr into the same sp. Ch 3. Continue around. Join with sl st to the top of your beginning ch-4. (60 tr total, 6 fan-arms of 10 tr each, 6 ch-1 spaces within fans, 6 ch-3 bridges)Bead Double Crochet (bead-dc): This is how you lock beads into your work. Before starting the stitch, slide one pre-strung bead along the thread until it sits flush against your work on the front side. Then work a regular double crochet (dc) as normal. The bead gets trapped at the base of the stitch, facing outward on the right side.Picot: Chain 3, then slip stitch into the first chain you made, the one closest to your hook. This forms a small decorative closed loop. Picots create the delicate points at the snowflake arm tips.
Round 7
First Bead Round Sl st to the ch-1 space at the center of the first fan. Ch 3 (counts as first dc). Work a bead-dc in the same space by sliding 1 bead into position before completing the dc. Ch 3. Sl st to the top of the outer tr at the fan arm tip, about 2 tr over to the edge. Work a picot . Sl st back to the ch-1 sp. Ch 3. Work 1 dc into the ch-1 sp. Ch 4 for the bridge to the next fan.Repeat across all 6 fan arms: sl st to ch-1 sp, ch 3, dc, bead-dc in sp, ch 3, sl st to outer tr tip, picot, sl st back, ch 3, dc in ch-1 sp, ch 4 bridge. Join with sl st to the top of your beginning ch-3. (6 beads placed)
Checkpoint: Six snowflake arms should be emerging from the center. Each arm tip has a picot. Six crystal beads are visible, one per arm. The motif should still lie flat. Diameter should be approximately 1.5 inches or 3.8 cm.
Round 8
Sl st into the first ch-4 bridge space. Ch 3 (counts as dc). Work 2 dc into the same ch-4 sp. Ch 2. Work 3 dc into the same space. Ch 2. Move to the next ch-4 sp and work 3 dc, ch 2, 3 dc. Ch 2. Continue around. Join with sl st to the top of your beginning ch-3. (36 dc in 6 shells, 12 ch-2 spaces)
Round 9
Second Bead Round Sl st to the ch-2 space at the center of the first shell. Ch 1. Sc into the space. Ch 4. Tr into the top of the center dc of the shell (the 3rd dc). Ch 3. Sl st to the top of the same tr. This creates the outer secondary arm tip. Ch 4. Sc into the next ch-2 sp (the outer space between shells). Ch 5. Sc into the next ch-2 sp (inner space of next shell). Ch 4. Tr into the center dc of that shell. Ch 3. Sl st to the top of the same tr. Ch 4. Continue around all 6 shell repeats. Join with sl st to the first sc.Bead placement for this round: As you work each ch-5 bridge between shells, slide 1 bead to sit at the midpoint. Work 2 ch, slide the bead snug, then work 3 more ch to finish the bridge. This places 1 bead at the center of each inter-shell bridge. (6 beads placed, 12 total beads now complete)
Final Checkpoint: Your snowflake now has 6 primary arms with beads near their bases, plus 6 secondary points between them. Six more beads sit on the bridges. Diameter should be approximately 2.5 to 2.75 inches or 6.3 to 7 cm. The motif should lie completely flat.
Round 10
Edging and Cord Anchor Loops Sl st to the first ch-5 bridge space. Mark 2 opposite ch-5 bridge spaces at the 3 o’clock and 9 o’clock positions. These will become your cord anchor loops.For the 4 unmarked ch-5 bridge spaces: sc into the space working around the bead, ch 2, sc into the same space.For the 2 marked anchor spaces: sc into the space, ch 8 to form the cord loop, sc into the same space.Work sc evenly around the entire outer edge, placing stitches into ch-4 spans and sc from the previous round. Join with sl st to the first sc. (Approximately 60 to 72 sc around the perimeter, 2 ch-8 anchor loops)Fasten off, leaving a 6-inch tail for weaving in.
Blocking Your Snowflake
Wet the snowflake thoroughly in cool water. Pin it to a blocking board, stretching each of the 12 outer points to their fullest extension. Let it dry completely. For extra crispness, spray lightly with fabric stiffener while pinned and allow it to dry again before removing the pins.
Assembling the Bracelet Threading the Cord
Cut your satin or waxed cord to 24 inches. Fold it in half to find the center. Feed one cut end through one ch-8 anchor loop from front to back. Feed the other end through the opposite anchor loop from front to back. Pull both ends so equal lengths extend from each side, with the cord’s midpoint hidden behind the snowflake.
Creating the Adjustable Sliding Knot
Hold both cord ends parallel. Cut a separate 4-inch piece of the same cord. Position this short piece perpendicular to the two main cords about 1 inch from the back of the snowflake. Wrap it around both main cords 3 to 4 times, then thread the ends back through the wraps. Pull snug. This creates a sliding barrel knot that allows the wearer to adjust the bracelet size.
Join
Step 1Insert hook under both loops of the indicated stitch, yarn over, pull through both the stitch and the loop on hook in one motion. This joins rounds almost invisibly.
Finish
- Weave in all loose thread ends securely before blocking, since fine lace threads can slip loose easily.
- Wet the motif, pin out all 12 outer points on a blocking board, and let it dry fully for crisp edges.
- Thread the cord through the motif, secure the ends with crimp beads, and tie the sliding knot closure.
Bigger or smaller
- Larger or smaller motif
- Swap to a different size 10 cotton brand with a thicker or thinner ply, or move between the steel size 7 and steel size 8 hook, to shift the overall drape and width of the finished disc slightly.
- Wrist fit
- The sliding knot closure is designed to fit wrist circumferences from 5.5 inches to 8 inches, or 14 cm to 20 cm. Cut the satin or waxed cord longer or shorter than 24 inches before tying the sliding knot to widen or narrow the range of wrist sizes the closure can adjust to.
FAQs
Asked and answered
These answers came from whoever first published the pattern, kept word for word.
Do the bead holes need to be a specific size?
Yes, the beads need a hole at least 0.5 mm across to pass the size 10 crochet thread. Test a single bead on the thread before buying a full batch so the bracelet does not stall partway through.
Can a different hook size be used?
Steel hook size 7 at 1.65 mm is the default, but steel size 8 at 1.50 mm suits anyone who crochets loosely. Pick one and stay consistent so the motif lies flat instead of cupping.
What if the cord needs to be a different color?
The pattern calls for light blue satin rattail or waxed nylon cord, but any cord in a preferred color will thread through just as well. Keep the cord at 1 mm so it still fits the stitches it passes through.
Is blocking really necessary?
Blocking is what pins the 12 outer points into their sharp, extended shape and stops the lace from curling. Skipping it leaves the motif soft and uneven, though fabric stiffener is optional for anyone using a non-cotton thread.