 STITCH ROUND
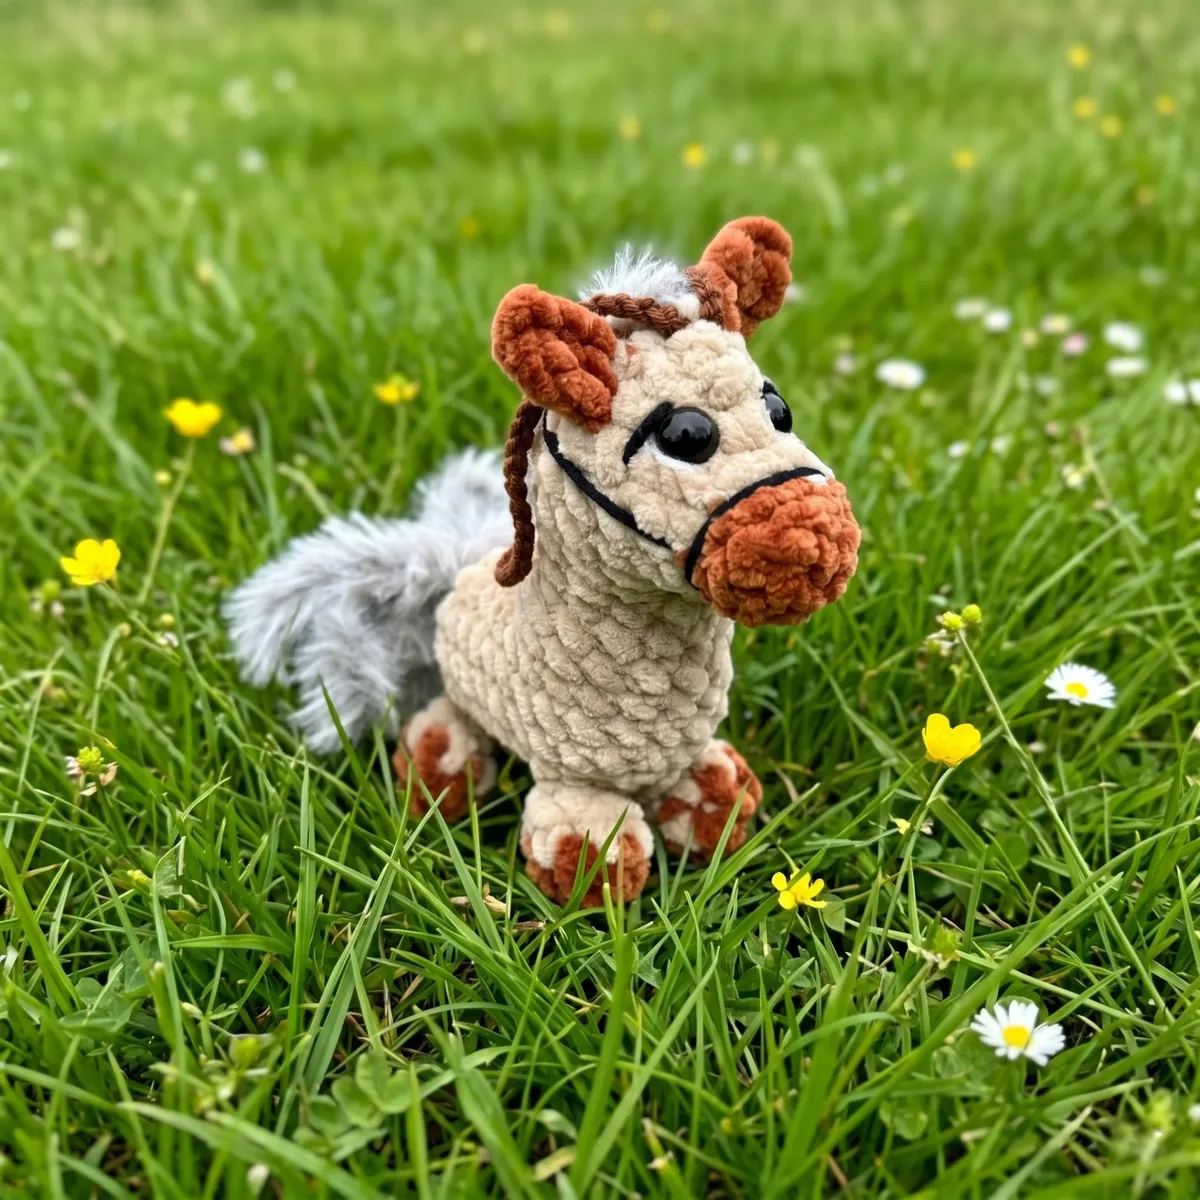
 Crochet horse keychain amigurumi pattern with ornament loop
17 rounds shape the head and body of this crochet horse keychain and ornament.
- Skill
- Intermediate
- Rounds
- 22 rounds
- Yarn weight
- Bulky
- Hook
- 4.5 mm
- Time
- 4-6 hours

Intermediate
What the original page called it. Nothing here is graded a second time.

22 rounds
Each one gets its own line, with a box beside it to tick as you go.

Bulky
What the sample was made in. Any weight works — the size moves with it.
About this pattern
This little horse builds from a single continuous piece — the head and body take 17 rounds worked back to back with no break, so the shape grows in one sitting rather than in separate parts sewn together later. Four legs, two ears, and an oval muzzle finish out the rest, each a short, quick tick-box on its own.
The shaping lives almost entirely in those early head-and-body rounds, where increases build the curve of the skull and the widen into the barrel of the body. Slow down at any round that mixes increases with plain stitches in the same pass — that's where a lost stitch marker or a miscount throws the whole shape off before it's obvious.
Finished size is approximately 4 inches (10 cm) tall. Gauge is not critical for this project — consistent tension matters more than hitting an exact measurement — and the pattern is written throughout in US crochet terminology.
- Work the head and body as one continuous spiral piece from a magic ring all the way through.
- Set the shaping aside partway through to insert safety eyes while there's still room to work inside.
- Build the oval muzzle separately as a short flat piece worked back and forth in rows.
- Stuff the head and body firmly before closing the final round.
- Sew the legs, ears, and muzzle onto the body, then add face and hoof details with a tapestry needle.
What goes wrong
- Losing the round marker in a spiral Move the stitch marker up every round without exception, since the head and body are worked in one continuous spiral with no natural stopping point to re-find the start.
- Muzzle piece rounds not lying flat Work the turn stitches into the last chain exactly as directed so the oval keeps its shape instead of curling before it's pinned to the face.
- Safety eyes placed after stuffing Insert the safety eyes while the head is still open and easy to reach, since fiberfill makes the backs impossible to seat properly once packed in.
Yarn, hook and the rest
Copied from the source pattern's own materials list.
Main color yarn
- YarnArt Dolce, shade 771 (or any chunky/bulky chenille-style yarn)
Contrast color yarn
- YarnArt Dolce, shade 765 — for legs, muzzle, and ears
- Loop/hanging cord yarn: YarnArt Jeans, shade 70 (or main color yarn)
- Bridle and eye detail yarn: YarnArt Jeans, shade 53 (or embroidery floss in brown)
- Eye white detail yarn: YarnArt Jeans, shade 01 (or white embroidery floss)
Mane and tail yarn
- YarnArt Market Fancy (or any textured/fluffy cotton yarn)
- Crochet hook: 4.5 mm
Safety eyes
- 10 mm, 2 pieces
- Polyester fiberfill stuffing
- Stitch marker
- Tapestry needle
- Scissors
Progress tracker
0 of the 22 rounds on this page are ticked.
The pattern, round by round
Kept in the order and the wording the source used. Tick a round as you finish it; the ticks stay on this device.
Head + Body
Round 1
Magic ring, 6 sc into ring. (6)
Round 2
Inc in each st around. (12)
Round 3
[1 sc, inc] repeat around. (18)
Round 4
4 inc, 14 sc. (22)
Round 5
22 sc. (22)
Round 6
4 dec, 14 sc. (18)
Round 7
3 dec, 12 sc. (15)
Round 8
3 dec, 9 sc. (12)After Rnd 8, work a shift round of 7 sc to reposition your stitch marker to the center back of the piece — this sets up the spine/back line for the body section. The exact number of shift stitches may vary slightly depending on your tension.
Round 9
Shift 7 sc (repositioning marker to center back). (12)
Round 10
Chain 7. (Do not turn.)
Round 11
Starting in the 2nd ch from hook, work 6 sc along the chain, then 12 sc across the existing stitches, then 5 sc along the other side of the chain foundation, then 1 inc. (25)
Round 12
1 inc, 23 sc, 1 inc. (27)
Round 13
1 inc, 26 sc. (28)
Round 14
28 sc. (28)
Round 15
28 sc. (28)
Round 16
2 dec, 9 sc, 2 dec, 7 sc, 2 dec. (22)
Round 17
[1 sc, dec] × 7, 1 sc. (15)Sl st at the end of the final round. Sew the remaining opening closed.Insert 10 mm safety eyes between Rnds 2 and 3. For a forward-facing look, leave 3 stitches between eyes. For a side-facing look, leave 5 stitches between eyes and position them lower on the face. Stuff the head and body firmly before closing.
Legs — Make 4
Work each leg in two colors. Begin with the contrast color (dark hooves).
Round 1
Magic ring, 6 sc. (6)Change to main color.
Round 2
6 sc. (6)
Round 3
6 sc. (6)Sl st at the end of Rnd 3. Leave a long tail for sewing. Do not stuff.
Muzzle/Nose
Work with contrast color yarn.
Chain 4. Starting in the 2nd ch from hook:
Row 1
2 sc, then 3 sc into the last chain stitch (to turn the corner). (5)
Row 2
Working along the opposite side of the foundation chain: 1 sc, 1 inc. (7)Fasten off, leaving a long tail for sewing.
Ears — Make 2
Chain 2. Starting in the 2nd ch from hook, work 1 sc. Pull the yarn through and fasten off, leaving a long tail for sewing.
Join
Step 1Eye shaping: Using a tapestry needle and matching yarn, create a subtle eye socket effect by running the needle in through point 1, out through point 2, in through point 3, and out through point 4 — secure the yarn. Then enter point 1, exit point 5, enter point 6, exit point 4, and secure. This gives the face gentle, expressive depth.
Step 2Ears: Sew both ears to the top of the head, leaving 1–2 stitches between them at center crown.
Step 3Muzzle: Pin the oval muzzle piece to the front of the face and sew into place using the yarn tail.
Step 4Legs: Sew all four legs close together beneath the body — front legs and back legs should sit nearly flush against one another for a stable, balanced look.
Step 5Eye whites: Using white yarn or embroidery floss, stitch small curved lines above and beside each safety eye to create a white highlight effect.
Step 6Eye pupils: Using dark yarn or black embroidery floss, add small pupil details around each safety eye.
Step 7Bridle: Using brown yarn or embroidery floss, embroider simple bridle lines across the muzzle and over the nose bridge.
Step 8Mane: Cut short lengths of your fluffy/textured yarn and sew them along the top of the neck and head as a mane. For the tail, knot or sew 4 lengths together and attach at the body’s back end. Any method of your choice works beautifully.
Step 9Hanging loop (optional): Attach your loop yarn at the top of the head, chain 50, and fasten off securely to create a hanging loop for a keychain ring or ornament hook.
Check your count
- Head + Body · Round 5: 22 sts
- Head + Body · Round 11: 25 sts
- Head + Body · Round 16: 22 sts
- Head + Body · Round 17: 15 sts
- Legs — Make 4 · Round 1: 6 sts
- Legs — Make 4 · Round 2: 6 sts
Finish
- Weave in every color-change tail on the legs before sewing them on, since chenille-style yarn hides knots poorly once stuffed.
- Stuff the head and body firmly as the rounds close in, working fill into the neck and rump areas before the opening gets too small. Stuff firmly but not so tightly that the fabric distorts.
- Close the last round with a tapestry needle and cinch tight, then attach the hanging cord loop at the same point for a secure keychain hang.
Bigger or smaller
- Larger
- To make a larger horse, simply use a heavier yarn with a proportionally larger hook. The stitch counts stay identical — only the gauge changes.
FAQs
Asked and answered
These answers came from whoever first published the pattern, kept word for word.
What skill level is required for this crochet horse pattern?
This pattern is suited for beginners with some crochet experience — you should be comfortable working in a continuous spiral, making a magic ring, and performing basic increases and decreases. Complete beginners may find the body construction and color changes slightly challenging, but the stitch counts are low and the sections are short, making it a great next-step project after your very first amigurumi.
Can I substitute the chenille yarn with a different yarn type?
Yes, absolutely. You can substitute YarnArt Dolce with any chunky or bulky weight chenille yarn in similar fiber content. Cotton or acrylic yarns in the same weight category will also work well, though the finished texture will differ slightly. Just make sure to adjust your hook size to match the yarn's recommended gauge and aim for a firm, tight fabric so the stuffing doesn't show through.
How long does it take to crochet this horse from start to finish?
Most intermediate crocheters can complete this project in approximately 2–3 hours, including assembly and embroidery details. Beginners may need 4–5 hours, especially when working with chenille yarn for the first time. The mane and tail embellishments add a little extra finishing time but are very straightforward to attach.