 STITCH ROUND
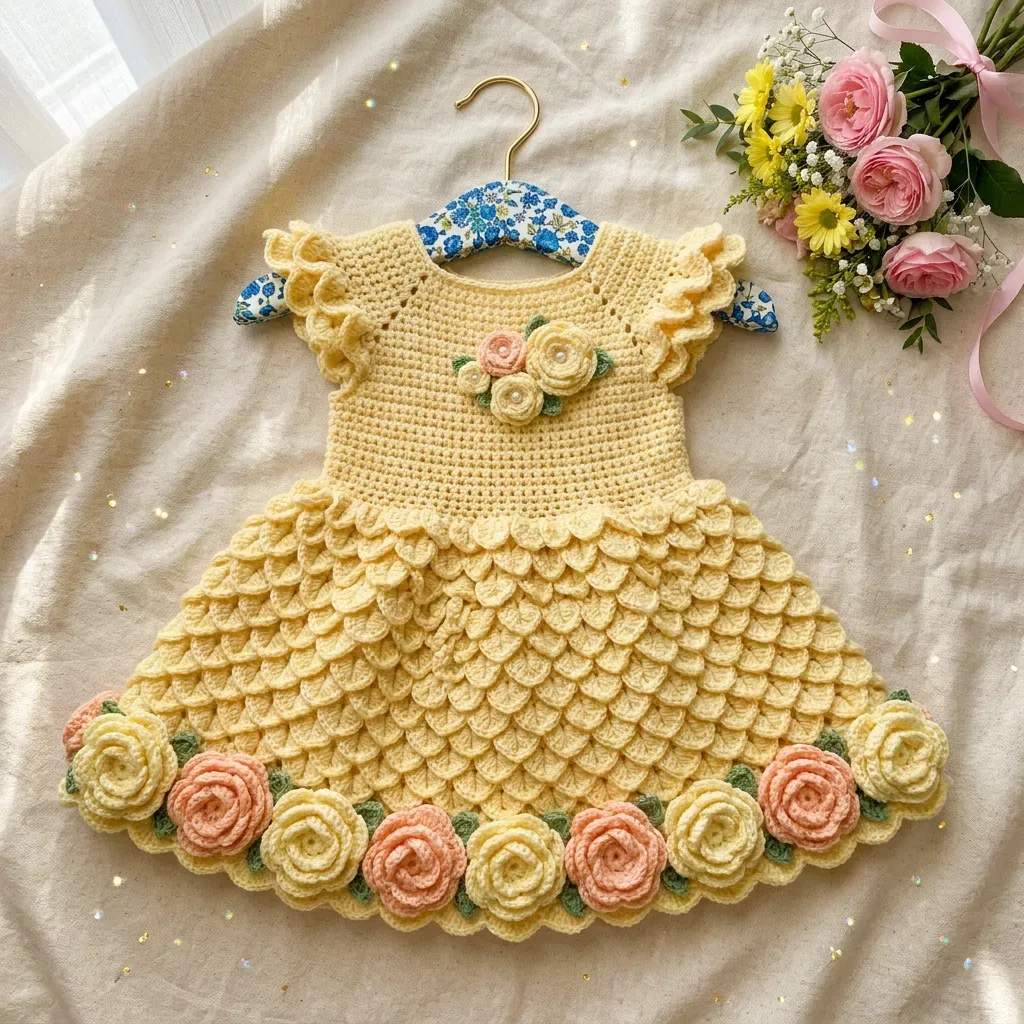
 Crocodile stitch baby dress with rolled rosettes
36 rounds and rows shape this crocodile-stitch baby dress with rolled rosettes.
- Skill
- Intermediate
- Rounds
- 36 rounds
- Yarn weight
- DK
- Hook
- 3.25 mm
- Time
- 20-28 hours

Intermediate
What the original page called it. Nothing here is graded a second time.

36 rounds
Each one gets its own line, with a box beside it to tick as you go.

DK
What the sample was made in. Any weight works — the size moves with it.
About this pattern
This buttercream-toned baby dress pairs a plain single crochet bodice with a crocodile stitch skirt that fans into overlapping scales, then finishes with two rolled roses and a leaf pinned at the chest. Eleven pattern sections cover 36 rounds and rows in total, split between the bodice, sleeve ruffles, button band, waist shaping, skirt foundation, crocodile stitch skirt, and hem scallop edging. Work through them in order and each section reads as one manageable sitting, even though the whole project spans several.
Shaping happens twice: waist decreases pull the bodice in below the underarms, and the crocodile stitch scales themselves do the flaring, opening the skirt from a snug foundation round to the widest point at the hem. Slow down at the crocodile stitch transition, since the technique of working double crochets around the posts of the foundation row takes a few scales to click, and at the rolled roses, where tight, even rolling determines whether the finished flower sits flat or floppy against the bodice.
- Start the bodice at the neckline and work single crochet top down in the round toward the underarms.
- Separate the sleeves from the body, then shape the lower bodice with waist decreases before the skirt begins.
- Set up the skirt foundation round, then transition into crocodile stitch, working double crochets around the posts of paired foundation stitches.
- Finish the sleeves with ruffle rounds and close the back opening with a buttoned band.
- Edge the hem with scallop stitching once the crocodile stitch skirt reaches its full flare.
- Roll the large and small roses, stitch the leaf, and sew everything onto the bodice as a finishing touch.
What goes wrong
- Skipping the gauge swatch Work swatches at both the D-3 bodice gauge and the E-4 skirt gauge before starting, since this is a fitted garment and off gauge skews the chest and length measurements.
- Losing track of crocodile stitch posts Work slowly through the first few scales, checking that each double crochet pair wraps around a single post from the foundation row rather than the chain space beside it.
- Rolling the roses too loosely Roll the strip tightly from the start and whipstitch the base every few stitches as you go, or the rose will loosen and lose its shape once attached.
- Rushing the sleeve separation Place stitch markers before separating sleeves from the body so the underarm stitches line up, since a miscount here throws off the waist shaping that follows.
Yarn, hook and the rest
Copied from the source pattern's own materials list.
- Main Color (MC): Light yellow or buttercream, approximately 450 yards of DK weight yarn (CYCA 3)
- Contrast Color A (CCA): Soft peach, approximately 60 yards of DK weight yarn
- Contrast Color B (CCB): Pale yellow, approximately 40 yards of DK weight yarn (you can use MC instead)
- Contrast Color C (CCC): Sage green or light olive, approximately 30 yards of DK weight yarn
- Paintbox Yarns Simply DK works beautifully for this project. Try Buttercup Yellow for the main color, Blush Pink for the peach roses, and Pistachio Green for the leaves. This yarn is 100% acrylic, machine washable, and gives excellent stitch definition for the crocodile stitch.
- Paintbox Yarns Cotton DK in Banana Cream is perfect for warmer climates or summer celebrations. Cotton produces a slightly stiffer crocodile stitch with beautiful definition.
Substitution note
- Choose any DK weight yarn. For baby items, prioritize machine washable fiber. Avoid yarns with heavy texture or halo like mohair or bouclé since these obscure the scales and make stitch counting difficult.
- US D-3 / 3.25 mm crochet hook for the bodice and roses
- US E-4 / 3.5 mm crochet hook for the skirt crocodile stitch
- Yarn needle
- 4 to 6 stitch markers
- 3 small buttons, approximately 0.5 inch diameter
- Sewing needle and matching thread for button attachment
Optional
- 2 small pearl beads for chest rose centers
- Scissors
Progress tracker
0 of the 36 rounds on this page are ticked.
The pattern, round by round
Kept in the order and the wording the source used. Tick a round as you finish it; the ticks stay on this device.
Dimensional Rolled Rose (Large)
These roses measure approximately 1.5 inches in diameter.
Foundation: Ch 36 loosely.
Round 1
Sc in 2nd ch from hook and in each ch across. (35 sc)
Round 2
Ch 3, turn. 2 dc in first st, 3 dc in each st across. (105 dc) Fasten off, leaving a long tail.To form the rose: Hold the end of Row 2 and begin rolling the strip tightly inward, with Row 2 (the ruffled edge) on the outside. As you roll, use the tail to tack the base every few stitches with whipstitches to secure. Continue rolling and tacking until the full strip is consumed. The base should be flat and secure.
Dimensional Rolled Rose (Small)
These measure approximately 0.75 inch in diameter.
Foundation: Ch 21 loosely.
Round 1
Sc in 2nd ch from hook and in each ch across. (20 sc)
Round 2
Ch 3, turn. 2 dc in first st, 3 dc in each st across. (60 dc) Fasten off and assemble the same way as the large rose.
Leaf
With CCC, ch 8.
Round 1
Sc in 2nd ch from hook, hdc in next, dc in next 2, hdc in next, sc in next, 3 sc in last ch (working around to opposite side of foundation chain), sc in next, hdc in next, dc in next 2, hdc in next, sc in last, sl st to first sc. Fasten off, leaving tail for sewing.
Section 1: Bodice (Worked Top Down in the Round)
Begin at the neckline.
Round 1
With MC and D-3 / 3.25 mm hook, ch 64, sl st to first ch to form a ring (take care not to twist). Ch 1, sc in each ch around. (64 sc)Place markers at the following positions to define raglan sections: Stitches 1 to 10: Right Back (10 sts)Stitches 11 to 12: Right Raglan marker zone (2 sts)Stitches 13 to 22: Right Sleeve (10 sts)Stitches 23 to 24: Left Raglan marker zone (2 sts)Stitches 25 to 38: Front (14 sts)Stitches 39 to 40: Left Raglan marker zone (2 sts)Stitches 41 to 50: Left Sleeve (10 sts)Stitches 51 to 52: Right Back Raglan marker zone (2 sts)Stitches 53 to 64: Left Back (12 sts)The four marker positions (at stitches 11, 23, 39, 51) represent the raglan lines. On each increase round, work inc at each marked stitch. Move markers up each round.
Round 2
Increase round Sc to 1 st before marker, inc in marked st, sc in marked st, inc in next st; rep from 4 times, sc to end of round. (72 sc)
Round 3
Sc in each st around. (72 sc)
Round 4
Increase round Sc to 1 st before marker, inc in marked st, sc in marked st, inc in next st; rep from 4 times, sc to end of round. (80 sc)
Round 5
Sc in each st around. (80 sc)
Round 6
Increase round Sc to 1 st before marker, inc in marked st, sc in marked st, inc in next st; rep from 4 times, sc to end of round. (88 sc)
Round 7
Sc in each st around. (88 sc)
Round 8
Increase round Sc to 1 st before marker, inc in marked st, sc in marked st, inc in next st; rep from 4 times, sc to end of round. (96 sc)
Round 9
Sc in each st around. (96 sc)
Round 10
Increase round Sc to 1 st before marker, inc in marked st, sc in marked st, inc in next st; rep from 4 times, sc to end of round. (104 sc)
Round 11
Sc in each st around. (104 sc)
Round 12
Increase round Sc to 1 st before marker, inc in marked st, sc in marked st, inc in next st; rep from 4 times, sc to end of round. (112 sc)
Round 13
Sc in each st around. (112 sc) Checkpoint: After Rnd 13, the neckline ring should measure approximately 12.5 inches in circumference. The piece from neckline to current working row should measure approximately 2.5 inches.
Section 6: Sleeve Ruffles
Work separately on each armhole.
With right side facing and D-3 / 3.25 mm hook, join MC to underarm bridge chain.
Pick up and sc in each of the 4 underarm chain sts, then sc in each of the 22 held sleeve sts. (26 sc total)
Round 1
(RS): Ch 1, turn. Sc in each st across. (26 sc)
Round 2
WS, ruffle foundation Ch 3, turn. 2 dc in each st across. (52 dc)
Round 3
Ruffle flare Ch 3, turn. Dc in first st, 2 dc in next st, dc in next st; rep from across to last st, dc in last st. (77 dc)Fasten off. Repeat for second sleeve.
Checkpoint: Each ruffle sleeve should measure approximately 2.5 inches wide at the base and ruffle out to approximately 3.5 inches.
Section 7: Back Button Band
With right side facing and D-3 / 3.25 mm hook, join MC at the top right back opening edge.
Round 1
Ch 1. Sc evenly down the right back opening edge, approximately 1 sc per row end. Work approximately 28 sc total. Fasten off. (28 sc)Join MC at the bottom left back opening edge.
Round 1
Ch 1. Sc evenly up the left back opening edge. (28 sc)
Round 2
Buttonhole row Ch 1, turn. Sc 3, ch 2, sk 2, sc 7; rep from 2 more times, sc to end. (3 buttonholes made)
Round 3
Ch 1, turn. Sc across, working 2 sc into each ch-2 sp. (28 sc) Fasten off. Sew 3 buttons onto right back band opposite buttonholes.
Separating Sleeves from Body
Round 14
Separation round Sc across 28 back sts, ch 4 (underarm bridge), skip next 22 sleeve sts, sc across 28 front sts, ch 4, skip next 22 sleeve sts, sl st to first sc of round to close. (56 sc body + 8 ch = 64 working sts)
Round 15
Sc in each sc and each ch around. (64 sc)
Section 2: Lower Bodice (Waist Shaping)
Round 16
to 22: Sc in each st around, 7 rounds even. (64 sc each round)
Round 23
Waist decrease round Sc 14, sc2tog; rep from 3 more times. (60 sc)
Round 24
Sc in each st around. (60 sc)
Round 25
Waist decrease round Sc 13, sc2tog; rep from 3 more times. (56 sc)
Round 26
to 28: Sc in each st around, 3 rounds even. (56 sc each round) Checkpoint: After Rnd 28, the bodice from neckline to current round should measure approximately 5.5 inches. The waist circumference should be approximately 11.5 inches.
Section 3: Skirt Foundation Round
Switch to E-4 / 3.5 mm hook.
Round 29
Skirt increase round Sc 1, inc; rep from around. (84 sc)
Round 30
Establish crocodile stitch foundation Ch 3 (counts as dc), dc in same st, ch 1, sk 1, 2 dc in next st; rep from around, ch 1, sk 1, sl st to top of beg ch-3 to join. (42 dc pairs, 42 ch-1 sps)
Section 4: Skirt in Crocodile Stitch
Crocodile Stitch Round 1:
Working on right side, join MC to top of first dc of any pair. Work one crocodile stitch scale on each dc pair around. After completing each scale, sl st into the next ch-1 space to move to the next pair. Complete 42 scales total. Sl st to base of first scale to close round. (42 scales)
Bridging Row 1 (Rnd 31): Sl st to top of first scale. Ch 3, dc in same sp, ch 1, sk to next scale top, 2 dc in top of that scale; rep from around, ch 1, sl st to top of beg ch-3. (42 dc pairs)
Crocodile Stitch Round 2: Work 42 crocodile stitch scales over the new dc pairs from Rnd 31. (42 scales)
Round 32
Increase bridging row Sl st to top of first scale. Ch 3, dc in same sp, ch 1, 2 dc in same sp, ch 1, sk to next scale top, 2 dc in top of that scale, ch 1, 2 dc in same sp; rep from around, ch 1, sl st to top of beg ch-3. (84 dc pairs)By working 2 dc pairs out of each scale top, you double the number of working pairs, expanding the circumference for the next scale row.Crocodile Stitch Round 3: Work 84 crocodile stitch scales over the pairs from Rnd 32. (84 scales)Bridging Row 2 (Rnd 33): Sl st to top of first scale. Ch 3, dc in same sp, ch 1, sk to next scale top, 2 dc in top of that scale; rep from around, ch 1, sl st to top of beg ch-3. (84 dc pairs)Crocodile Stitch Round 4: Work 84 crocodile stitch scales over the pairs from Rnd 33. (84 scales)Bridging Row 3 (Rnd 34): Sl st to top of first scale. Ch 3, dc in same sp, ch 1, sk to next scale top, 2 dc in top of that scale; rep from around, ch 1, sl st to top of beg ch-3. (84 dc pairs)Crocodile Stitch Round 5 (final layer): Work 84 crocodile stitch scales over the pairs from Rnd 34. (84 scales)Checkpoint: After completing all 5 crocodile stitch scale rounds, the skirt should measure approximately 7.5 inches from the waist join. Total dress length from neckline should be approximately 13 inches.
Section 5: Hem Scallop Edging
Round 35
Sl st to top of first scale. Join MC. Work scallop edging: (Sl st, ch 1, 4 dc, ch 1, sl st) in top of each scale around. Work 1 scallop per scale top. (84 scallops)Fasten off and weave in end.
Join
Step 1Wet blocking is strongly recommended to open the crocodile stitch scales fully.
Step 21. Hand wash the completed dress in cool water with gentle wool wash or baby-safe soap. Do not wring.
Step 32. Gently squeeze out excess water. Roll in a clean towel to remove most moisture.
Step 43. Lay flat on a foam blocking board or clean towel. Gently tug and pin the skirt hem into a smooth, even circle.
Step 54. Use pins to hold the neckline open and round.
Step 65. Gently open each crocodile stitch scale with fingertips so they fan outward fully.
Step 76. Allow to dry completely, approximately 12 to 24 hours.
Step 8The roses do not require blocking.
Check your count
- Dimensional Rolled Rose (Large) · Round 1: 35 sts
- Dimensional Rolled Rose (Small) · Round 1: 20 sts
- Section 1: Bodice (Worked Top Down in the Round) · Round 4: 80 sts
- Section 1: Bodice (Worked Top Down in the Round) · Round 8: 96 sts
- Section 1: Bodice (Worked Top Down in the Round) · Round 12: 112 sts
- Section 6: Sleeve Ruffles · Round 1: 26 sts
Finish
- Weave in ends from the bodice, skirt, sleeves, and button band before blocking, since loose tails are hard to trace once scales overlap.
- Wet block the dress, pinning the skirt hem into an even circle and holding the neckline open and round so the crocodile stitch scales open fully.
- Sew on the buttons, attach the rolled roses and leaf to the bodice, and secure the pearl beads at the center of the chest rose.
Bigger or smaller
- Larger
- Repeat one of the crocodile stitch skirt rows an extra time before starting the hem scallop edging to add length and drama to the flare without touching the bodice fit.
FAQs
Asked and answered
These answers came from whoever first published the pattern, kept word for word.
What if the crocodile stitch scales look uneven?
Uneven scales usually mean the double crochets are landing on the chain spaces instead of the posts from the foundation row. Rip back to the last correct scale and recheck that each pair wraps a post before continuing.
Can the dress be made without contrast colors?
Yes, contrast color B can be swapped for the main color, and the sage green leaf or peach roses can be substituted with whatever DK weight shades are on hand. The construction stays the same regardless of color choice.
Why does gauge matter so much for this pattern?
The bodice and skirt gauges determine the chest circumference and overall length, and this is a fitted baby garment with no ease built in. A swatch at both the D-3 and E-4 hook sizes catches sizing problems before hours are invested in the skirt.
Is the crocodile stitch skirt harder than it looks?
The technique takes a few scales to click but becomes repetitive once the mechanics of working around the foundation posts are understood. Most of the skirt's 10 to 14 hours is steady, autopilot stitching rather than difficult problem solving.