 STITCH ROUND
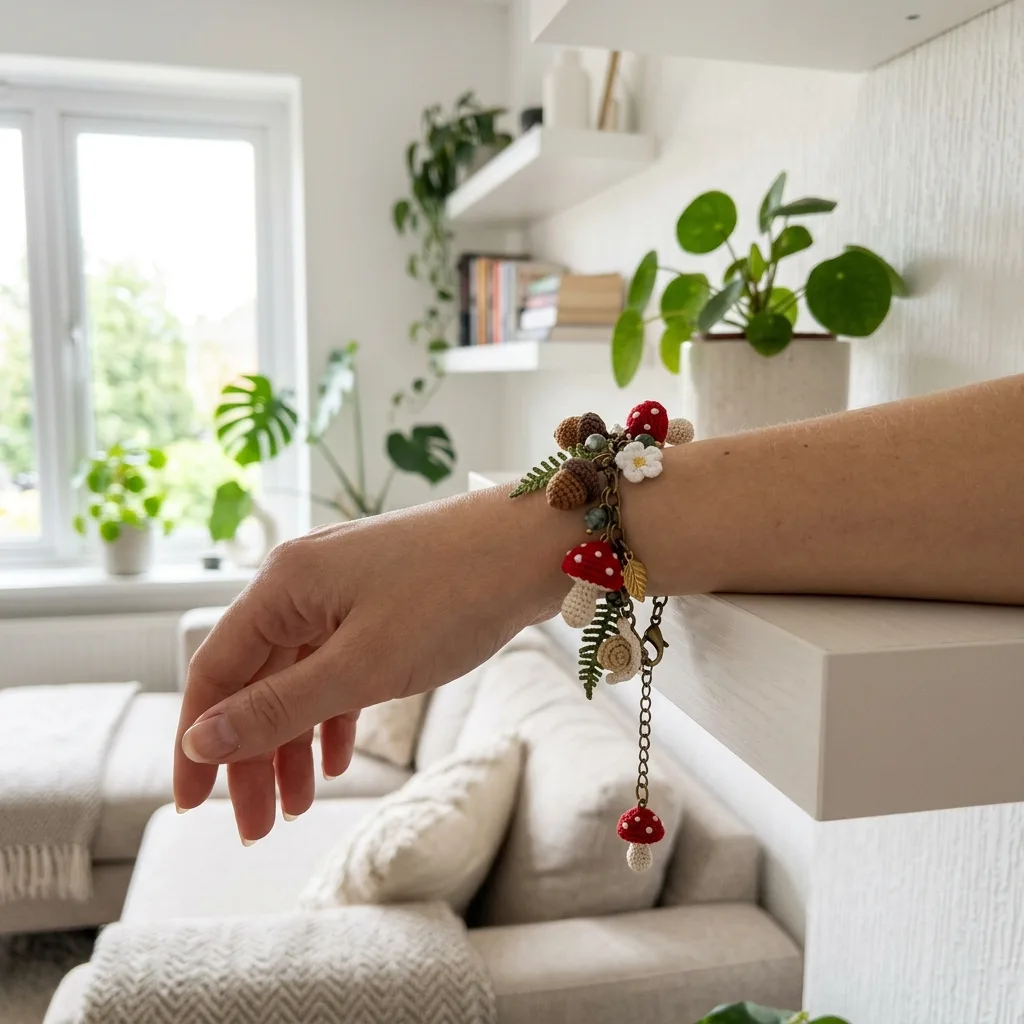
 Mini mushroom and acorn charm bracelet crochet pattern
24 rounds shape six tiny charms into a meadow-themed crochet bracelet.
- Skill
- Intermediate
- Rounds
- 24 rounds
- Yarn weight
- Fingering
- Hook
- 1.5 mm
- Time
- 4-6 hours

Intermediate
What the original page called it. Nothing here is graded a second time.

24 rounds
Each one gets its own line, with a box beside it to tick as you go.

Fingering
What the sample was made in. Any weight works — the size moves with it.
About this pattern
This bracelet builds a set of tiny meadow charms — mushroom caps, two styles of acorn, fern leaves, a daisy center, and a snail shell — worked across twenty-four rounds spread over six small pieces. Each piece uses only a handful of rounds, so the full set ticks off fast even though the hook is fine and the thread is thin. A stitch marker earns its keep here, since every round is short and easy to lose track of.
Shaping stays simple: each charm starts in a magic ring, increases once to round out the body, holds steady for a few plain rounds, then decreases back down before the last stitches close the hole. Slow down at the increase and decrease rounds, since a skipped stitch there throws off the curve of an acorn or mushroom cap. Take extra care stuffing lightly and joining the cap to the stem, since a charm this small shows every uneven seam.
- Start each charm with a magic ring worked in the color assigned to that piece.
- Increase early to round out the body, then hold steady through a few plain rounds.
- Decrease back down and stuff lightly before closing the last stitches.
- Join the mushroom cap to its stem with a row of slip stitches through both layers.
- Repeat the same magic-ring shaping for the acorn, fern, daisy, and snail shell charms.
- Lay the finished charms along the chain bracelet base and plan the spacing before attaching anything.
What goes wrong
- Magic ring left loose Pull the tail firm before starting the first round so the six starting stitches sit tight. A loose ring leaves a hole at the base of every charm.
- Overstuffing tiny acorns and caps Add only a small pinch of polyester fiberfill, enough to round the shape without straining the stitches. An overstuffed charm will not sit flush against the chain.
- Cap and stem joined off-center Line the cap up directly over the stem before slip stitching through both layers. A crooked join leaves the mushroom leaning once it hangs on the bracelet.
- Pulling jump rings open instead of twisting Twist each ring sideways with pliers rather than pulling the ends apart. Pulling distorts the ring so it will not close flush again.
Yarn, hook and the rest
Copied from the source pattern's own materials list.
- for Your Charm Bracelet
- Yarn
- You’ll need crochet thread or fingering weight cotton yarn in the following colors:
- Red (for mushroom caps)
- Dark brown (for acorn caps)
- Medium brown (for acorn caps, variation)
- Tan or light brown (for acorn bodies)
- Green (for fern leaves)
- Yellow (for daisy centers and snail shell)
- Hook and Tools
- Steel crochet hook size 1.5mm to 1.75mm (US 6 or 7 steel)
- Tapestry needle
- Small amount of polyester fiberfill stuffing
- Stitch marker
- Jewelry Supplies
- Antique brass cable chain bracelet base (approximately 7 inches)
- Lobster clasp closure
- 12 to 15 small jump rings (5mm to 6mm)
- 6 to 8 sage green glass beads (6mm)
- 2 to 3 small brass leaf charms
- Jewelry pliers (chain nose and round nose)
Progress tracker
0 of the 24 rounds on this page are ticked.
The pattern, round by round
Kept in the order and the wording the source used. Tick a round as you finish it; the ticks stay on this device.
Main Pattern
Round 1
Make a magic ring, work 6 sc into ring, pull tight to close. (6 sts)to 3: Sc around. (6 sts) Join to cap. Add spots and jump ring. Bracelet Assembly Instructions
Step 1: Lay out your chain flat. Arrange all your charms, beads, and metal leaf accents in a pleasing pattern. I like to place the larger mushrooms near the center and work outward with smaller elements.
Step 2: Using chain nose pliers, open a jump ring by twisting sideways (never pull apart). Thread through the attachment point on your first charm.
Step 3: Slide the open jump ring through a link in your chain. Close the jump ring by twisting back together.
Step 4: Continue attaching charms, spacing them approximately 1 inch apart. Alternate between crochet charms, beads, and metal leaves for balance.
Step 5: Thread beads onto headpins if needed, create a wrapped loop, and attach to chain links between crochet charms.
Step 6: Check that your clasp is securely attached. Test the bracelet around your wrist before wearing.
Step by step: Tips for Perfect Micro Crochet.
Tension matters more than ever at this scale. Work tightly to prevent stuffing from showing through. If you normally crochet loosely, go down one hook size.
Good lighting is essential. Position yourself near a window or use a bright craft lamp. Your eyes will thank you.
Take breaks. Micro crochet can strain your hands and eyes. Set a timer for 30 minutes and stretch.
Count your stitches every round. With so few stitches per round, one mistake throws off the entire shape.
Use stitch markers liberally. Mark the first stitch of each round so you never lose your place.
Customization Ideas This pattern is wonderfully flexible. Consider these variations: Swap the red mushroom caps for orange, yellow, or purple for a fantasy forest feel.
Round 2
Inc in each st around. (12 sts)Working in BLO only, sc in each st around. (12 sts) This creates the textured ridge you see on real acorn caps.Step by step: Sl st in each st around. (12 sts) Fasten off, leaving a long tail; Assembly.Place cap on top of acorn body. Sew in place using the tail. Create a small stem at the top by chaining 3, then slip stitching back down the chain. Attach a jump ring through the stem.Step by step: Fern Leaf Charm (Make 1 to 2); The fern adds wonderful texture and movement to your bracelet. This is worked flat; Foundation: Ch 15.
Round 3
*Sc 1, inc* repeat around. (18 sts)
Round 4
Sc in each st around. (18 sts)
Round 5
Working in BLO only, *sc 1, dec* repeat around. (12 sts) Fasten off, leaving a long tail for sewing. Stuff cap lightly with fiberfill.
White Spots
Using cream thread, embroider 4 to 6 French knots randomly across the red cap. Alternatively, you can use tiny dots of white fabric paint if embroidery frustrates you.
To make a French knot: Thread your needle, bring it up through the cap where you want a spot. Wrap thread around needle 2 to 3 times. Insert needle back down very close to where you came up, holding wraps in place. Pull through slowly.
Mushroom Stem (Cream)
Part 2
Round 1
Make a magic ring, work 6 sc into ring. (6 sts)
Round 2
Inc in each st around. (12 sts)
Round 3
to 6: Sc in each st around. (12 sts)
Round 7
*Sc 1, dec* repeat around. (8 sts) Stuff stem lightly. Do not fasten off. Joining Cap to StemPlace cap on top of stem, wrong sides facing inward. Using your working yarn, slip stitch through both layers to join. Weave in ends securely.Attach a small jump ring through one stitch at the top edge of the cap for hanging.
Acorn Charm (Make 4 to 6)
These tiny acorns work up in about 10 minutes each. Make them in different brown combinations for visual interest.
Acorn Body (Tan)
Part 3
Round 1
Make a magic ring, work 6 sc into ring. (6 sts)
Round 2
Inc in each st around. (12 sts)
Round 3
to 5: Sc in each st around. (12 sts)
Round 6
*Sc 1, dec* repeat around. (8 sts) Stuff very lightly. The acorn should feel firm but not bulging.
Round 7
Dec around. (4 sts) Fasten off. Close hole by weaving yarn through remaining stitches and pulling tight.
Acorn Cap (Dark Brown or Medium Brown)
Part 5
Round 1
Skip first ch, sl st in next 2 ch, *sc 1, hdc 1, dc 1, ch 3, sl st in 2nd ch from hook, sl st in next ch, dc 1, hdc 1, sc 1, sl st 2* repeat pattern along chain, adjusting as needed to reach the end.
Don’t panic if your first fern looks wobbly. The leaflets naturally curl and twist, which actually looks more realistic.
For a simpler fern, try this alternative:
Simple Fern: Ch 12. Working back along chain: sl st 1, *ch 3, sl st back into same base ch, sl st 1 in next ch* repeat to end.
Fasten off. Attach jump ring at the stem end.
Daisy Flower Charm (Make 1 to 2)
These cheerful flowers add brightness to the woodland palette.
Flower Center (Yellow)
Round 1
Make a magic ring, work 6 sc into ring, sl st to join. (6 sts) Fasten off. Petals (Cream)Join cream thread to any stitch on the yellow center.*Ch 4, sl st in 2nd ch from hook, sl st in next ch, sl st in next ch, sl st into next st on center* repeat around. You should have 6 petals.Fasten off. Weave in ends. Attach jump ring between two petals.
Snail Charm (Make 1)
The snail shell is a simple spiral. This charm adds whimsy to your bracelet.
Shell (Tan or Yellow)
Round 1
Make a magic ring, work 6 sc into ring. (6 sts)
Round 2
Inc in each st around. (12 sts)
Round 3
to 4: Sc in each st around. (12 sts) Stuff lightly. Continue decreasing:
Round 5
*Sc 1, dec* repeat around. (8 sts)
Round 6
Dec around. (4 sts) Fasten off. The piece will naturally curl into a spiral shape. Gently coil it and tack with a few stitches if needed.
Snail Body (Cream)
Ch 8. Sl st in 2nd ch from hook and in each ch across. (7 sl sts)
Sew body to the flat side of the shell. Attach jump ring at the top of the shell.
Small Mushroom Variation (Make 1 to 2)
For variety, make one or two smaller mushrooms.
Mini Cap (Red)
Round 1
Magic ring, 6 sc. (6 sts)
Round 2
Inc around. (12 sts)
Round 3
Sc around. (12 sts) Fasten off and stuff.
Check your count
- Main Pattern · Round 1: 6 sts
- Main Pattern · Round 2: 12 sts
- Main Pattern · Round 3: 18 sts
- Main Pattern · Round 4: 18 sts
- Part 2 · Round 1: 6 sts
- Part 2 · Round 2: 12 sts
Finish
- Weave in every yarn tail on each small charm before assembly, since loose ends show on a piece this size.
- Check stuffing levels once more, firm but not bulging, so each charm sits flat against the chain.
- Open each jump ring sideways with chain nose pliers, link a charm to the bracelet chain, then close the ring fully before moving to the next.
Bigger or smaller
- Smaller
- Work with the smaller end of the hook range, around 1.5mm, and keep tension tight. Tighter stitches on the same thread shrink each finished charm slightly.
FAQs
Asked and answered
These answers came from whoever first published the pattern, kept word for word.
What yarn or thread works best for these charms?
Size 10 crochet thread gives the cleanest results, with DMC Petra or Aunt Lydia's Classic both suited to the fine steel hook. Fingering weight cotton such as Scheepjes Catona also works if a slightly larger finished charm is preferred.
How much fiberfill does each charm actually need?
Only a small amount of polyester fiberfill is needed per charm. Stuffing lightly keeps the acorn firm without bulging and lets it seat neatly against the chain.
Do all six charm parts follow the same basic shape?
Most parts share a magic ring start, an increase round, a few plain rounds, then a decrease and close, as seen in the acorn pieces. The shell and mini cap follow their own shorter round counts but use the same core techniques.
How do the finished charms attach to the bracelet?
Jump rings link each charm to the antique brass cable chain base, opened sideways with pliers and closed fully after threading. Sage green glass beads and the lobster clasp closure finish the assembled piece.