 STITCH ROUND
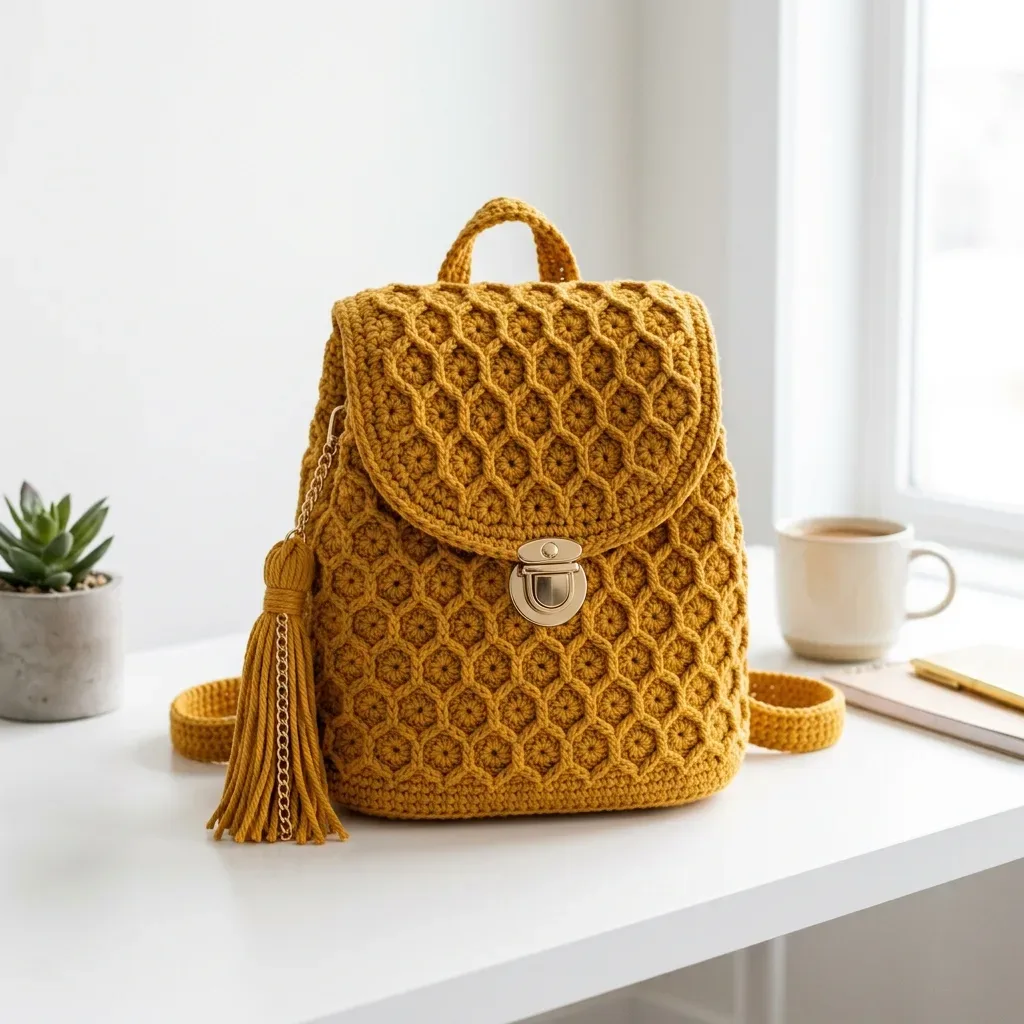
 Mustard yellow honeycomb backpack crochet pattern
13 rounds shape this mustard cotton backpack with raised honeycomb surface crochet.
- Skill
- Intermediate
- Rounds
- 13 rounds
- Yarn weight
- Worsted
- Hook
- 4.0 mm
- Time
- 12-16 hours

Intermediate
What the original page called it. Nothing here is graded a second time.

13 rounds
Each one gets its own line, with a box beside it to tick as you go.

Worsted
What the sample was made in. Any weight works — the size moves with it.
About this pattern
This mustard cotton backpack comes together in 13 rounds spread across five parts: two matching panels, a long gusset, a top rim, a rounded flap, and a pair of straps. Each piece starts as plain single crochet worked flat, so there is no shaping to track while counting stitches. Ticking off one part at a time keeps the project manageable, even with the honeycomb texture still to add once every panel is finished.
There is very little shaping in this backpack. Panels and gusset are straight rectangles, and only the flap curves at its edge. The real care point is the surface crochet grid: slow down when placing vertical and horizontal stitch markers before working the honeycomb lines, since a skipped marker throws off every repeat after it. Seaming the gusset around both panels also deserves patience, easing the long strip evenly so the finished bag sits square rather than puckered.
- Begin with two flat panels worked straight up in single crochet to form the front and back.
- Work a long gusset strip separately to wrap around the sides and bottom of the bag.
- Add the honeycomb surface crochet to each panel once it lies flat, guided by a marker grid.
- Block every piece under steam to flatten the rows without crushing the raised overlay texture.
- Seam the panels to the gusset, then crochet the rim around the finished top opening.
- Attach the flap, clasp hardware, lining, and straps to complete the backpack.
What goes wrong
- Skipping the stitch marker grid Place the vertical and horizontal markers across the panel before starting any surface slip stitches, or the honeycomb lines will drift off course.
- Working the fabric too loose Swatch first and drop a hook size if the cotton feels floppy, since a backpack needs dense, sturdy fabric to hold its shape.
- Flattening the honeycomb with a hot iron Hold the iron above the fabric and let steam do the work instead of pressing directly onto the raised overlay texture.
- Easing the gusset unevenly Pin the long gusset strip to both panels before sewing so the strip distributes evenly around the sides and bottom.
Yarn, hook and the rest
Copied from the source pattern's own materials list.
Yarn
- Worsted weight 100% cotton yarn, approximately 820 yards / 750 meters in mustard yellow
Recommended yarn brands
- Paintbox Yarns Cotton Aran, which is sturdy, smooth, and crisp for excellent stitch definition
- Lion Brand 24/7 Cotton, a firm mercerized cotton with excellent structure
- Hobbii Friends Cotton 8/8 held single, a matte cotton with saturated color
Hook
- US G/6 / 4.0 mm crochet hook, or the size needed to achieve gauge
Notions
- Yarn needle
- Stitch markers
- Measuring tape
- Scissors
- Pins
Lining materials
- Cotton fabric lining, about 18 x 24 inches / 46 x 61 cm
- Optional inner pocket fabric
Hardware
- 1 small gold turn-lock clasp
- 2 D-rings
- 2 strap sliders or buckles
- 2 lobster hooks or rectangular rings
- 8 to 10 inches / 20 to 25 cm of fine gold chain for the tassel
Progress tracker
0 of the 13 rounds on this page are ticked.
The pattern, round by round
Kept in the order and the wording the source used. Tick a round as you finish it; the ticks stay on this device.
Front and Back Panels
Make 2 identical panels. These form the front and back of your backpack.
Foundation: Ch 37.
Round 1
Sc in 2nd ch from hook and in each ch across. Turn. (36 sc)
Round 2
through 48: Ch 1, sc in each st across. Turn. (36 sc) Checkpoint: Each panel should measure approximately 7.9 inches wide by 9.4 inches tall / 20 x 24 cm after blocking.
Do not fasten off after completing the second panel if you want to continue directly into the top edging later. Set both panels aside while you add the honeycomb texture.
Side and Bottom Gusset
The gusset is a long strip that wraps around the sides and bottom of the bag, connecting the front and back panels.
Foundation: Ch 23.
Round 1
Sc in 2nd ch from hook and in each ch across. Turn. (22 sc)
Round 2
through 132: Ch 1, sc in each st across. Turn. (22 sc) Checkpoint: Your strip should measure approximately 4.7 inches wide by 26 inches long / 12 x 66 cm. It will ease around both sides and the bottom of your panels.
Top Opening Rim
Join yarn at a back corner of the opening.
Round 1
Ch 1, sc around the top opening: 36 stitches across front, 22 stitches across side, 36 stitches across back, 22 stitches across side. Join with sl st. (116 sc)
Round 2
and 3: Ch 1, sc in each st around, join. (116 sc) Fasten off and weave in ends.
Rounded Front Flap
The flap is worked from the top edge downward so the shaped edge curves neatly over the front of the bag.
Foundation: Ch 37.
Round 1
Sc in 2nd ch from hook and in each ch across. Turn. (36 sc)
Round 2
through 6: Ch 1, sc in each st across. Turn. (36 sc)
Round 7
Ch 1, sc2tog, sc across to last 2 sts, sc2tog. Turn. (34 sc)
Round 8
Ch 1, sc in each st across. Turn. (34 sc)
Round 9
through 24: Repeat Rows 7 and 8 eight more times, reducing 2 stitches on every odd row. Your final Row 24 has 18 sc.Edging: Ch 1, sc evenly around the entire flap, working 2 sc in each lower curved corner to keep the edge smooth. Join and fasten off.
Checkpoint: Your flap should be approximately 7.9 inches / 20 cm wide at the top and 4.7 to 5 inches / 12 to 13 cm deep at the center.
Flap texture: Add the honeycomb overlay to the flap using the same 6 stitch by 4 row grid. Keep the first 6 rows full-width, then allow the honeycomb to taper naturally as the flap narrows. Center the design so the motif row meets cleanly above where your clasp will go.
Shoulder Straps
Make 2 identical straps.
Foundation: Ch 6.
Round 1
Sc in 2nd ch from hook and in each ch across. Turn. (5 sc)
Round 2
through 130: Ch 1, sc in each st across. Turn. (5 sc) Edging: Sc evenly around the entire strap, working 2 sc in each corner. Fasten off.
Checkpoint: Each strap measures approximately 25.5 to 26 inches / 65 to 66 cm before hardware adjustment.
If you prefer longer or shorter straps, adjust the row count before fastening off. Try the bag on and see what length feels comfortable for you.
Join
Step 1Step 1, Shape: Lightly steam block all your pieces: panels, gusset, flap, straps, and handle. Be careful not to flatten the raised overlay texture. Hold your iron a few inches above the fabric and let the steam do the work.
Step 2Step 2, Flap: Sew the top edge of the flap to the upper back edge of the bag, centered over the opening.
Step 3Step 3, Clasp: Install the turn-lock plate at the lower center of the flap. Install the receiving plate on the front panel, positioning it so the flap closes without pulling or straining the fabric.
Step 4Step 4, Strap hardware: Sew two D-rings or rectangular rings to the upper back of the bag, approximately 1.5 inches / 4 cm in from each side. Attach strap ends to the lower side seams. Thread the straps through sliders or buckles for adjustability.
Step 5Step 5, Handle: Sew handle ends to the back top edge, inside the strap anchors. Reinforce this attachment by sewing through several layers. The handle takes a lot of stress when you grab the bag.
Check your count
- Front and Back Panels · Round 1: 36 sts
- Side and Bottom Gusset · Round 1: 22 sts
- Top Opening Rim · Round 1: 116 sts
- Rounded Front Flap · Round 1: 36 sts
- Rounded Front Flap · Round 2: 36 sts
- Rounded Front Flap · Round 7: 34 sts
Finish
- Steam block every panel, the gusset, the flap, and the straps before any seaming begins.
- Weave in all loose ends left from the panels, gusset, and surface crochet overlay lines.
- Seam the flap and clasp hardware, add the D-rings and straps, then fit the cotton lining inside.
Bigger or smaller
- Smaller
- Work fewer repeat rows on the panels and gusset before starting the honeycomb grid, which shortens the bag while keeping the same stitch pattern.
FAQs
Asked and answered
These answers came from whoever first published the pattern, kept word for word.
When should the honeycomb texture be added?
Finish each panel completely first, then add the surface slip stitch overlay while the piece lies flat. Working texture and shaping at the same time makes the marker grid much harder to control.
How much yarn does this backpack need?
About 820 yards of worsted weight cotton in mustard yellow covers the panels, gusset, flap, and straps. Sturdy cottons such as Paintbox Yarns Cotton Aran or 24/7 Cotton give the structure this bag needs.
What hook size should be used?
A US G/6 / 4.0 mm hook matches the stated gauge, but sizing down is worth trying if the swatch feels loose. A backpack needs dense, firm fabric to support its contents.
Does the bag need a fabric lining?
Yes, a cotton fabric lining about 18 x 24 inches fits inside the finished bag to add structure and hide the seams. An optional inner pocket fabric can be added at the same stage.