 STITCH ROUND
Ocean blue ombre mini backpack crochet pattern
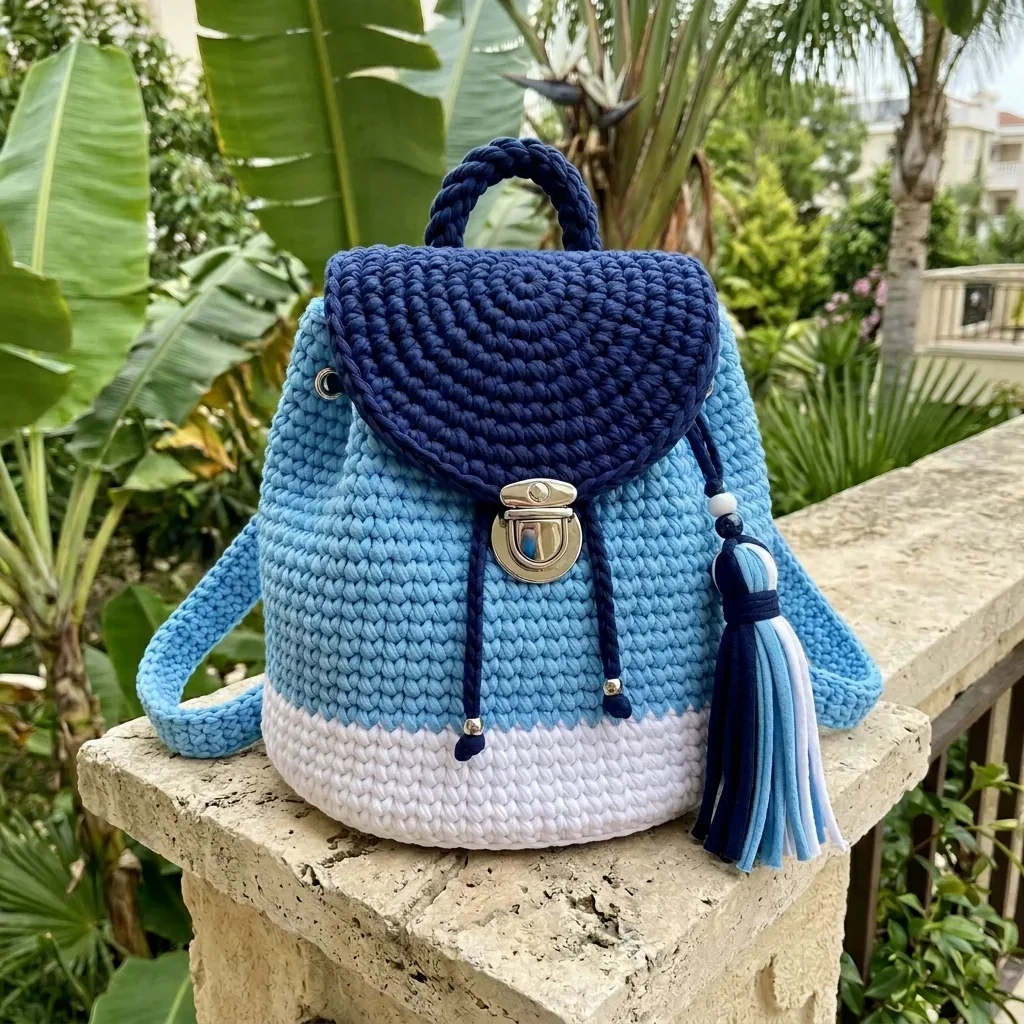
24 rounds build this ocean blue ombre mini backpack with flap, handle, straps, and tassel.
- Skill
- Intermediate
- Rounds
- 24 rounds
- Yarn weight
- Super Bulky
- Hook
- 6 mm
- Time
- 6-8 hours

Intermediate
What the original page called it. Nothing here is graded a second time.

24 rounds
Each one gets its own line, with a box beside it to tick as you go.

Super Bulky
What the sample was made in. Any weight works — the size moves with it.
About this pattern
This mini backpack builds from a firm oval base into a boutique-style bag across a tidy run of twenty-four rounds split between the main body, the flap, the eyelet opening, and two shoulder straps. Dense single crochet keeps every surface sturdy enough to hold its shape without stuffing or wire support. Tick off each section in order—base, body, flap, straps, top band—and the backpack takes shape fast, with the color blocks marking clear checkpoints along the way.
Skill Level: Intermediate—you'll need to be comfortable with shaping in the round, making neat color changes, working flap rows, and basic hardware placement. Finished Size: Approximately 9 inches wide x 10.5 inches tall x 4 inches deep (23 x 27 x 10 cm). Time to Complete: About 6 to 8 relaxed hours, plus finishing and drying time after blocking.
Gauge: 9 sc x 8 rounds = 4 inches / 10 cm in firm single crochet, worked in the round after light steaming. Flap rows: 9 sc x 8 rows = 4 inches / 10 cm. Make a swatch and adjust your hook size before starting—if your swatch is too loose, go down a hook size; if it's too tight, go up.
- Start at the oval base and work continuous single crochet rounds upward in white before the color blocks begin.
- Shift to sky blue through the main body, keeping each color change crisp where the ombre bands meet.
- Finish the top in deep navy, then work the eyelet round that carries the drawstring closure.
- Shape the rounded flap separately before braiding three navy cords into the finished carry handle.
- Crochet two sky blue shoulder straps as plain rectangles, adding hardware before final assembly begins.
- Sew the flap, handle, straps, and tassel into place to complete the finished backpack shape.
What goes wrong
- Messy ombre color joins Carry the join to the start of a round and weave tails in along the inside to keep the sky blue and navy transitions crisp.
- Loose single crochet gauge Swatch first and drop a hook size if stitches look open, since a firm fabric is what holds the backpack's shape without stuffing.
- Uneven braided handle cords Keep the three chained cords at the same tension while braiding and knot both ends tightly before sewing the handle to the back.
- Eyelet round placed off-center Mark the first eyelet with a stitch marker before working the round so the drawstring pulls evenly on both sides.
Yarn, hook and the rest
Copied from the source pattern's own materials list.
Yarn
- Super bulky tubular cotton or polyester cord yarn, 5-6 mm diameter
Total yardage needed
- 210 yards / 192 meters
White
- 45 yards / 41 meters
Sky Blue
- 125 yards / 114 meters
Navy
- 40 yards / 37 meters
Yarn Suggestions
- Hoooked Ribbon XL for a firm, sculpted look
- YarnArt Macrame Cord 5 mm for pronounced stitch texture
- Bernat Maker Home Dec for a softer, lightweight version
- Substitute with a smooth, low-stretch cord yarn that creates a stiff fabric. Avoid loosely plied yarns unless you plan to line the bag.
Tools
- Size J/10 (6 mm) crochet hook, or size needed to match gauge
- 1 locking stitch marker
- Tapestry needle
- Scissors
- Measuring tape
Hardware
- 2 strap adjusters or D-rings (optional)
- Metal cord tips (optional)
- 1 bead for tassel cord
- 1 small turn-lock clasp or magnetic bag clasp, approximately 1 inch / 2.5 cm
Progress tracker
0 of the 24 rounds on this page are ticked.
The pattern, round by round
Kept in the order and the wording the source used. Tick a round as you finish it; the ticks stay on this device.
Oval Base Instructions (White)
The base creates the foundation for your entire backpack. Take your time here to get it flat and even.
Round 1
Ch 13. Sc in 2nd ch from hook and next 10 ch, 3 sc in last ch; working on other side of chain, sc in next 10 ch, 2 sc in first ch. (26 sc)
Round 2
Inc in first st, sc 10, inc in each of next 3 sts, sc 10, inc in each of next 2 sts. (32 sc)
Round 3
Inc, sc 4; repeat from 6 times, inc, sc 1. (38 sc)
Round 4
Inc, sc 5; repeat from 6 times, inc, sc 1. (44 sc)
Round 5
Inc, sc 6; repeat from 6 times, inc, sc 1. (50 sc)
Round 6
Inc, sc 7; repeat from 6 times, inc, sc 1. (56 sc)
Round 7
Sc 3, inc, sc 6; repeat from 7 times, inc, sc 4. (64 sc) Your oval base should lay flat at this point. If it cups upward, your tension is too tight or you need more increases. If it ruffles, your tension is too loose.
Body Instructions
Now we'll build the walls of the backpack by working into the back loops only on the first round, then continuing in regular single crochet.
Round 8
BLO sc around to turn the base upward. (64 sc) Working in back loop only creates that nice defined ridge where the base meets the sides.
Rounds 9–13
Sc around in white. (64 sc)
Round 14
Join sky blue with standing sc at back center. Sc around. (64 sc)
Rounds 15–28
Sc around in sky blue. (64 sc) Checkpoint: Body should measure approximately 9 inches / 23 cm wide, 4 inches / 10 cm deep, and 10 inches / 25.5 cm tall from the bottom edge.
Rounds 29–30
Join navy. Sc around. (64 sc)
Top Opening and Eyelet Round
The eyelet round creates spaces for your drawstring to weave through. This is what gives the backpack its classic cinched closure.
Round 31
Sc 6, ch 1, skip 1 st, sc 1; repeat from 8 times. (56 sc + 8 ch-1 spaces)
Round 32
Sc in each sc and ch-1 space around. Invisible join. (64 sc) Mark the back center and front center. The flap will be sewn to the back over Rnds 30-32.
Rounded Flap Instructions (Navy)
The flap is worked flat in rows, starting from a magic ring and increasing outward to create that beautiful rounded shape.
Row 1
Make a magic ring, ch 1, work 6 sc in ring. Pull ring snug. Turn. (6 sc)
Row 2
Ch 1, inc in each st across. Turn. (12 sc)
Row 3
Ch 1, sc 1, inc; repeat from across. Turn. (18 sc)
Row 4
Ch 1, sc 2, inc; repeat from across. Turn. (24 sc)
Row 5
Ch 1, sc 3, inc; repeat from across. Turn. (30 sc)
Row 6
Ch 1, sc 4, inc; repeat from across. Turn. (36 sc)
Row 7
Ch 1, sc 5, inc; repeat from across. Turn. (42 sc)
Row 8
Ch 1, sc across evenly for a firm outer edge. Do not turn. (42 sc) Edging: Work 21 sc evenly along the straight top edge, then sl st to fasten off. Leave a 24 inch / 61 cm sewing tail.
Checkpoint: Flap should be approximately 9.25 inches / 23.5 cm wide and 4.5 inches / 11.5 cm deep.
Shoulder Straps (Sky Blue, Make 2)
The straps are simple rectangles worked back and forth in rows. Make two identical straps.
Ch 7.
Row 1
Sc in 2nd ch from hook and each ch across. Turn. (6 sc)
Rows 2–78
Ch 1, sc across. Turn. (6 sc) Fasten off, leaving a long sewing tail. Each strap measures approximately 34 to 36 inches / 86 to 91 cm before hardware adjustment. For shorter straps, remove rows in pairs.
Top Handle (Navy)
The braided handle adds both function and style to your crochet backpack.
Make 3 cords: ch 22 with navy and fasten off.
Braid the 3 cords together, knotting both ends securely.
Sew the handle ends to the top back, spacing them 3.25 inches / 8 cm apart.
Drawstring (Navy)
Ch 110, keeping the chain even and flexible.
Weave through the 8 eyelets, starting and ending at the front.
Add beads or cord tips to the ends for a polished finish.
Layered Tassel
The tassel uses all three colors for a coordinated look.
Cut 16 strands, each 10 inches / 25 cm long: 6 navy strands, 6 sky blue strands, 4 white strands.
Fold all strands together over a 12 inch / 30 cm hanging cord.
Wrap tightly with navy yarn 0.75 inches / 2 cm below the fold.
Knot securely, trim ends straight, and attach to a side ring or flap cord.
Join
InfoNow it’s time to bring all the pieces together.
Step 1Step 1: Center the straight edge of the flap over the back top edge. Sew through the flap edge and top band, keeping the seam flat and strong.
Step 2Step 2: Close the flap over the front. Mark clasp placement, then attach the lower clasp to the bag front and the upper clasp to the flap. Reinforce the inside with a small felt or fabric square if your hardware has prongs.
Step 3Step 3: Sew top handle ends securely at the back top edge.
Step 4Step 4: Attach shoulder straps to the upper back and lower back corners. Add D-rings or adjusters if desired.
Step 5Step 5: Weave drawstring through eyelets, tie ends, and add cord tips.
Step 6Step 6: Attach tassel at the right front side or to the drawstring, matching the project photo styling.
Check your count
- Oval Base Instructions (White) · Round 2: 32 sts
- Oval Base Instructions (White) · Round 4: 44 sts
- Oval Base Instructions (White) · Round 6: 56 sts
- Body Instructions · Rounds 9–13: 64 sts
- Body Instructions · Round 14: 64 sts
- Body Instructions · Rounds 29–30: 64 sts
Finish
- Weave in every color-change end along the ombre transitions before blocking so no tails show through the dense stitches.
- Steam block the body gently to firm up the single crochet fabric and square off the oval base.
- Attach the flap, handle, straps, and tassel last, checking clasp alignment before final stitching.
Bigger or smaller
- Smaller
- Drop to a lighter cord yarn and a smaller hook, or shorten the shoulder straps by removing rows in pairs, for a more compact, lightweight bag.
FAQs
Asked and answered
These answers came from whoever first published the pattern, kept word for word.
Can a different cord yarn replace the listed options?
Any smooth, low-stretch cord that creates a stiff fabric works in place of the Hoooked Ribbon XL or YarnArt Macrame Cord. Avoid loosely plied yarns unless the bag will be lined.
How long do the finished shoulder straps end up?
Each strap measures approximately 34 to 36 inches before hardware is added. Remove rows in pairs to shorten them to a preferred length.
Is lining the backpack necessary?
Lining is optional and mainly recommended when using a loosely plied substitute yarn. A firm cord yarn worked at the stated gauge holds its shape without one.
What hardware does the backpack actually need?
Strap adjusters or D-rings and metal cord tips are both optional extras for the shoulder straps and cord ends. The core build only requires a hook, stitch marker, tapestry needle, and a bead for the tassel.