 STITCH ROUND
Sunset gradient granny square tote bag crochet pattern
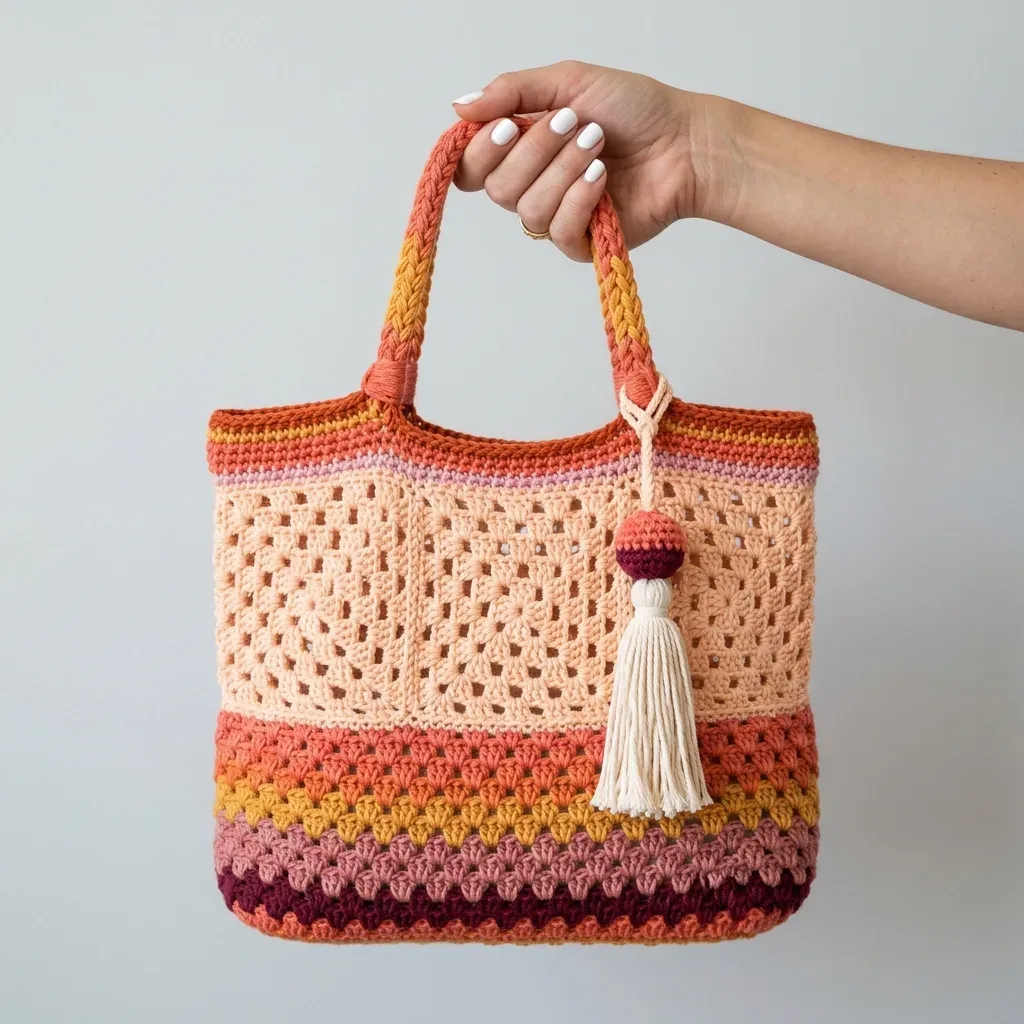
22 rounds build this boxy, sunset-gradient granny square tote bag with braided handles.
- Skill
- Intermediate
- Rounds
- 22 rounds
- Yarn weight
- Worsted
- Hook
- 6.0 mm
- Time
- 6-9 hours

Intermediate
What the original page called it. Nothing here is graded a second time.

22 rounds
Each one gets its own line, with a box beside it to tick as you go.

Worsted
What the sample was made in. Any weight works — the size moves with it.
About this pattern
This boxy tote breaks down into five numbered sections that add up to twenty-two rounds total, plus a set of handles and a tassel with no round count of their own. The base takes a single round, the lower shell stripe band three, the granny panel four per square, the upper stripe band eight, and the tassel's crocheted bead six. Each section clears quickly once its technique clicks, which makes the whole build feel like a short checklist rather than one long slog.
- Start at the base and build up the shell-stitch sunset stripes that form the lower section.
- Set the lower band aside and make four separate granny squares in peach, joining them together as the last round is worked.
- Attach the finished granny panel to the top of the shell-striped base to form the main body of the tote.
- Crochet the striped upper band directly into the top edge, working in the round around the whole bag.
- Braid the handles separately from the main body, then attach them securely to the top band.
- Finish by stitching on a crocheted bead and a fringed tassel for the final embellishment.
What goes wrong
- Uneven shell clusters Each shell is five double crochets worked into one stitch or space, so count stitches as they go in rather than eyeballing the fan shape, or the stripes along the lower section will look lopsided.
- Rushing the join-as-you-go round The final round of the granny squares locks all four panels together in one pass, so work slowly and check each corner before moving on to the next square.
Yarn, hook and the rest
Copied from the source pattern's own materials list.
- You’ll need worsted weight cotton yarn in six colors, approximately 1,400 yards total. Here’s the breakdown:
- Color A (coral/terra cotta): 320 yards
- Color B (gold/mustard yellow): 120 yards
- Color C (peach/light salmon): 350 yards
- Color D (lavender/pale lilac): 60 yards
- Color E (mauve/dusty rose): 120 yards
- Color F (burgundy/deep wine): 80 yards
- Color G (cream/natural off-white): 80 yards for the tassel fringe only
- Cotton yarn is strongly recommended here. It provides the structural stiffness that gives this tote its beautiful boxy shape. I love Lion Brand 24/7 Cotton for this project. It holds color vibrantly and has excellent stitch definition.
- US size J/10 (6.0 mm) hook for the main bag body
- US size I/9 (5.5 mm) hook for granny squares and tight joining rounds
- Tapestry needle for weaving ends
- 6 stitch markers
- Scissors
- Small amount of polyfill for the crocheted bead
- Rustproof pins for blocking
Progress tracker
0 of the 22 rounds on this page are ticked.
The pattern, round by round
Kept in the order and the wording the source used. Tick a round as you finish it; the ticks stay on this device.
Section 3: Granny Square Center Panel
Switch to your I/9 hook. You’ll make 4 granny squares separately, then join them.
Granny Square (Make 4 in Color C, peach)
Magic ring (or ch 4, join with sl st to form ring).
Round 1
Ch 3 (counts as dc), 2 dc in ring, ch 2, [3 dc in ring, ch 2] 3 times. Join with sl st to top of beg ch-3. Fasten off. (4 clusters, 4 ch-2 corner sps)
Round 2
Join Color C in any ch-2 corner sp. Ch 3, 2 dc in same sp, ch 2, 3 dc in same sp (first corner made), ch 1, [3 dc in next corner sp, ch 2, 3 dc in same sp, ch 1] 3 times. Join. Fasten off. (8 clusters, 4 ch-2 corner sps, 4 ch-1 side sps)
Round 3
Join Color C in any ch-2 corner sp. Ch 3, 2 dc in same sp, ch 2, 3 dc in same sp, ch 1, 3 dc in next ch-1 side sp, ch 1, [3 dc in next corner sp, ch 2, 3 dc in same sp, ch 1, 3 dc in ch-1 side sp, ch 1] 3 times. Join. Fasten off. (12 clusters, 4 ch-2 corner sps, 8 ch-1 side sps)
Round 4
Join Color C in any ch-2 corner sp. Ch 3, 2 dc in same sp, ch 2, 3 dc in same sp, [ch 1, 3 dc in next ch-1 sp] twice, ch 1, [3 dc in next corner sp, ch 2, 3 dc in same sp, (ch 1, 3 dc in next ch-1 sp) twice, ch 1] 3 times. Join. Fasten off. (16 clusters, 4 ch-2 corner sps, 12 ch-1 side sps)
Block all 4 squares to exactly 5 inches by 5 inches before joining.
Section 4: Upper Stripe Band
Setup Round: Join Color A to top right corner of front granny panel. Ch 1, sc across top of front panel (approximately 40 sts), sc across right gusset wall (approximately 14 sts), sc across top of back panel (approximately 40 sts), sc across left gusset wall (approximately 14 sts). Join. (108 sc)
Round 1
Color A Ch 1, sc in each st around. Join. (108 sc)
Round 2
Color D, lavender Join Color D. Ch 1, sc in each st around. Join. (108 sc)
Round 3
Color D Ch 1, sc in each st around. Join. (108 sc)
Round 4
Color A Ch 1, sc in each st around. Join. (108 sc)
Round 5
Color A Ch 1, sc in each st around. Join. (108 sc)
Round 6
Color B Join Color B. Ch 1, sc in each st around. Join. (108 sc)
Round 7
Color A Ch 1, sc in each st around. Join. (108 sc)
Round 8
Color A Ch 1, sc in each st around. Join. (108 sc) Top Edging Round: With Color A, ch 1, sc in each st around. Join. Fasten off. (108 sc)
Section 6: Tassel Embellishment
Tassel Body: Cut 40 strands of Color G, each 14 inches long. Fold all strands at the center. Tie a separate 12-inch strand tightly around the fold point, leaving a long tail for attachment.
Tassel Neck Wrap: Using Color C, wrap firmly around the bundle approximately 1 inch below the fold point, 8 to 10 times. Tie off and weave in.
Trim fringe ends evenly to about 5 inches below the neck wrap.
Crocheted Bead: With Color A and I/9 hook, make a magic ring.
Round 1
6 sc into ring, pull tight. (6)
Round 2
2 sc in each st around. (12)
Round 3
[Sc in next st, 2 sc in next st] 6 times. (18)
Round 4
Sc in each st around. (18)
Round 5
[Sc in next st, sc2tog] 6 times. (12)Stuff lightly with polyfill.
Round 6
Sc2tog 6 times. (6)Fasten off, leave a long tail, thread through remaining 6 sts, pull tight to close.
Before closing completely, thread the bead onto the tassel tie-strand so it sits directly above the tassel. Attach to the right handle attachment point at the front face.
Section 1: Bag Base
Using Color A and your J/10 hook, ch 50.
Foundation Row (RS): Sc in 2nd ch from hook and in each ch across. (49 sc)
Round 2
through 14: Ch 1, turn. Sc in each st across. (49 sc) After Row 14, do not fasten off. Your base rectangle should measure approximately 14 inches wide by 3.5 inches tall.
Section 2: Lower Shell Stripe Band
Now you’ll work in joined rounds around the perimeter of your base. Switch to Color F (burgundy).
Setup Round (Rnd 1): Ch 1. Work sc evenly around entire perimeter as follows: sc in each of 49 sts across top edge, 3 sc in corner st, sc in each of 14 row-end edges down side, 3 sc in corner, sc in each of 49 sts across bottom, 3 sc in corner, sc in each of 14 row-end edges up other side, 3 sc in corner. Join with sl st to first sc. (138 sc)
Place stitch markers at the 4 corner center stitches.
Round 2
Color F, shell round Ch 3 (counts as dc here and throughout), 2 dc in same st, sk 2 sts, sc in next st, [sk 2 sts, 5 dc in next st (shell made), sk 2 sts, sc in next st] around, adjusting final repeat to close round evenly, 2 dc in same st as beg ch-3, join with sl st to top of beg ch-3. (23 shell units)At corner stitches, work your 5-dc shell into the corner stitch without skipping surrounding stitches. This eases the corner naturally.
Round 3
Color F Sl st into center of first shell, ch 3, 2 dc in same sp, sc in next sc between shells, [5 dc in center of next shell, sc in sc between shells] around. Join. (23 shells)Rnd 4 (Color E, mauve): Join Color E. Rep Rnd 3. (23 shells)Rnd 5 (Color E): Rep Rnd 3. (23 shells)Rnd 6 (Color A, coral): Join Color A. Rep Rnd 3. (23 shells)Rnd 7 (Color B, gold): Join Color B. Rep Rnd 3. (23 shells)Rnd 8 (Color A): Join Color A. Rep Rnd 3. (23 shells)
Round 9
Color A Rep Rnd 3. (23 shells) Transition Round (Rnd 10, Color A): Ch 1, sc in each dc and each sc around, working 3 sc into center dc of each corner shell. Join. (138 sc)
Your shell stripe section should now measure approximately 5.5 inches tall from the base.
Attaching Panels to Bag Body
With Color A and J/10 hook, hold one panel against the front face of your bag with the right side facing outward. Using a slip stitch seam, join the bottom edge of the panel to the live stitches of Rnd 10 across the front, centering the panel. Repeat for the back panel.
Leave the top edges of each panel open for now.
Section 5: Braided Handles
Each handle needs 18 strands total: 6 strands each of Colors A, B, and C. Cut each strand 60 inches long.
Handle anchor points: On each main face, mark two positions 3 inches in from the side edges along the top edge band. These sit approximately 8 inches apart.
Fold all 18 strands in half. Insert the folded center loop through the first anchor point from outside to inside. Pass working ends through the loop and pull firmly to secure with a lark’s head knot.
Divide the 36 working ends into 3 groups of 12 strands each. Braid firmly for approximately 22 to 24 inches.
Attach the free end to the second anchor point on the back face using the same method. Secure with several overhand knots on the inside. Trim ends to about 1 inch and weave in securely.
Repeat for your second handle.
Join
Step 1Weave in all yarn ends on the inside of the bag, working through at least 1 inch of stitches in two directions.
Step 2Lightly mist the entire bag with water or steam block using a garment steamer. Pin the granny square panels to ensure they lie flat.
Step 3Allow to dry completely before using.
Step 4If you’re using a base insert, cut your plastic canvas or cardboard to 13 inches by 3.5 inches and slip it into the bottom of your finished bag.
Check your count
- Section 4: Upper Stripe Band · Round 2: 108 sts
- Section 4: Upper Stripe Band · Round 4: 108 sts
- Section 4: Upper Stripe Band · Round 6: 108 sts
- Section 4: Upper Stripe Band · Round 8: 108 sts
- Section 6: Tassel Embellishment · Round 2: 12 sts
- Section 6: Tassel Embellishment · Round 4: 18 sts
Finish
- Weave in every yarn end on the inside of the bag, running each tail through at least an inch of stitches in two directions.
- Mist or steam the whole bag and pin the granny square panels flat before letting it dry completely.
- Slip a cut-to-size base insert into the bottom of the bag if extra structure is wanted.
Bigger or smaller
- Larger
- Repeat the upper stripe band's color sequence for an extra round or two before closing it off, adding height above the granny panel without altering the base or lower shell section.
- Smaller
- Work the same stripe sequences with a lighter worsted cotton and drop to a smaller hook throughout, which tightens the shell clusters and granny squares and shrinks the finished bag.
FAQs
Asked and answered
These answers came from whoever first published the pattern, kept word for word.
Can a different cotton yarn be substituted for the recommended brand?
Any worsted weight cotton works as long as it has similar stitch definition and body, since the structure of the bag depends on cotton's natural stiffness rather than a specific brand. Check gauge with the J/10 hook before committing to a full skein lineup.
Why does the pattern call for two different hook sizes?
The J/10 hook keeps the shell-stitch base and striped bands loose enough to hold their boxy shape, while the smaller I/9 hook tightens up the granny squares and their joining round so the panel doesn't sag. Swapping hooks at the right point keeps all three sections matched in density.
What happens if the granny squares don't come out to the stated size?
Check gauge against the I/9 hook benchmark before assembling, since a panel that runs small or large will throw off how it lines up with the shell-stitch base and stripe band. Adjust hook size up or down and recheck before joining all four squares.
Is the base insert required?
No, the insert is optional and only recommended for extra structure at the bottom of the bag. Cotton yarn alone already gives the base enough body to hold a boxy shape.